This Uhale privacy guide explains how users can manage photo permissions, pairing invitations, connected accounts, shared content, and access to compatible digital photo frames. Available settings and menu names may vary by app version, frame model, hardware partner, phone operating system, and region.
Uhale is designed to let users select the photos they want to send instead of automatically publishing an entire phone library. Frame owners should regularly review connected users, protect pairing information, keep the app and frame software updated, and remove access when another person no longer needs to contribute content.
Troubleshooting
Quick guides to solve problems on your own!
Wi-Fi
1.My frame can’t connect to my Wi-Fi
Import/Export/Backup
1.Can’t import photos from SD card
2.Can’t export photos to SD card
Screen
2.Touch screen not working properly
My frame can’t connect to my Wi-Fi
If your WiFi is visible, but the frame won’t connect to it at all, it is usually an indication that something is wrong with either the password or the encryption of the WiFi.
Troubleshooting steps:
Double check that the password is entered correctly
To ensure that you enter the password correctly, you can press the “Show” icon next to the password field. This will make the password visible while typing and allows you to double check that the password is entered correctly.
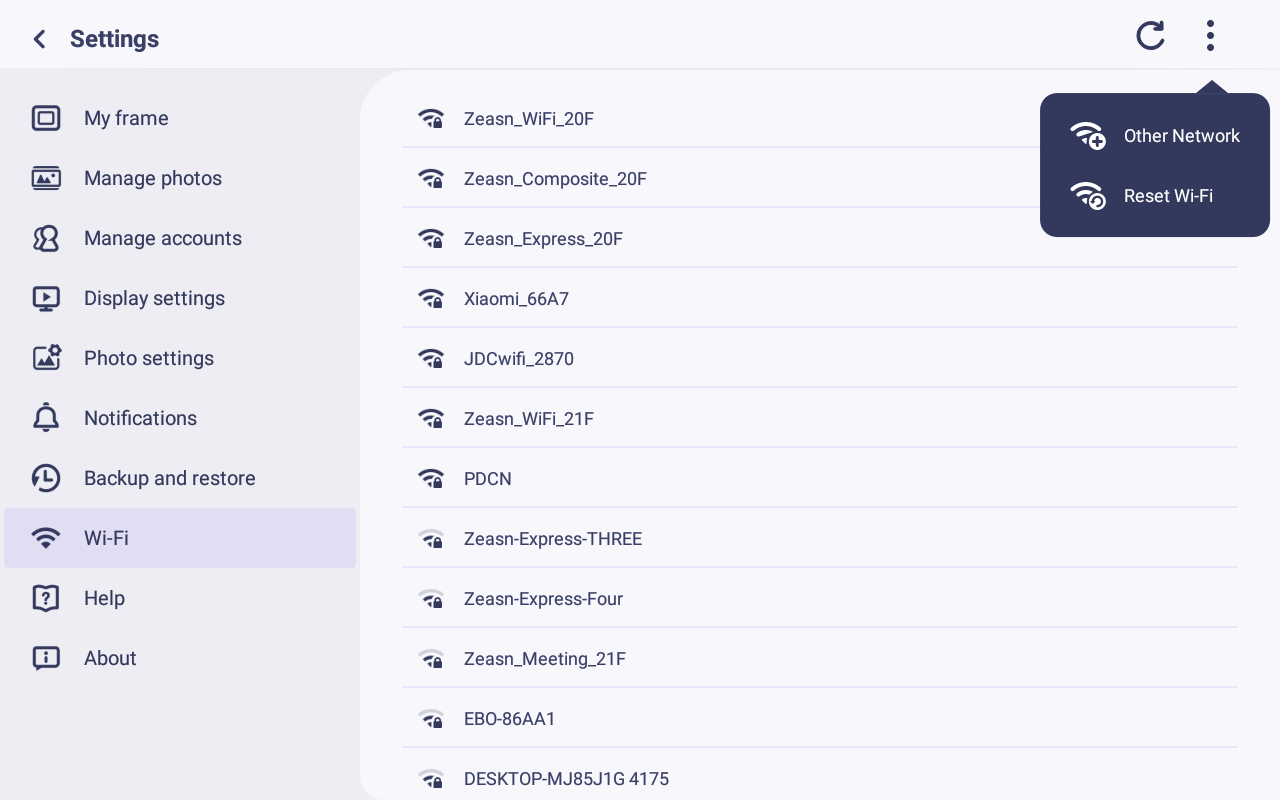
Reset Wi-Fi
To give the frame the best condition for success, start by resetting its Wi-Fi. To do this:
1. Go to Settings → Wi-Fi
2. Press the three little dots in the upper-right corner
3. Select “Reset Wi-Fi”
Try another Wi-Fi
If the problem still occurs at this point, it’s time to eliminate either the Wi-Fi or the frame as the culprit. This is done by connecting the frame to an entirely different Wi-Fi. It can also be done by connecting the frame to a mobile hotspot.
Reboot frame
If your frame is not behaving as intended, it always a good idea to try to reboot it.
You can turn off the frame with the power button in the quick menu.
Do not unplug the frame while it’s still running.
Reboot network equipment
Sometimes it may be necessary to reboot (turn off and turn on) your network equipment.
Try to reboot your router, modem and access points
WiFi encryption
All password protected WiFi connections use a certain encryption type, but outdated encryption types may not be supported. We recommended that you use WPA2 encryption for a secure and compatible WiFi.
Enterprise encryption and WPA3 are currently not supported.
We suggest that you contact your Internet Service Provider or someone tech savvy to change this setting if needed.
Can’t import photos from SD card
You can import photos from external device to the frame.
If you experience problems in doing so, here are a few troubleshooting steps to fix it.
Troubleshooting Steps:
1.Reboot and unplug the frame
Try to power off the frame.
Once the frame has shut off, unplug the power cord for the frame in both ends (from both the frame and from the outlet) for 30 seconds before plugging it back in again.
2.Check external device (e.g. SD Card) requirements
The SD card has to meet certain requirements for the import to be successful. Almost all frames have the following requirements for a micro SD card:
1)The maximum storage of the SD card should be 32GB or less
2)The format of the SD card should be FAT32 (most SD cards of this size are FAT32 by default)
If these requirements are not met, the frame might not detect the SD card at all and the following message will be displayed; “An external storage could not be found.”
3.Check the file format
If the does detect the SD card, but does not successfully transfer all the photos it could be due to unsupported file formats. The frame is only able to import photos in the following file formats: .jpg / .jpeg / .png
If the photos on your SD card are stored in another file format, you can convert the files to a supported format from your computer.
4.Try another external device(e.g. SD Card)
If none of the above turned out useful, please try to import the photos using another external device.
Please format the SD card before transferring the photos to it to make sure that the SD card is compatible with the frame.
Can’t export photos to SD card
You can export photos from external device to the frame.
If you experience problems in doing so, here are a few troubleshooting steps to fix it.
Troubleshooting Steps:
1.Reboot and unplug the frame
Try to power off the frame.
Once the frame has shut off, unplug the power cord for the frame in both ends (from both the frame and from the outlet) for 30 seconds before plugging it back in again.
2.Check external device (e.g. SD Card) requirements
The SD card has to meet certain requirements for the import to be successful. Almost all frames have the following requirements for a micro SD card:
1)The maximum storage of the SD card should be 32GB or less
2)The format of the SD card should be FAT32 (most SD cards of this size are FAT32 by default)
If these requirements are not met, the frame might not detect the SD card at all and the following message will be displayed; “An external storage could not be found.”
3.Try another external device(e.g. SD Card)
If none of the above turned out useful, please try to import the photos using another external device.
Please format the SD card before transferring the photos to it to make sure that the SD card is compatible with the frame.
Can’t make a backup
You can backup your frame to a micro SD card.
If you experience problems in doing so, here are a few troubleshooting steps to fix it.
Troubleshooting Steps:
1.Reboot and unplug the frame
Try to power off the frame.
Once the frame has shut off, unplug the power cord for the frame in both ends (from both the frame and from the outlet) for 30 seconds before plugging it back in again.
2.Check external device (e.g. SD Card) requirements
The SD card has to meet certain requirements for the import to be successful. Almost all frames have the following requirements for a micro SD card:
1)The maximum storage of the SD card should be 32GB or less
2)The format of the SD card should be FAT32 (most SD cards of this size are FAT32 by default)
If these requirements are not met, the frame might not detect the SD card at all and the following message will be displayed; “An external storage could not be found.”
3.Try Another external device(e.g. SD Card)
If none of the above turned out useful, please try to import the photos using another external device.
Please format the SD card before transferring the photos to it to make sure that the SD card is compatible with the frame.
Screen flickers
If a frame has been unplugged while running, or if there has been a power outage or power surge, problems can occur with the display of the frame. It can show as flickering on the screen, as lines going across the screen or it can freeze the display entirely.
Troubleshooting steps:
1.Reboot and unplug the frame
Try to power off the frame from the menu of the screen if possible.
Then unplug the power cord for the frame in both ends (from both the frame and from the outlet) for 5 minutes before plugging it back in again.
2.Try another power adapter
The problem can also be related to the power adapter of the frame.
If you have another identical power adapter lying around, you can test if the screen stops flickering using this instead of the original.
If none of the above seem to solve the problem, please get in touch with our support team.
Please include the name of the brand who made your frame as well as its serial number. This information will usually be written on the back of the frame, on the box or in the order confirmation.
Touch screen not working properly
It a frame has been unplugged while running, or if there has been a power outage or power surge, problems can occur with the touch screen of the frame.
If your frame is not responding to touch gestures, here are a few things to try.
Troubleshooting steps:
1.Check if screen protecting film is covering the display
Some frames are shipped with a see-through screen protecting film to cover the screen. This is meant to be peeled off upon set up of the frame, as the film can make it harder for the frame to respond to touch gestures.
2.Reboot and unplug the frame
Try to power off the frame from the menu of the screen if possible.
Then unplug the power cord for the frame in both ends (from both the frame and from the outlet) for 10 minutes before plugging it back in again.
If none of the above seem to solve the problem, please get in touch with our support team.
Please include the name of the brand who made your frame as well as its serial number. This information will usually be written on the back of the frame, on the box or in the order confirmation.
Guides
Our answers to your frequently asked questions!
Frame
1.Get started: How to set up your frame
5.How to delete photos on your frame
6.How to adjust video volume and notification volume
8.How to import photos and photos
9.How to export photos and videos
11.How to make a backup of a frame/How to restore a frame from a backup
12.How to connect the frame to a smartphone hotspot
13.Play photos/videos from external storage
APP Side
2.How to send photos/videos from smartphone to frame
3.How to switch between albums in the App
5.How to Allow Access to Photos in the Uhale App
6.How to withdraw photos/videos
WEB side
1.How to log in/out of Web side
2.How to send photos/videos from Web side
Get started: How to set up your frame
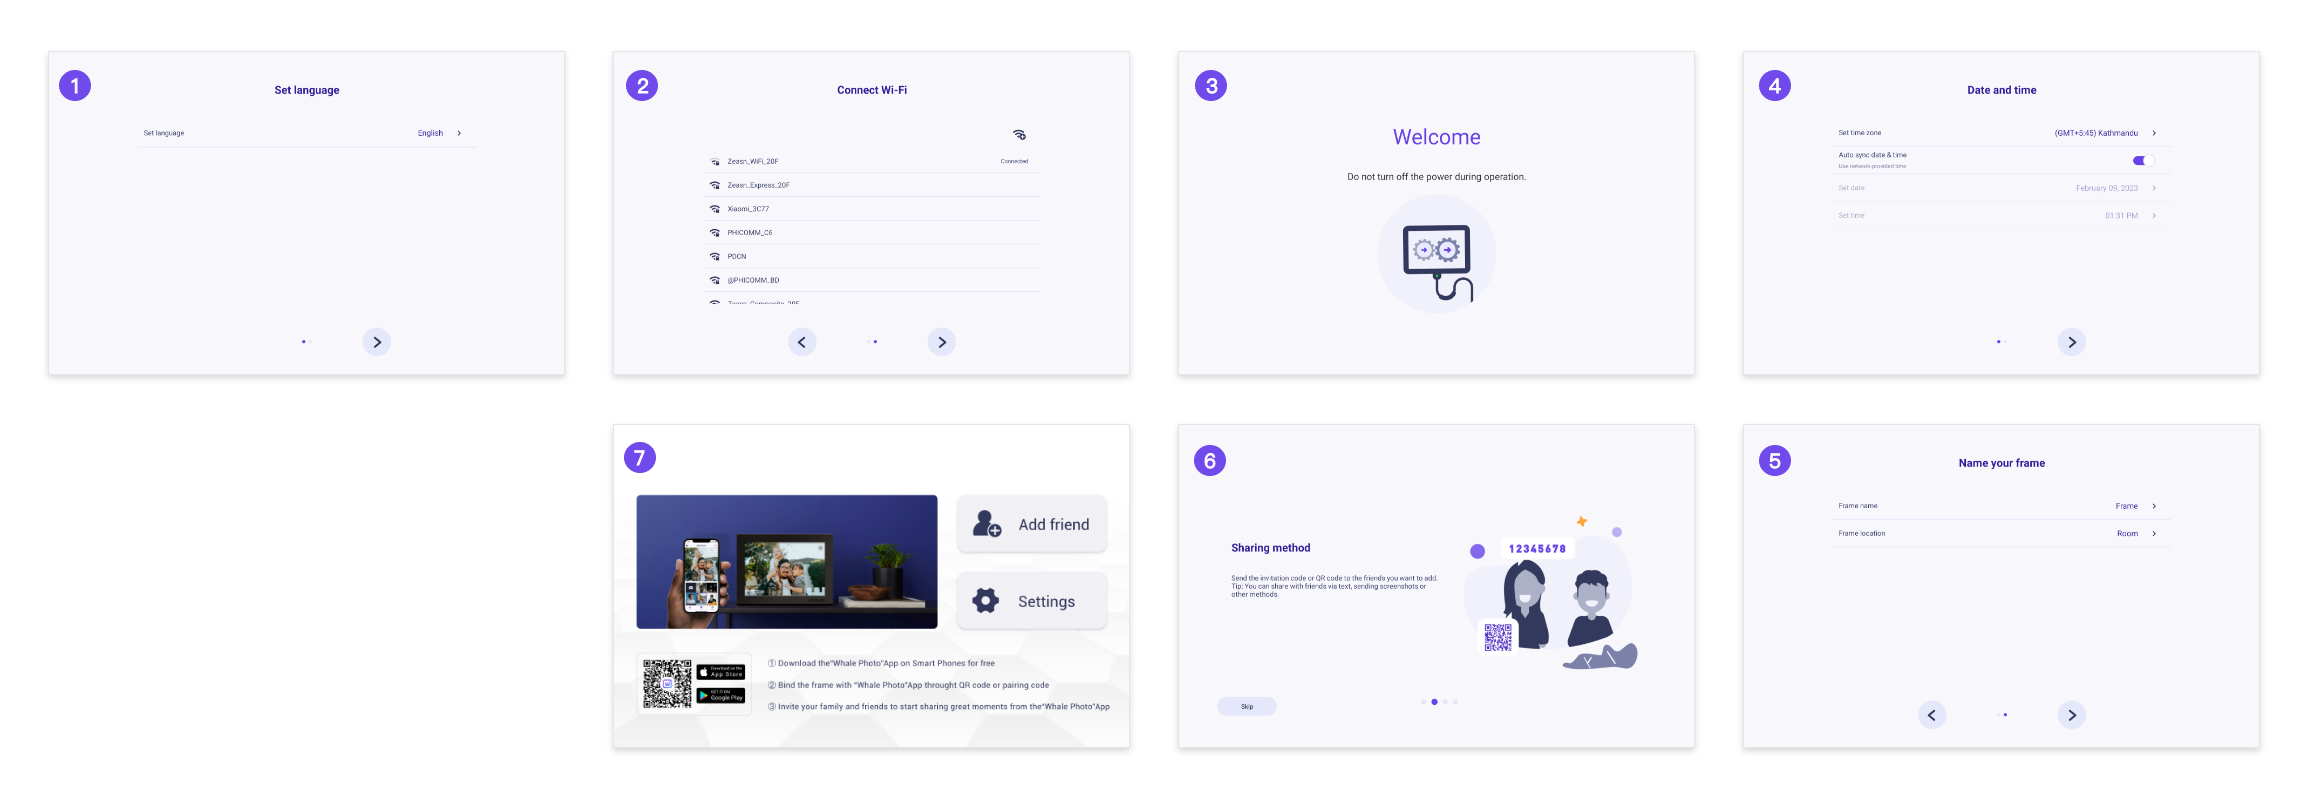
When starting your frame for the first time, you will need to setup the frame.
1.Uhale Photo Frame may request to upgrade to the latest version. If so, it is recommended to upgrade the photo frame before proceeding.
2.Choose a language you preferred as default
3.Connect the photo frame to the Internet via Wi-Fi.
4.Set the date, time and set the time zone if needed.
5.Name the photo frame (E.g. Jack’s Frame) ;
6.Set the location of the photo frame (E.g. Living Room, Kitchen, Office).
7.Check the quick guide on the Uhale Photo frame.
Gallery
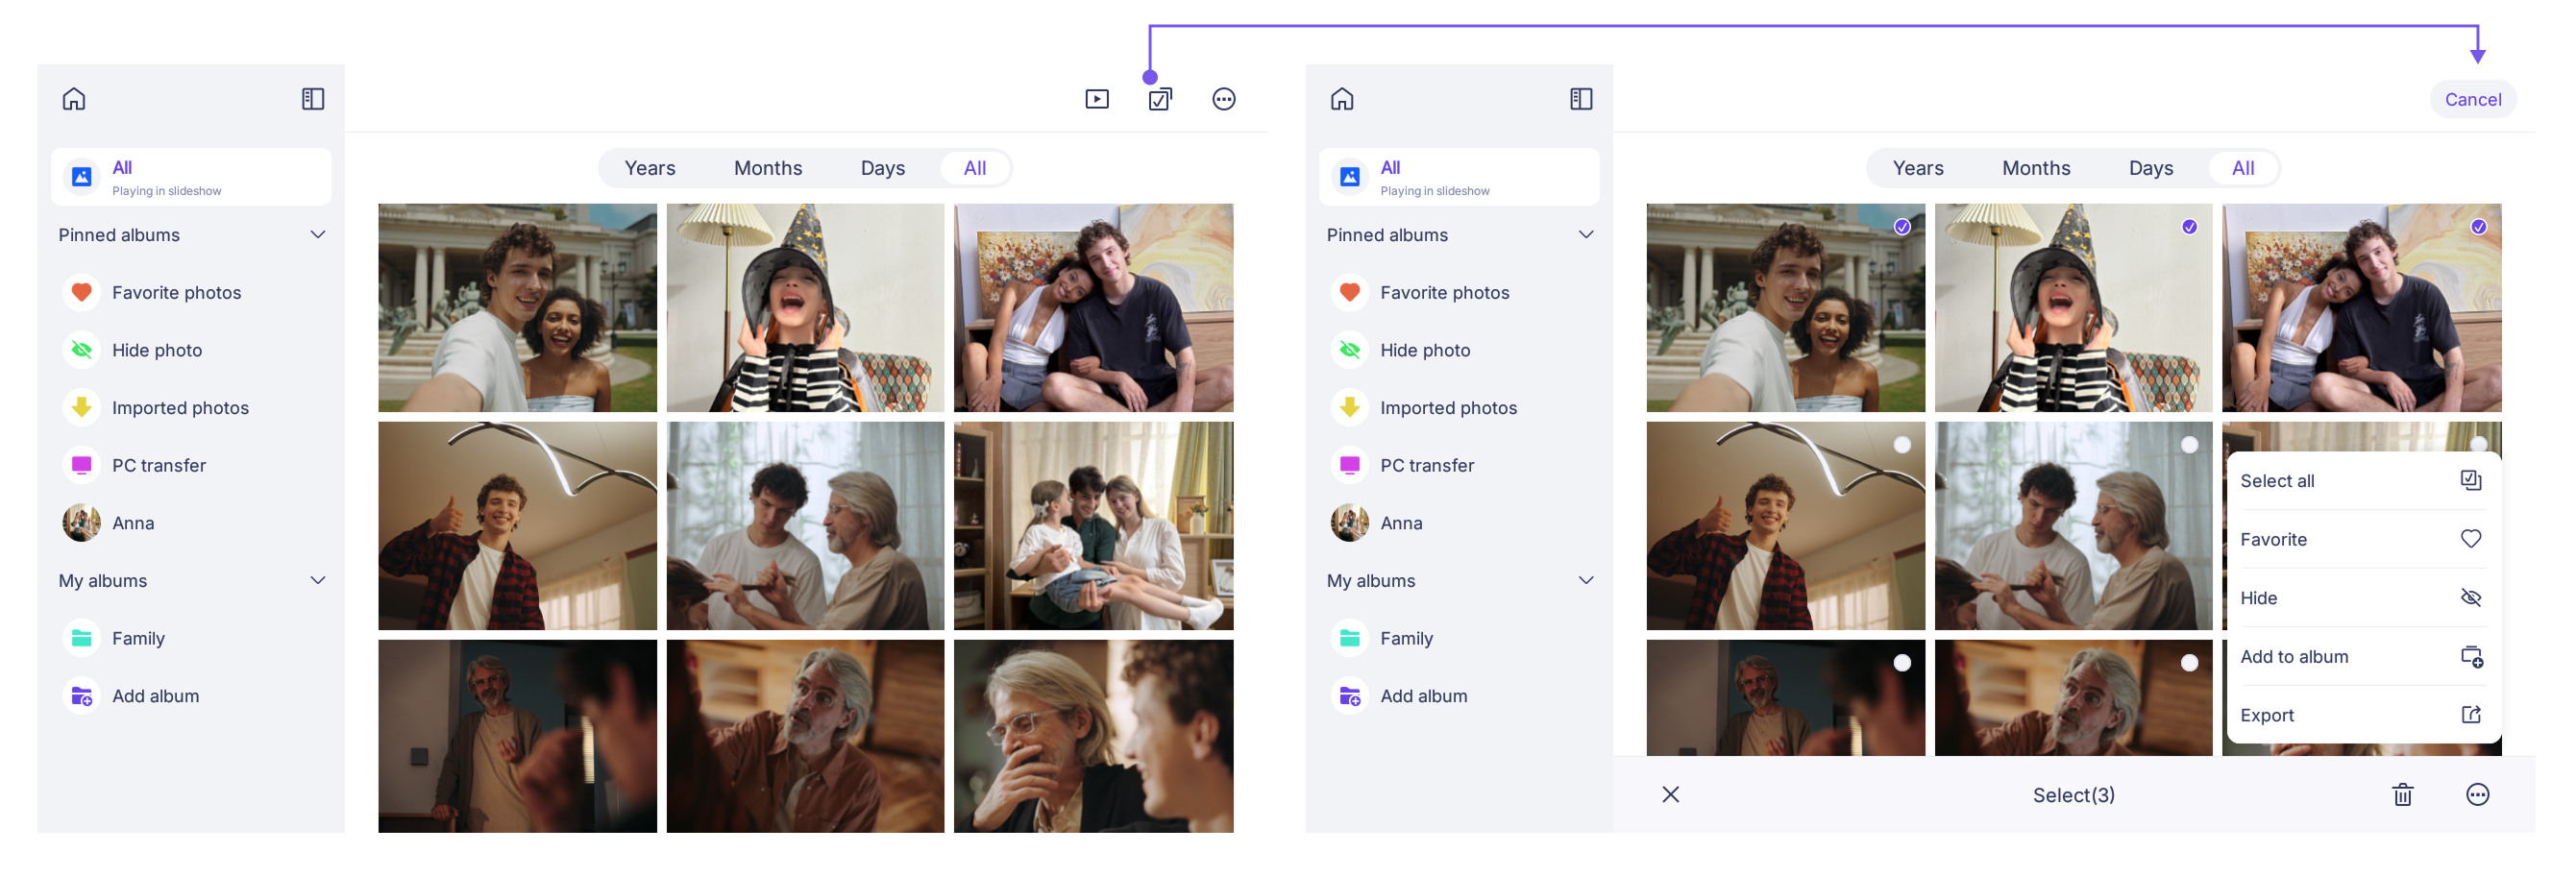
Starting from Uhale version 5.0.0 and above, the Gallery feature has been completely upgraded. Tap the “Gallery” button in the quick menu to open your frame’s gallery. Here, you can view an overview of all the content on your frame and easily manage your photos and videos.
How to manage photos?
You can easily manage your photos through the Gallery. Follow these steps:
1. In the Gallery, use the album list on the left to quickly switch between different frames or albums for easy browsing.
2. Tap the multi-select icon in the upper-right corner of the current album to enter selection mode.
3. Once in selection mode, you can select multiple photos or videos at once to perform the following actions:
— Delete unwanted photos
— Favorite photos you like
— Hide photos
— Add selected photos to a custom album
— Export them to external storage devices (e.g., SD card)
How to create a custom album?
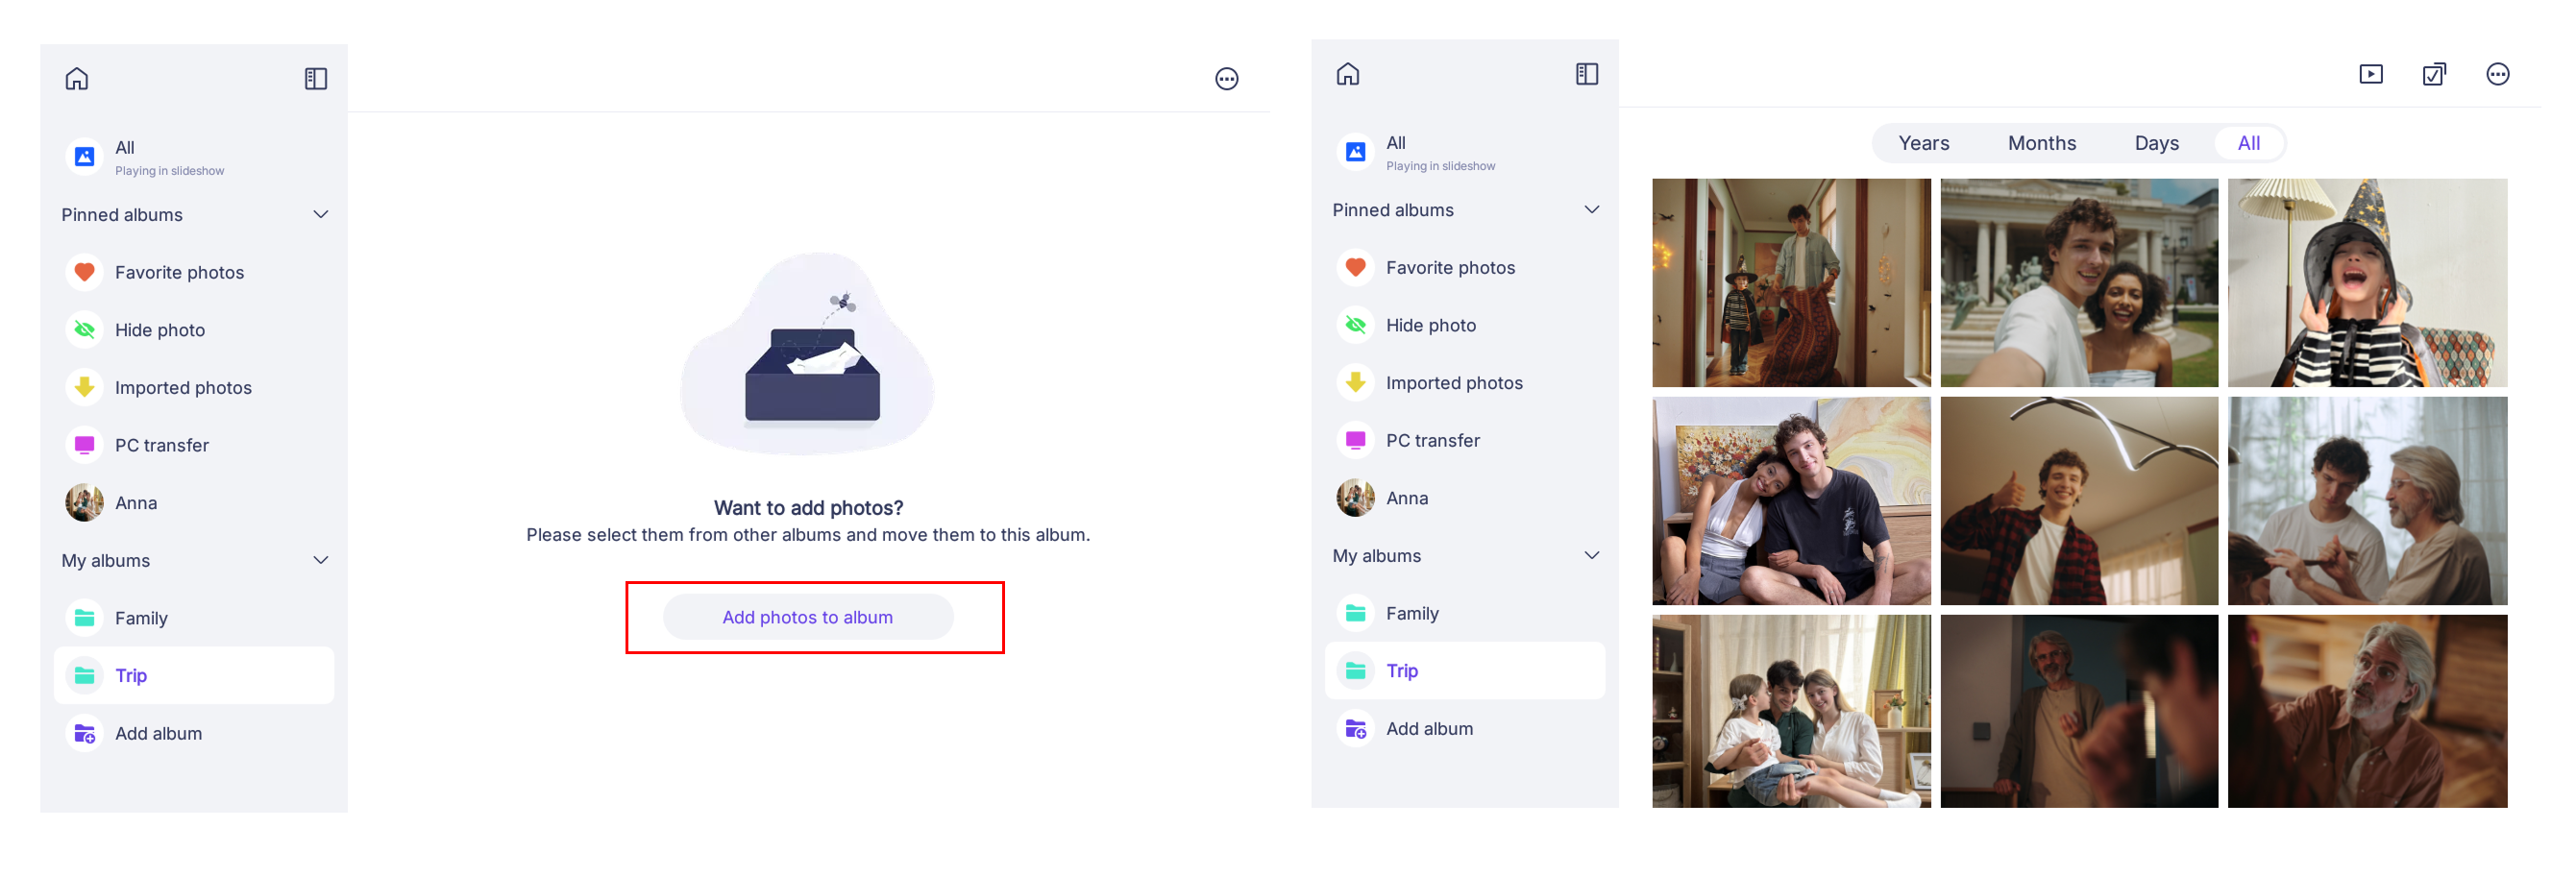
You can easily create your own albums to better organize your photos. Follow these steps:
1. In the Gallery, scroll to the bottom of the album list on the left side and tap Add album.
2. A pop-up window will appear. Enter the desired album name and confirm to create it.
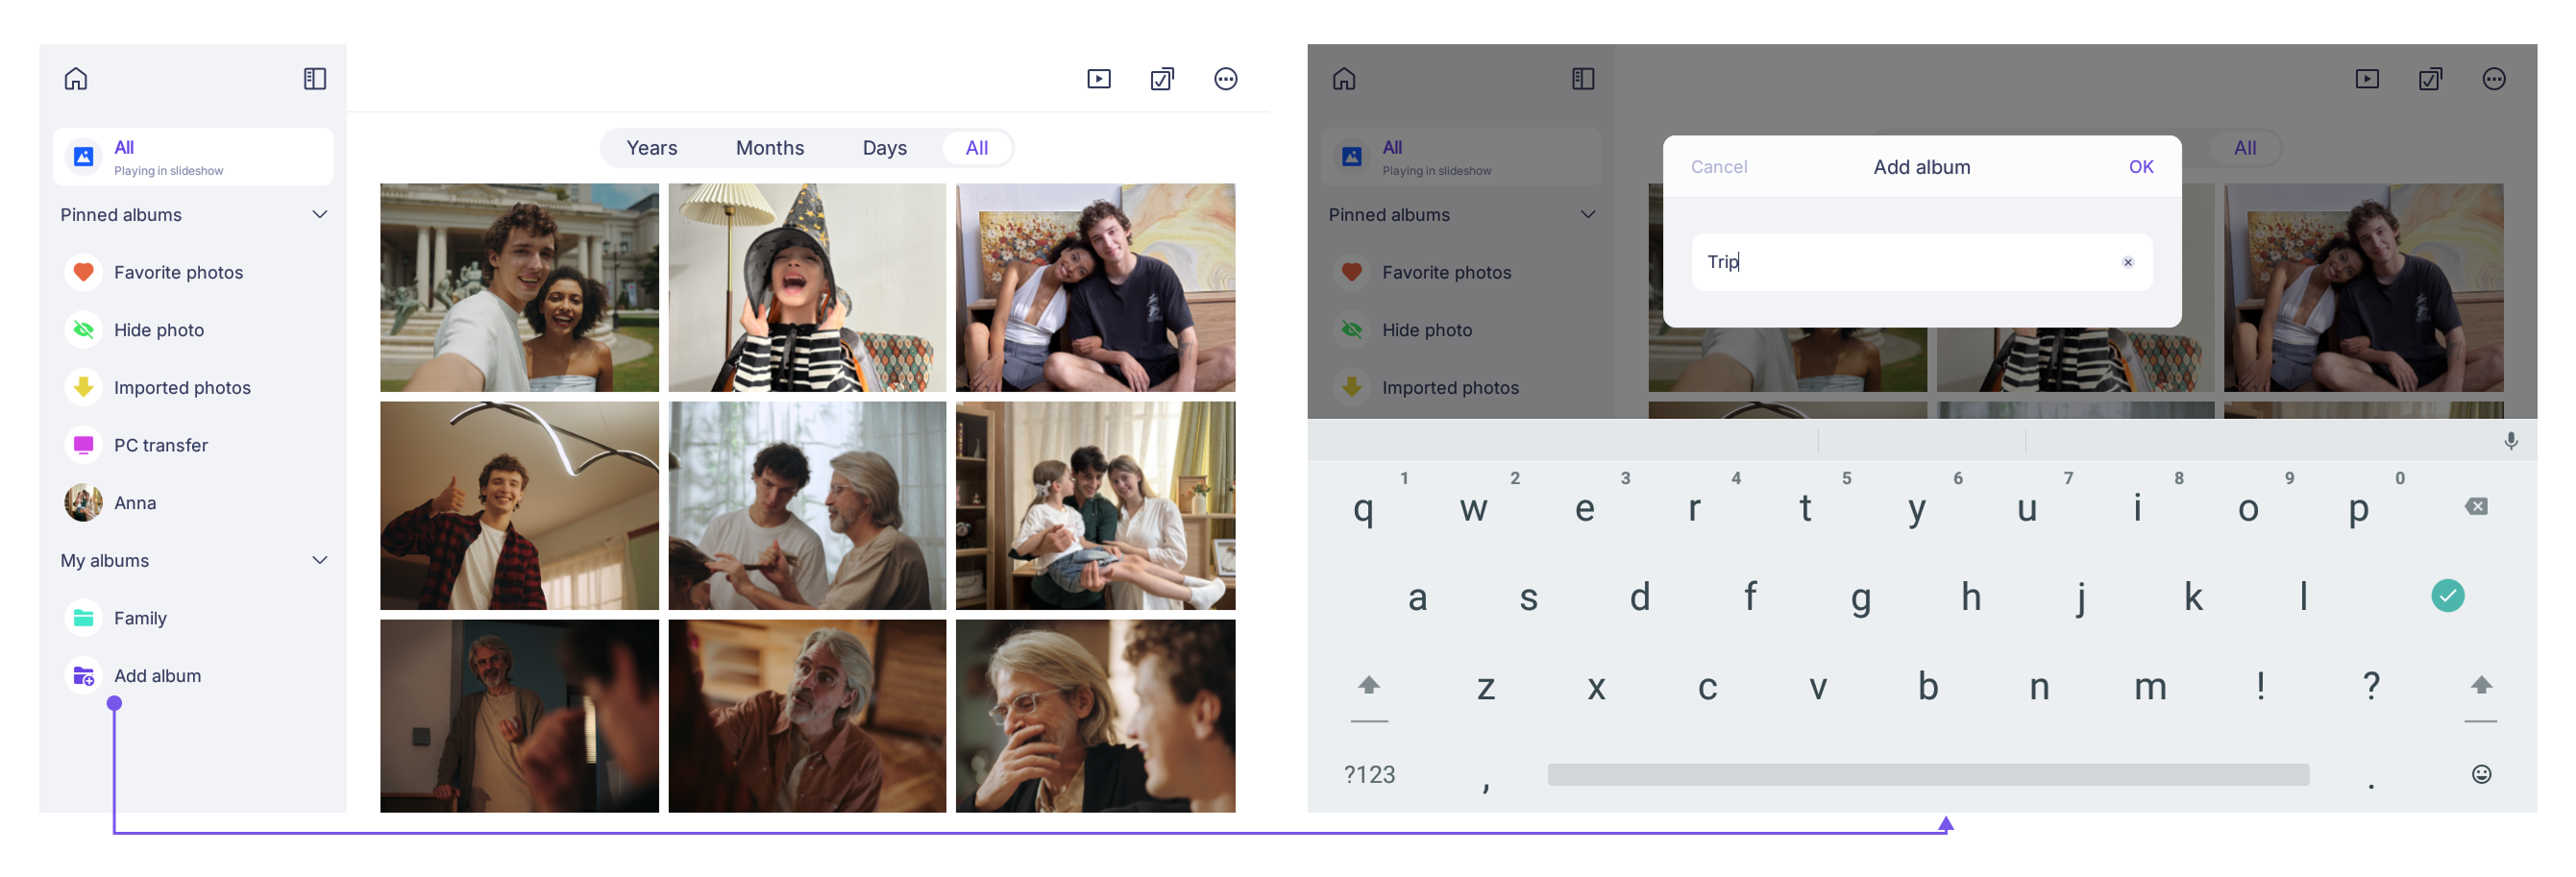
3. After the album is successfully created, you can select photos and add them to your new custom album.
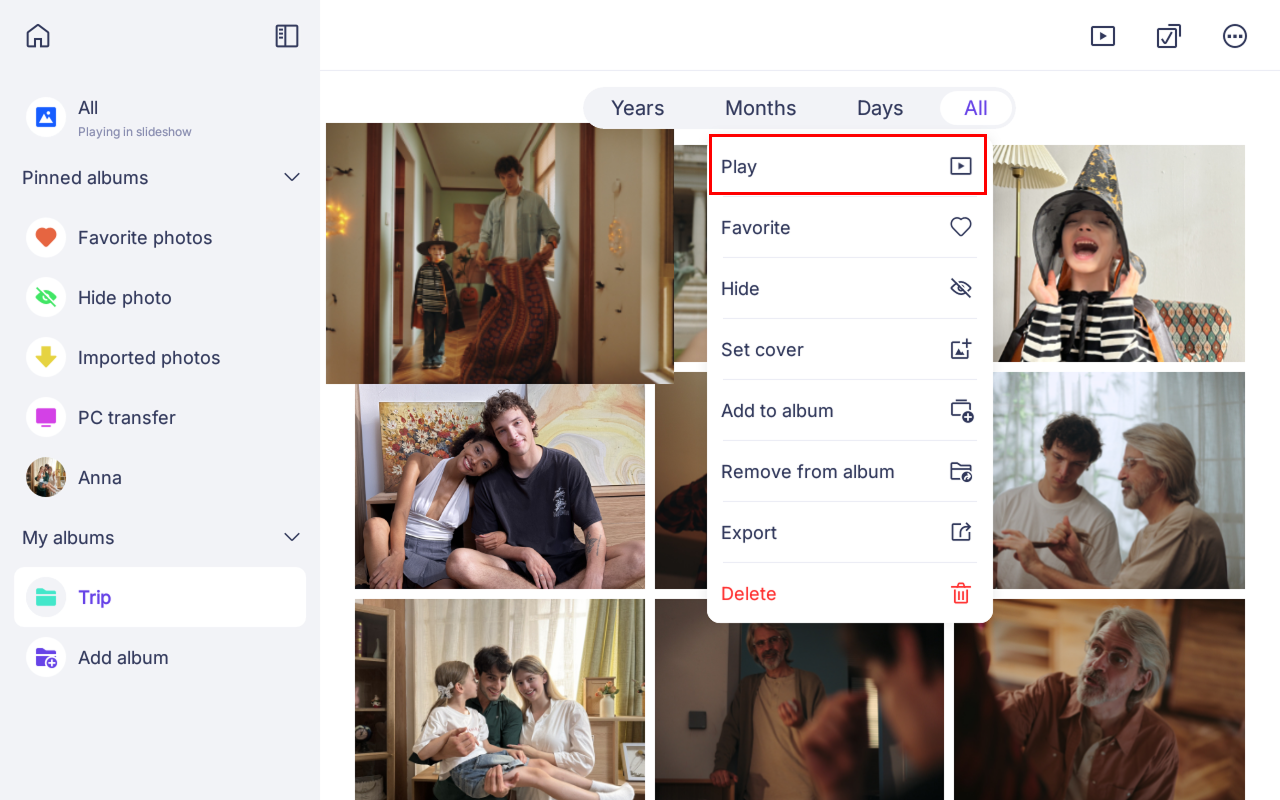
How to play a single album in the gallery?
You can easily play photos from one album in slideshow. Follow these steps:
1. Choose the album you want to play from the Gallery.
2. You can either:
— Long press a photo and tap Play in the quick menu to start the slideshow from that photo.
— Tap the Play icon in the upper-right corner to start playing from the first photo in the album.
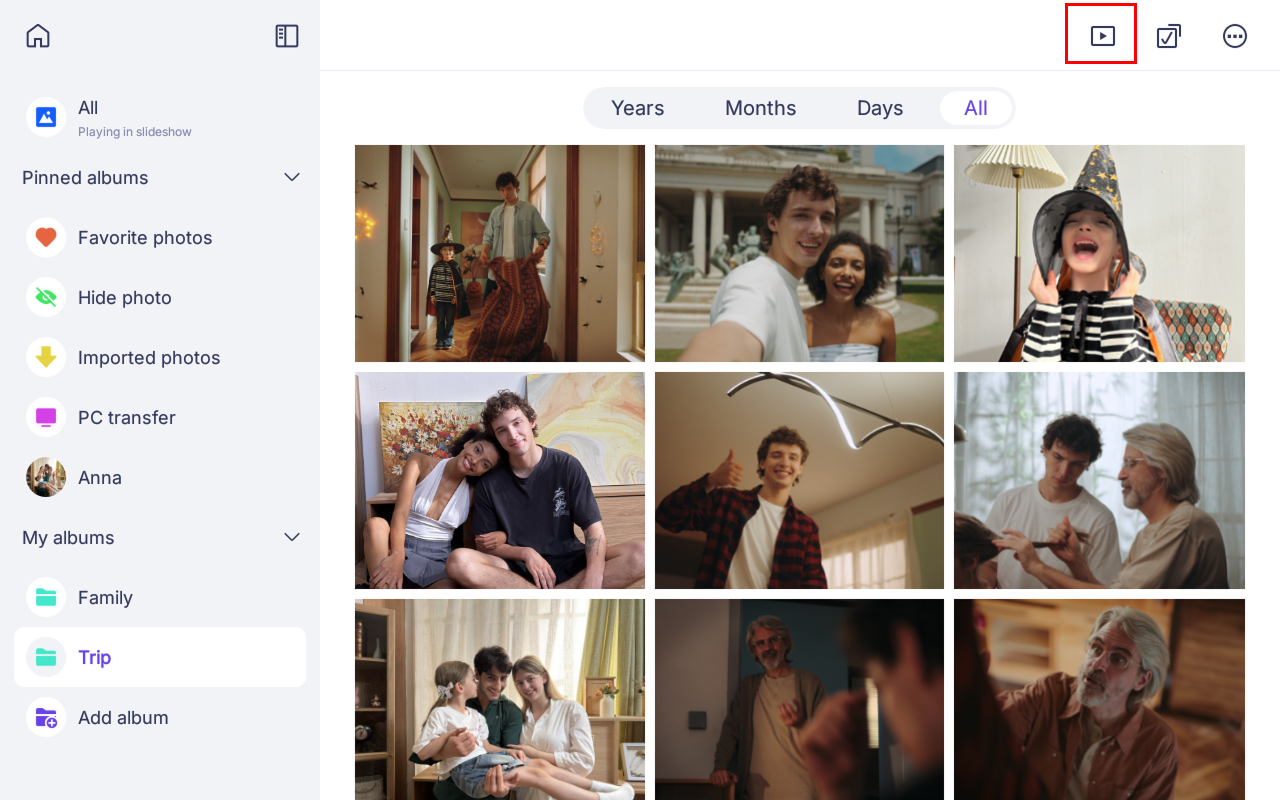
The slideshow will play photos from the currently selected album. You can switch to another album anytime from the album list in the menu.
How to set an album cover?
You can easily choose a favorite photo to use as your album cover. Follow these steps:
1. Locate the album for which you want to set a cover.
2. Choose the photo you want to use and long press it.
3. Tap Set as Cover from the options that appear.
4. Once set successfully, the selected photo will appear as the album cover in the album list.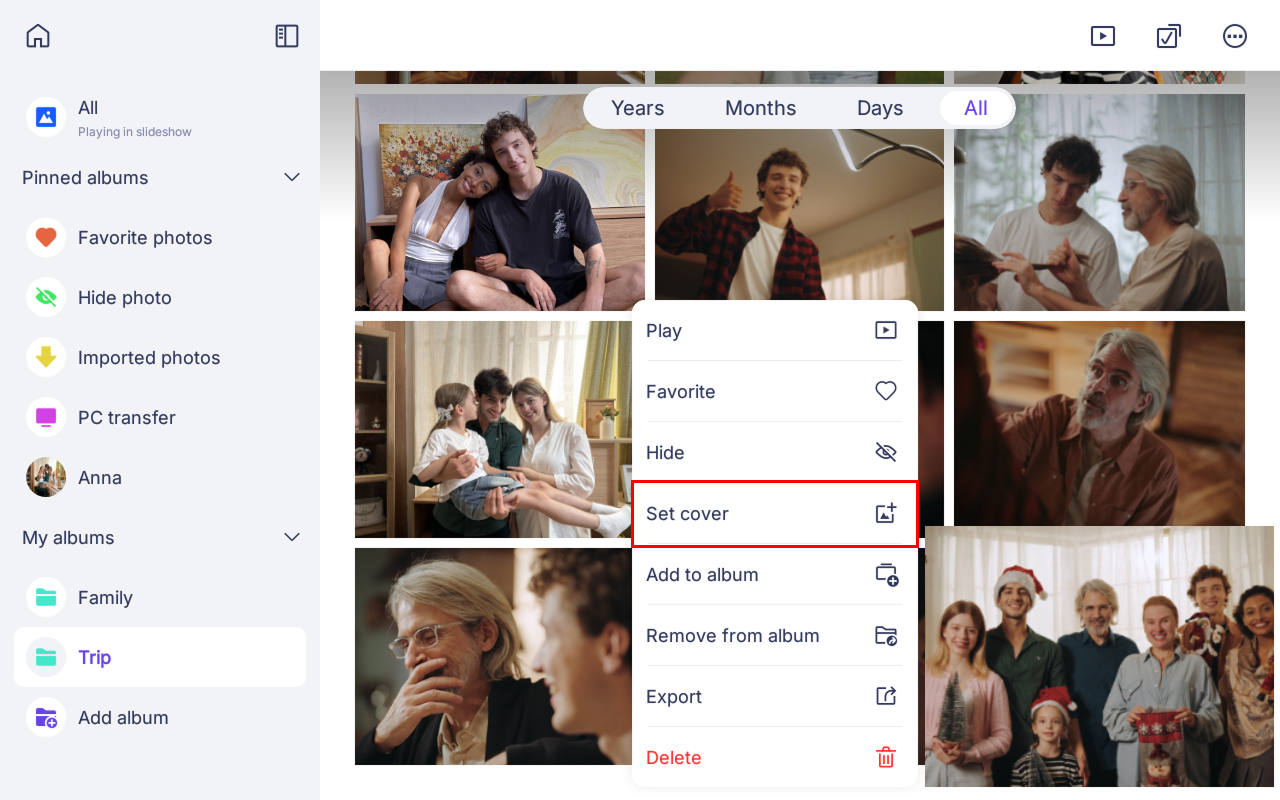
The Quick Menu
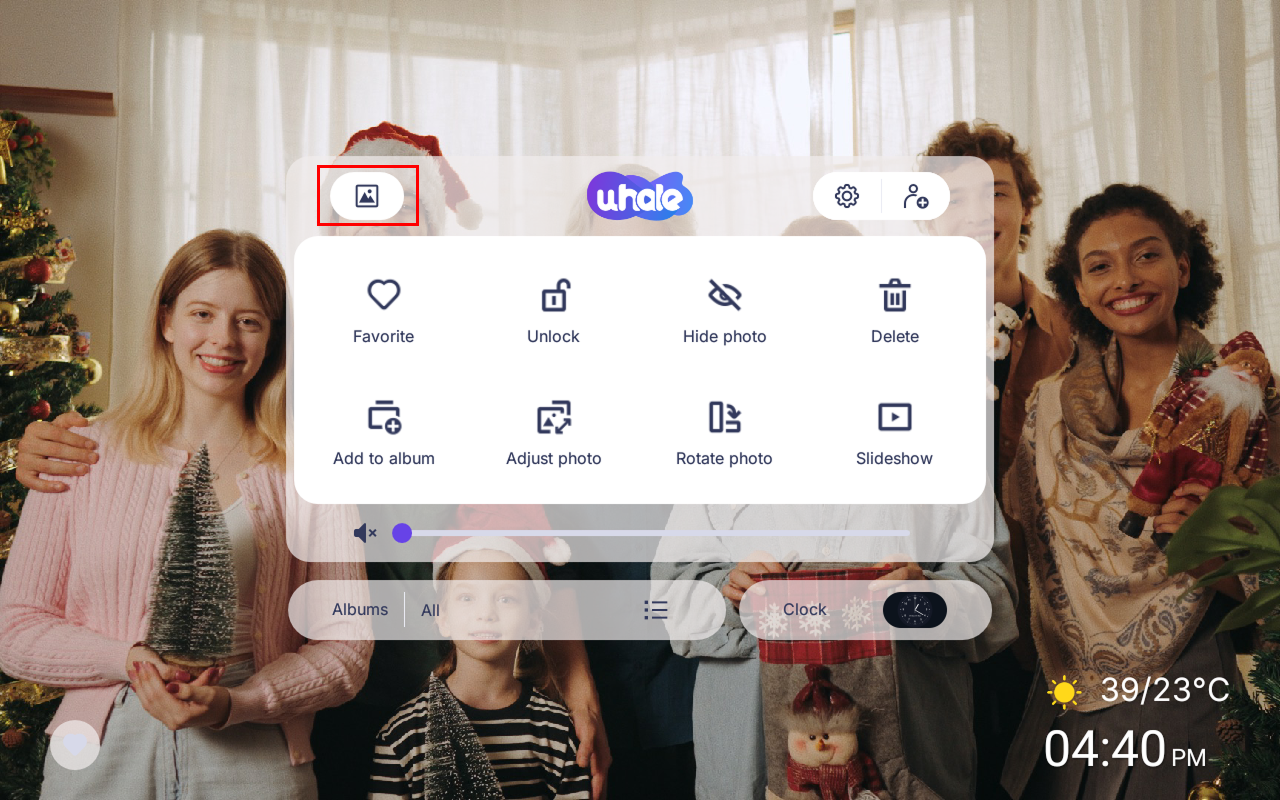
With a single tap on the frame’s screen, you can access a quick menu containing numerous possibilities. This article will guide you through the function of each button you’ll find there.
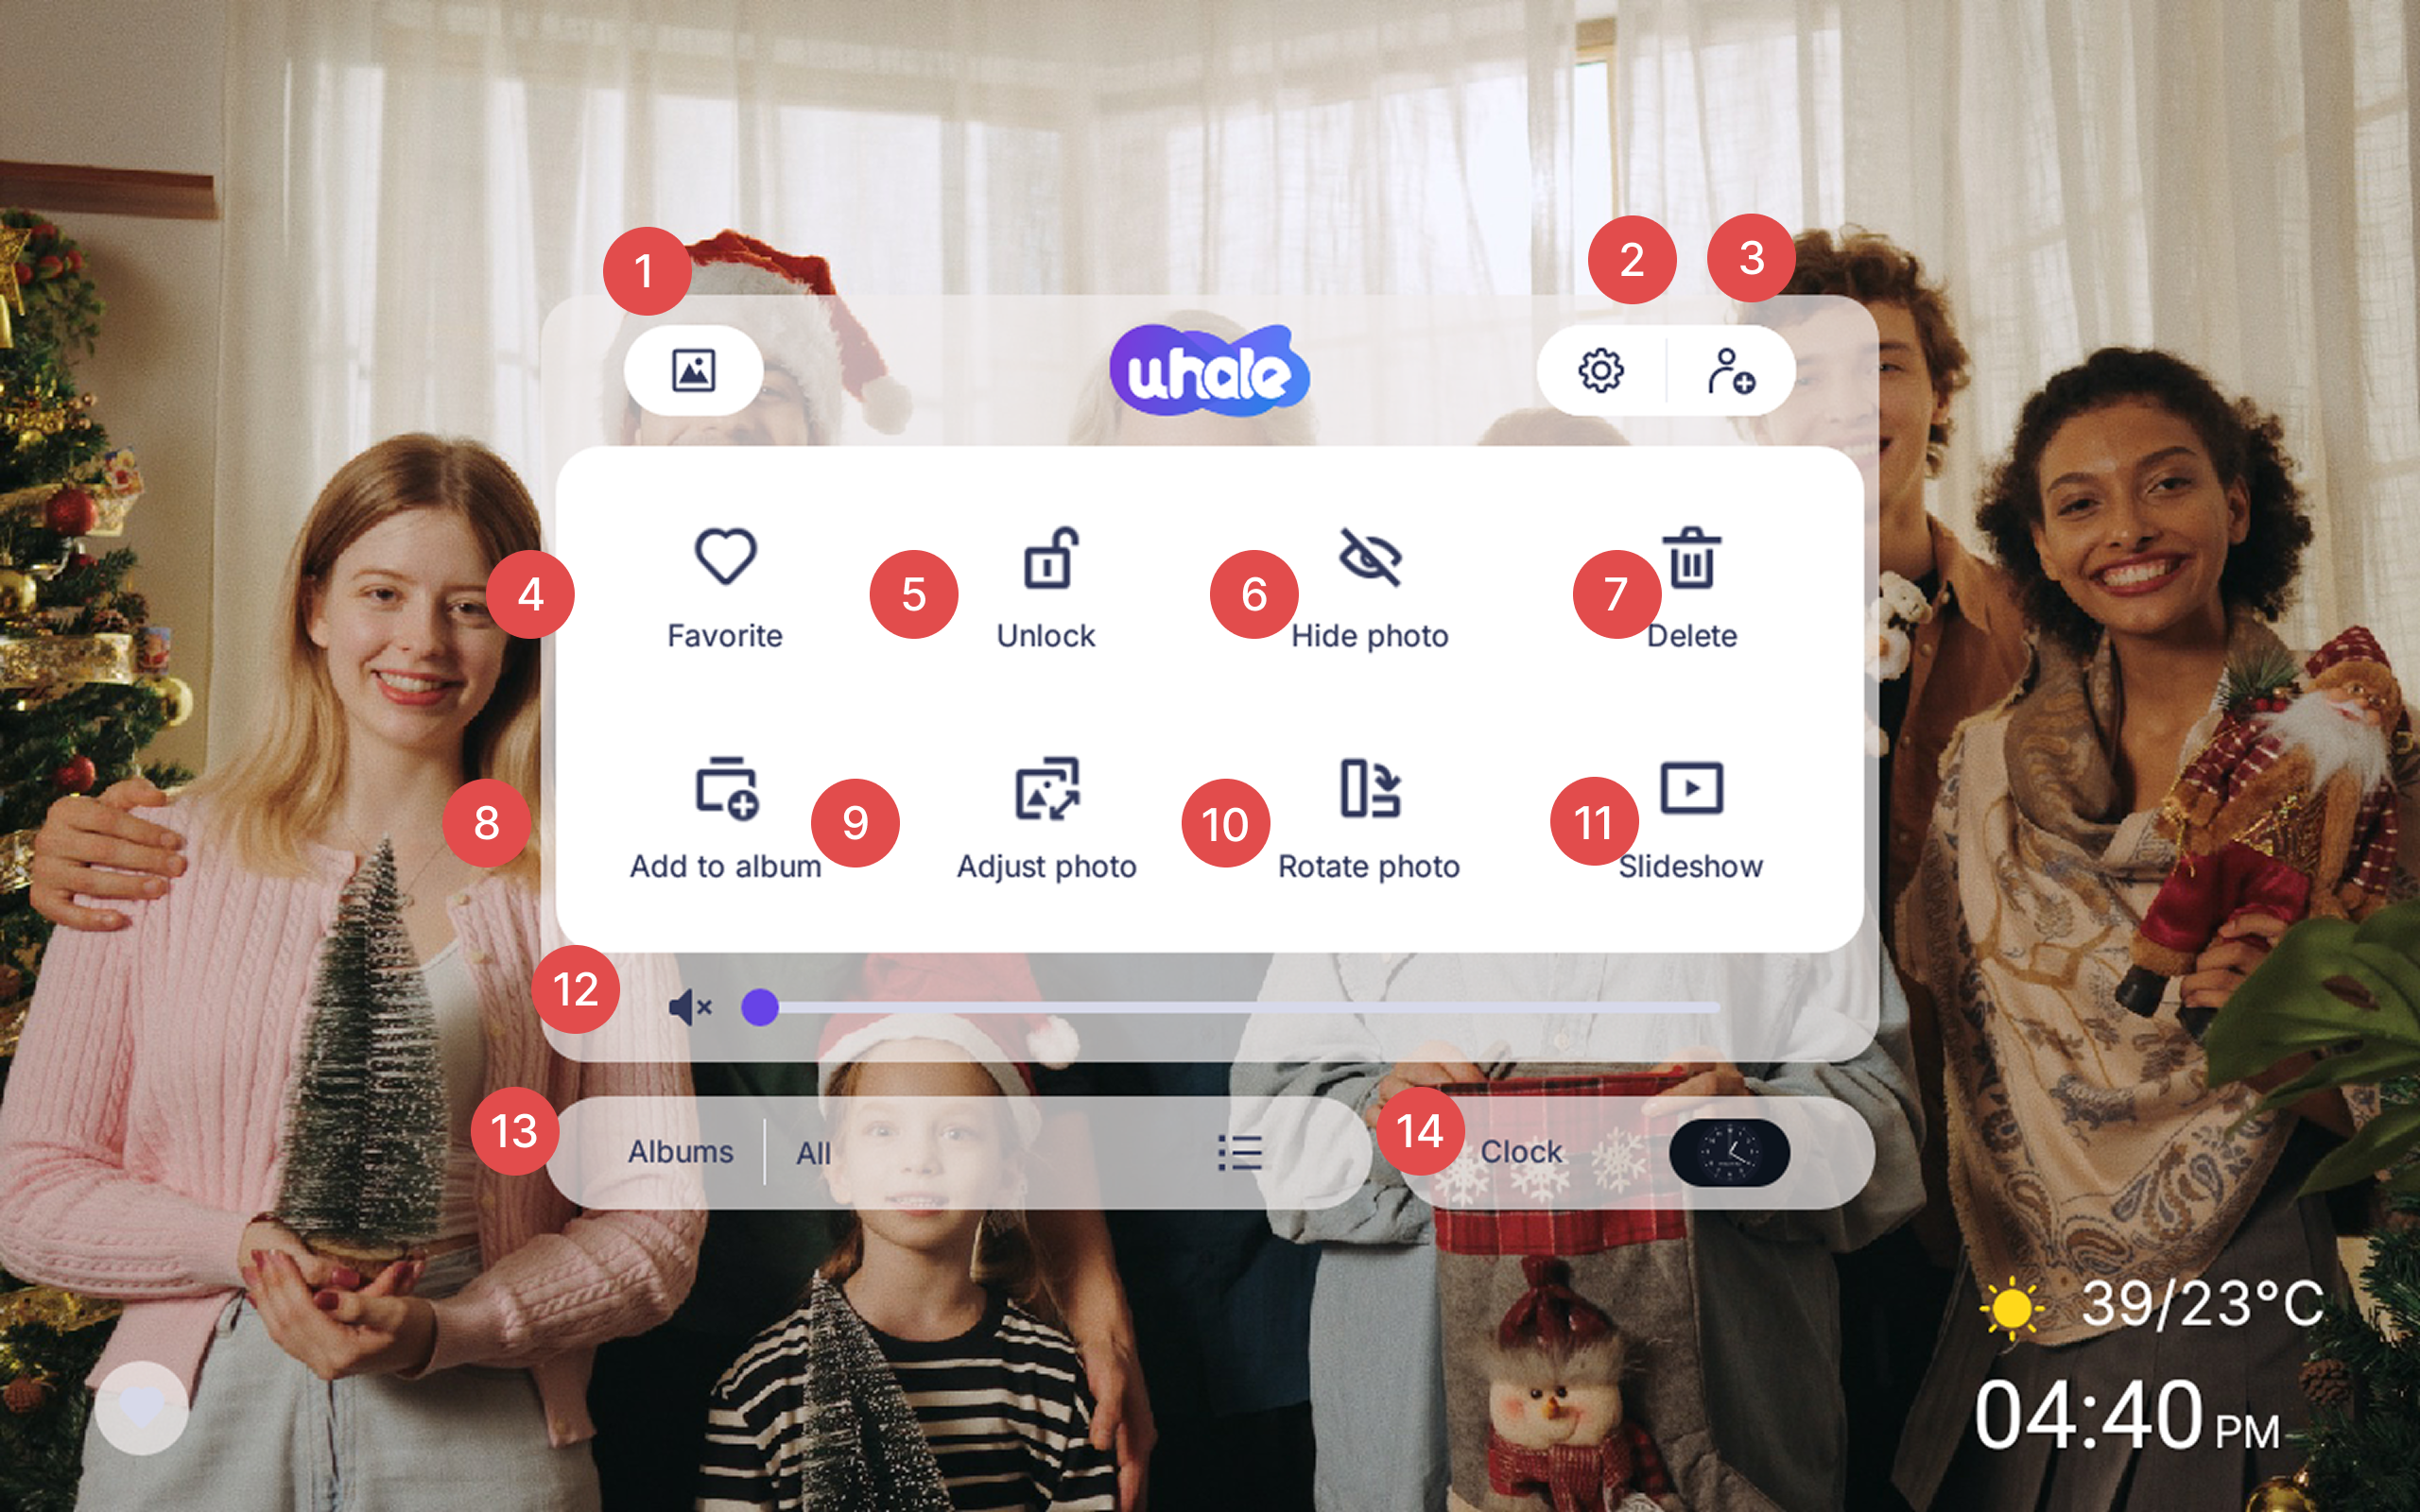
1. Photo Gallery
Tap to open the gallery, where you can manage all your photos and videos.
2. Settings
Adjust various frame settings here, such as brightness, volume, slideshow interval, and Wi-Fi connection.
3. Connect to App
Tapping this generates a pairing code and QR code. Open the Uhale App, enter the code or scan the QR code, and you’re all set to bind the frame!
4. Favorite
Mark your favorite photos as favorites for easy access later.
5. Lock/Unlock
Instantly lock or unlock the photo.
6. Hide Photo
Tap to hide the currently displayed photo—it won’t show up in slideshows anymore.
7. Delete
To delete a picture entirely from the frame, simply tap the Delete button.
8. Add to Album
Categorize the current photo into a specific album.
9. Adjust Photo
Customize how the photo displays here. Choose between “Fill frame” or “Fit to frame” modes; in Fill mode, you can also manually adjust the photo’s display area.
10. Rotate Photo
Rotate the photo 90 degrees clockwise or counterclockwise to get the perfect angle.
11. Slideshow
Pick transition animations for your slideshow to make playback more dynamic!
12. Volume Settings
Quickly adjust the frame’s volume.
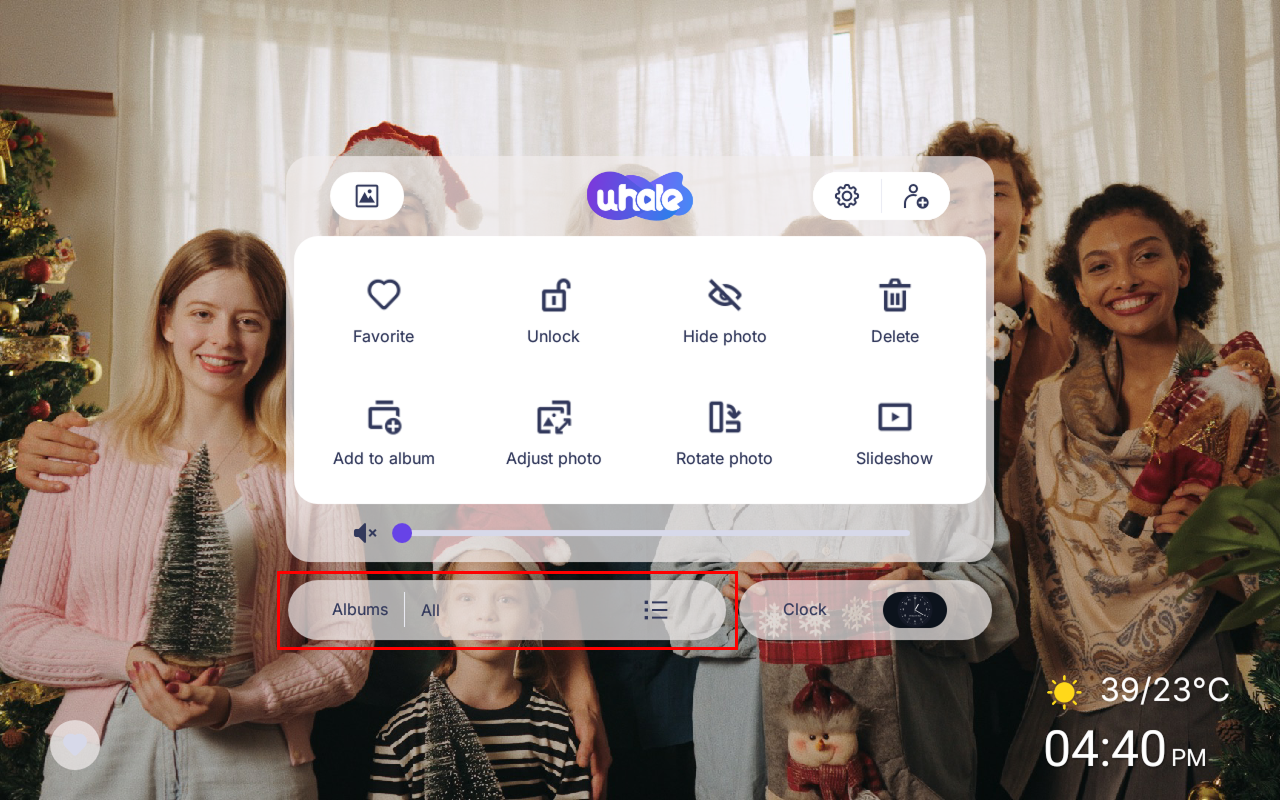
13. Switch Albums
Choose to play photos from a specific album, or switch to play all photos across albums.
14. Clock
Tap to enter clock mode—turn your frame into a sleek clock in seconds!
Is my frame online?
Even if the frame is connected to a WiFi, the frame might not necessarily have a connection to the internet in which case your frame will appear offline from connected phones.
This mostly happens if your WiFi uses certain settings which the frame does not support, or if the network equipment simply needs to be rebooted.
Here’s a guide to check if your frame is online and connected to the internet:
1.Open the Settings on your frame
2.Go to the Wi-Fi submenu
3.Check the Connection status
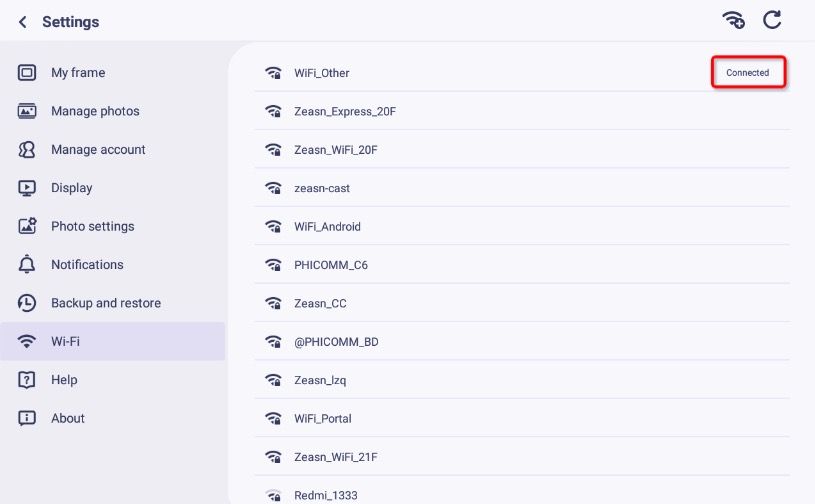
If the Connection status says “Connected” as shown on the photo above, your frame is online and good to go!
If the frame cannot change the connection status to “Connected”.
Troubleshooting steps:
1.Disconnect the current network and reconnect.
2.Change other network connection.
3.Restart the frame.
4.Use mobile hotspot to connect.
5.Reset the frame .(please backup your photo data before resetting the frame)
How to add friends
Due to differences in frame system versions, the UI display and the way to bind friends may vary. Please follow the instructions based on your frame version.
1. How to Bind Friends on Frame Version 5.0.0 and Above
Scenario 1: Adding Friends from the Frame Home Screen
1. Tap the “Via Uhale App” icon on the frame screen.
2. A dialog will appear:
Page 1: Displays a QR code for downloading the Uhale App.
Swipe left to Page 2, where the system will automatically generate a pairing code and QR code, valid for 48 hours.
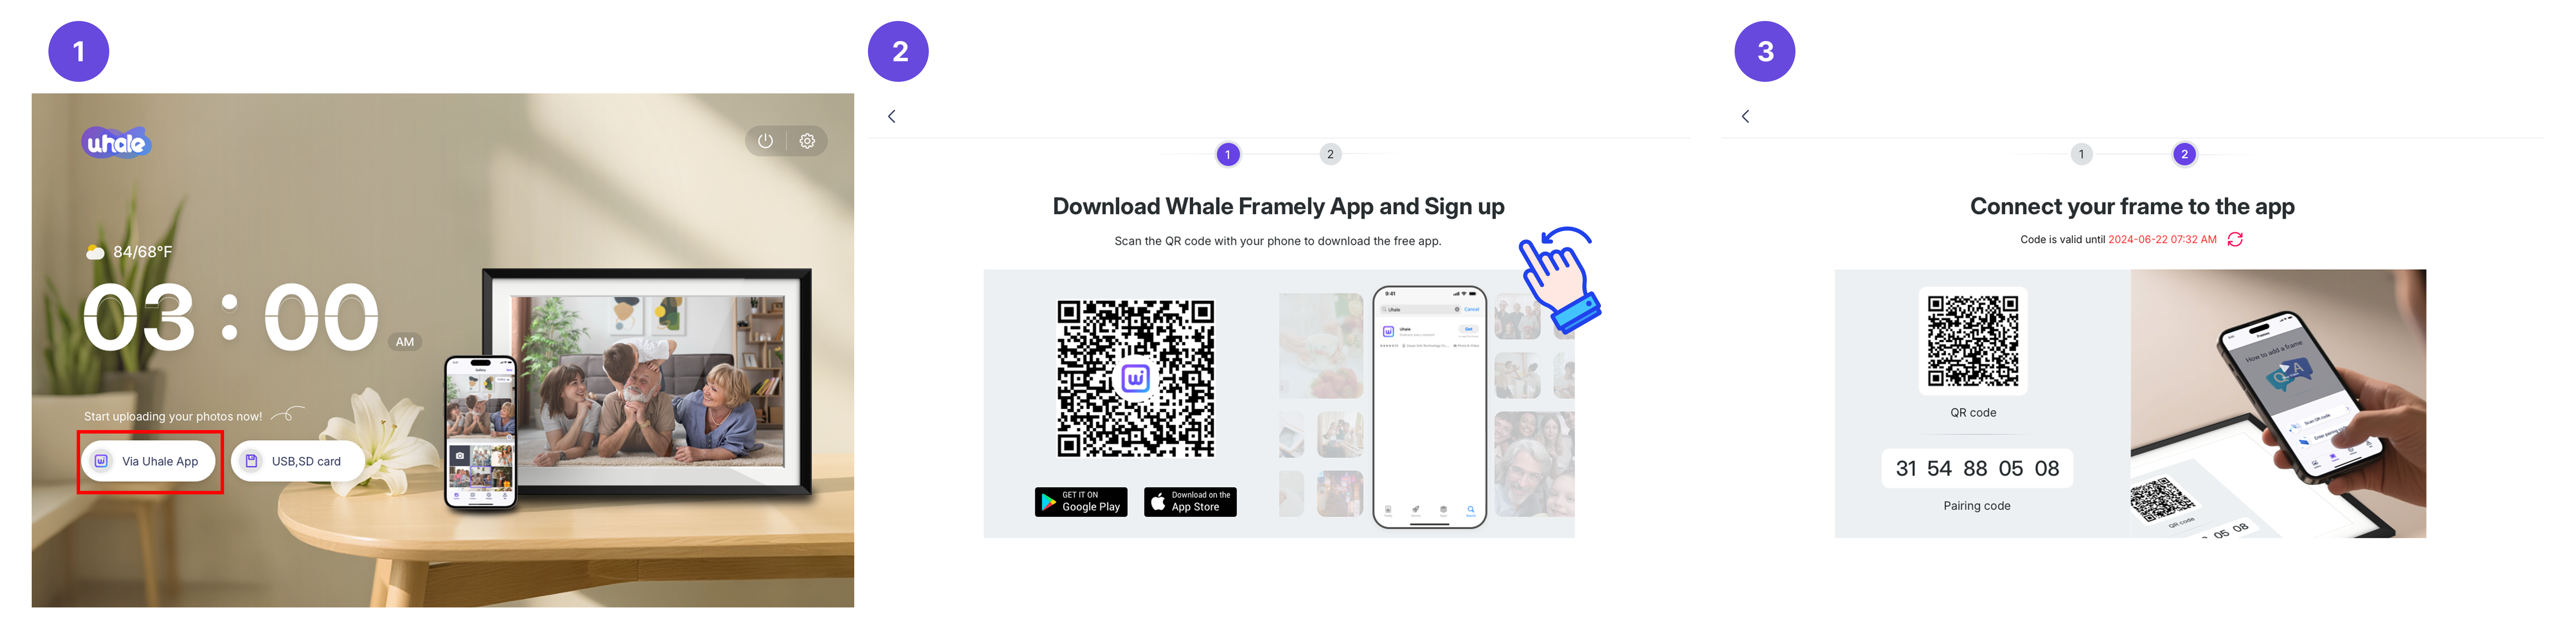
3. Open the Uhale App and follow the prompts to scan the QR code or enter the pairing code to complete the binding.
Scenario 2: Adding Friends While the Frame Is Playing Photos
1. Tap the frame screen to bring up the menu.
2. Tap the icon in the top-right corner (highlighted with a red box). The system will generate a QR code (valid for 48 hours).
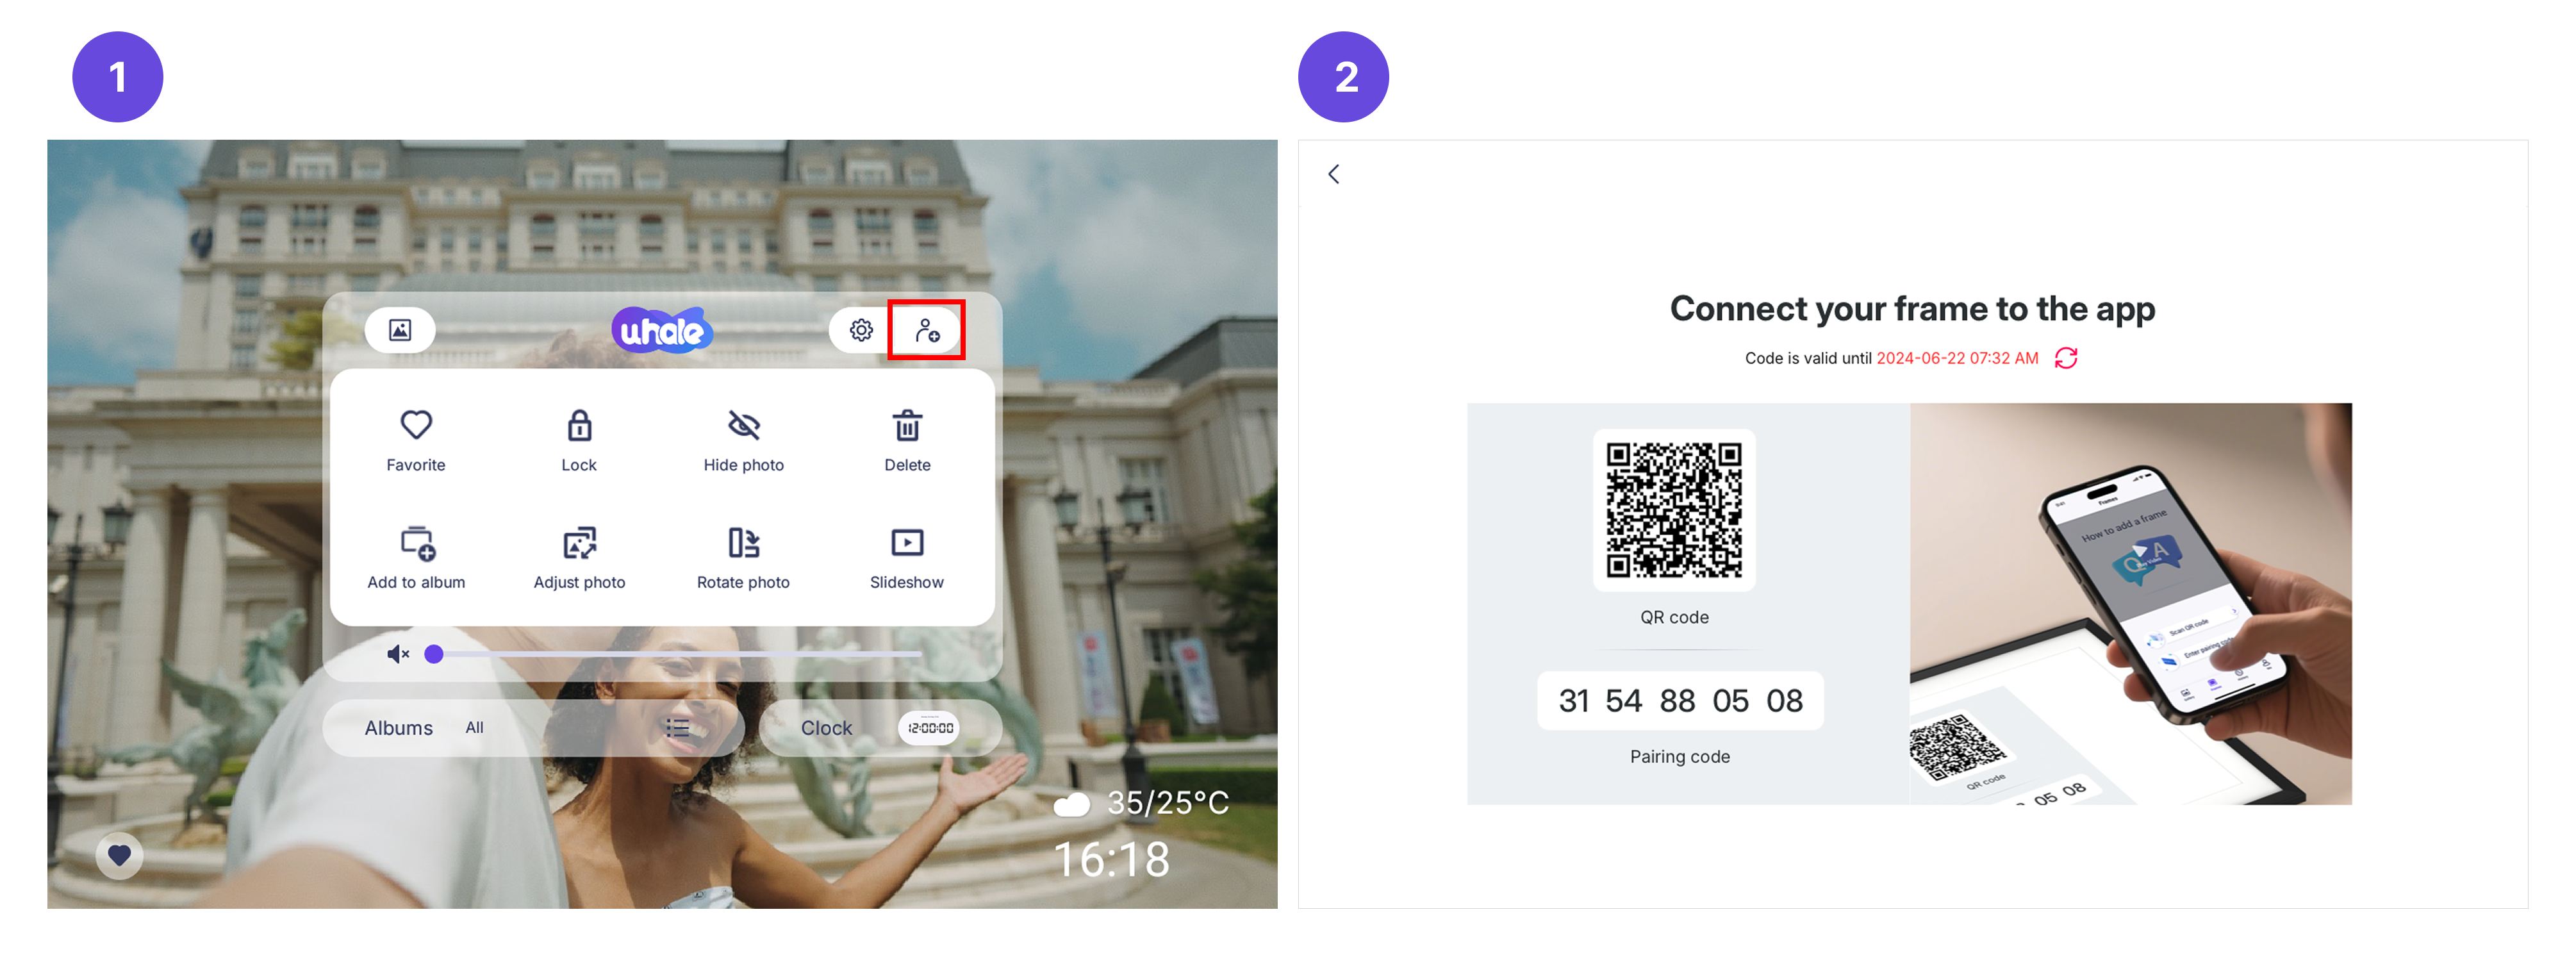
3. Open the Uhale App and follow the prompts to scan the QR code or enter the pairing code to complete the binding.
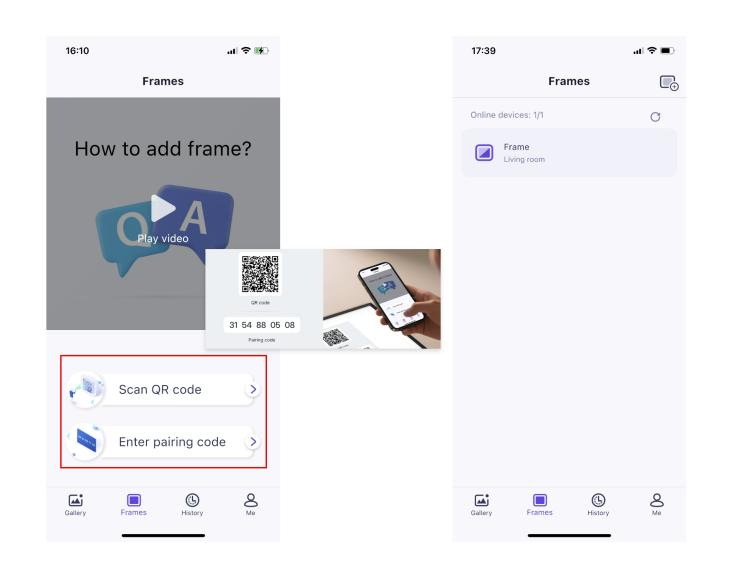
2. How to Bind Friends on Frame Version Below 5.0.0
Before You Start:
Make sure your friend has downloaded and installed the Uhale App.
Binding Steps:
1. On the frame, tap the “Add Friend” icon.
2. A binding dialog will pop up. The system will automatically generate a random pairing code and QR code, valid for 48 hours.
3. Share the invitation code with your friend using your preferred method, such as SMS, email, instant messaging apps, or a phone call.
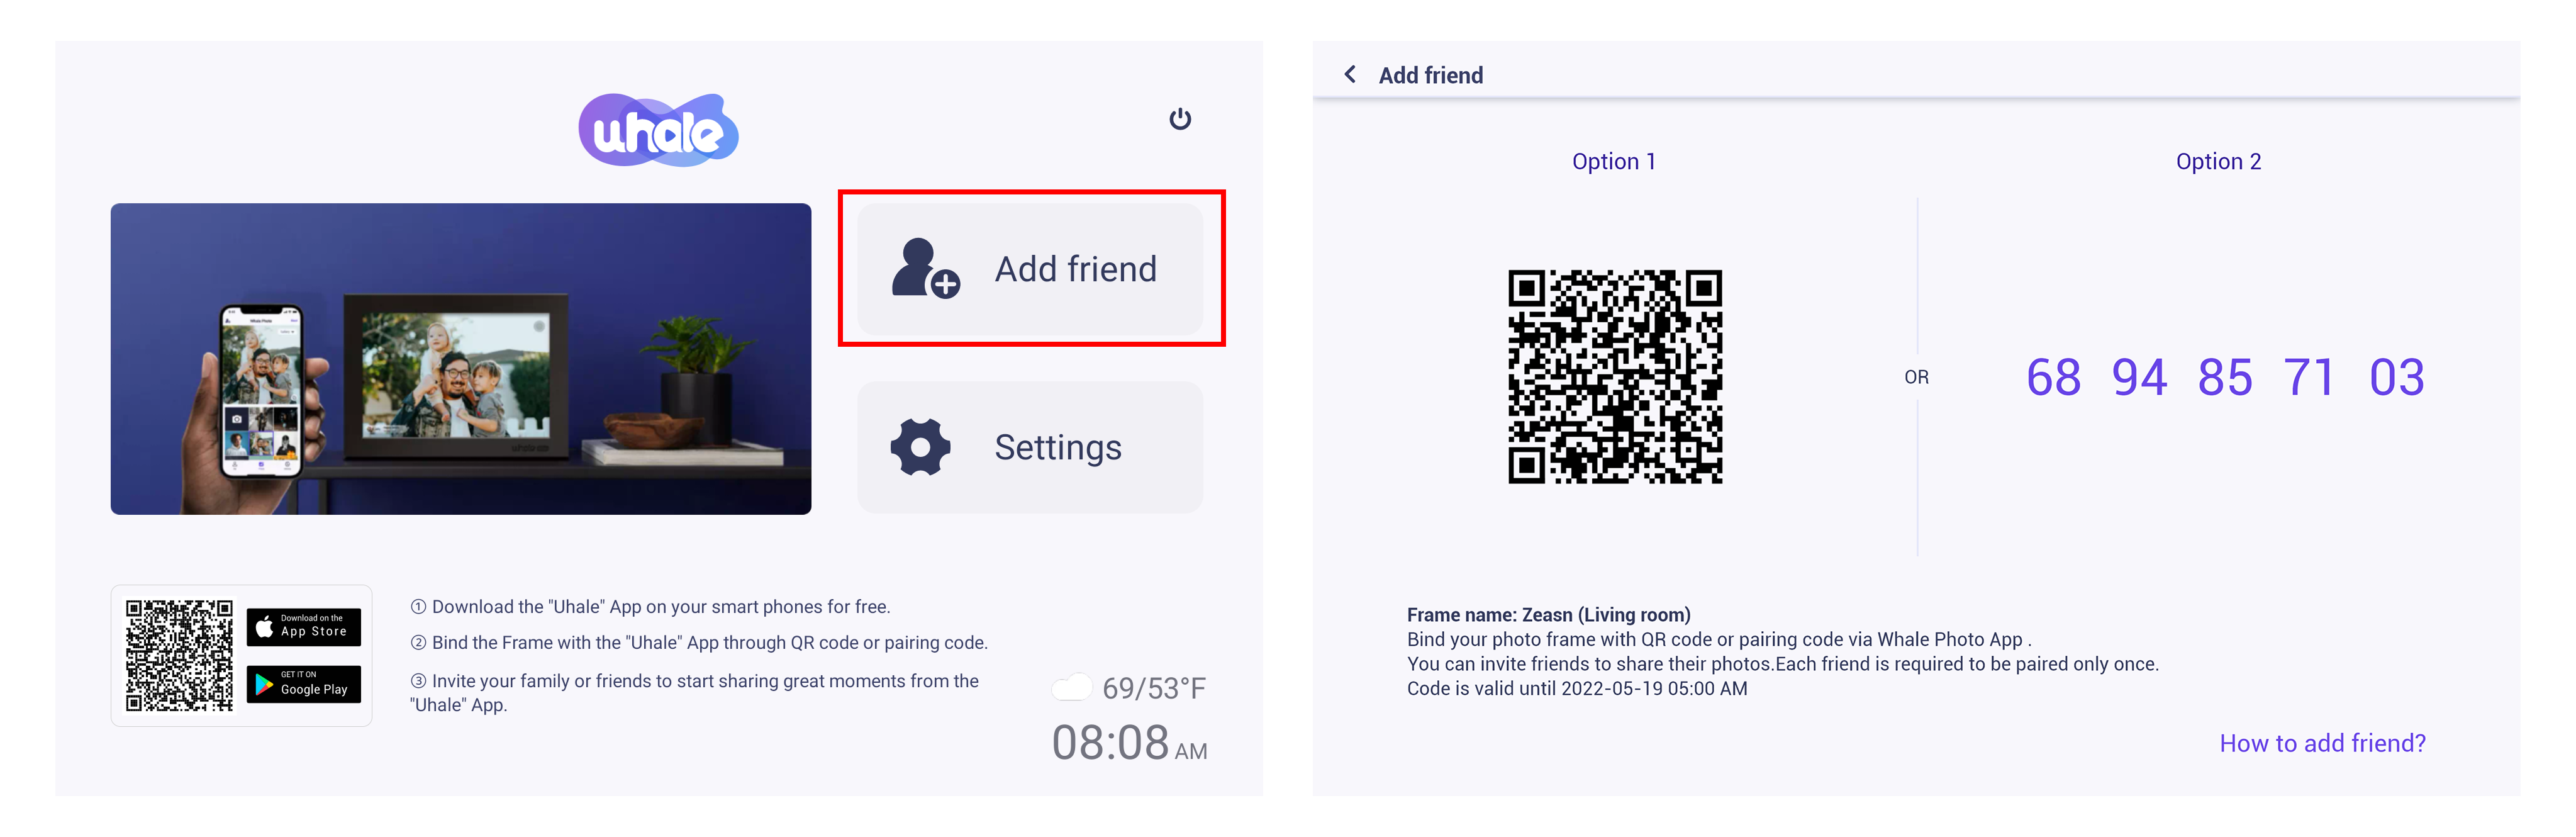
4. Once your friend completes the binding in their Uhale mobile app, they will automatically appear in your frame’s friend list and will be able to send photos to your frame.
Once the frame is connected to your Uhale App, you will be able to find them in “manage account” on the frame.
3. Frequently Asked Questions
Q: How long are the pairing code and QR code valid?
A: The pairing codes and QR codes generated in all versions are valid for 48 hours. If they expire, you will need to generate a new one.
Q: Where can I check the accounts that have been successfully bound?
A: You can view them under Frame → Settings → Account Management.
Q: What should I do if the pairing code expires?
A: If the pairing code has expired, please follow these steps:
Reopen the pairing code generation page;
Click the Refresh button on the page to generate a new pairing code.
Reminder: Each pairing code has a specified validity period. Please make sure to complete the pairing process within the time indicated on the page. Otherwise, a prompt saying “pairing code expired” will appear.
How to switch albums during slideshow?
You can easily change the album being played during a slideshow. Follow these steps:
1. Open the Menu
While the slideshow is playing, tap the screen to bring up the menu.
Tap Albums; the album currently being played will be marked as Now Playing.
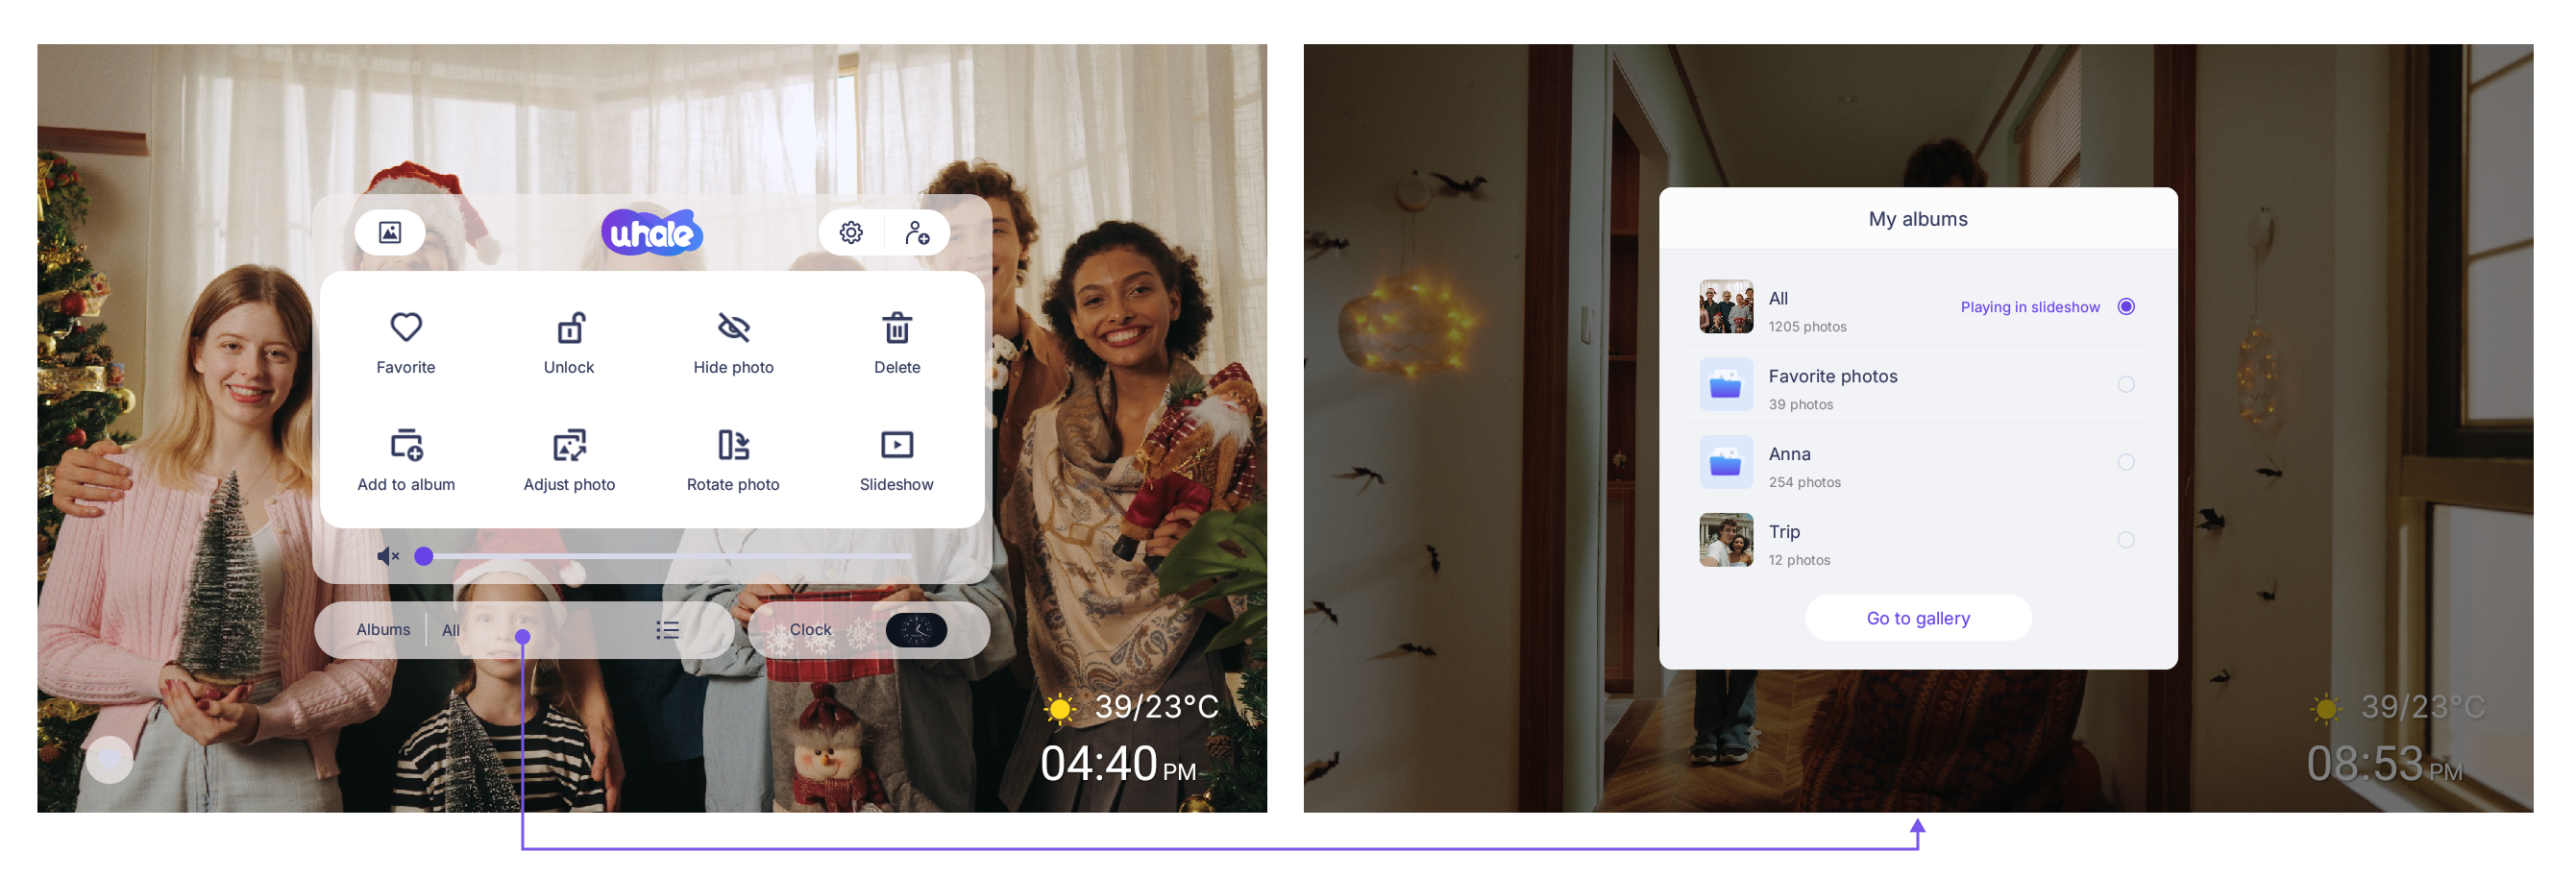
2. Switch Albums
Select another album (for example, Trip) to start playing it immediately.
If you want to play photos from all albums, choose the All album option.
How to change language
If you accidentally selected the wrong language when setting up the frame, or if for some other reason you wish to change the language on your frame, it is super simple!
Step:
1.Tap the screen to open the quick menu.
2.Go to Settings.
3.Press the Set language option.
4.Find your preferred language and press it.
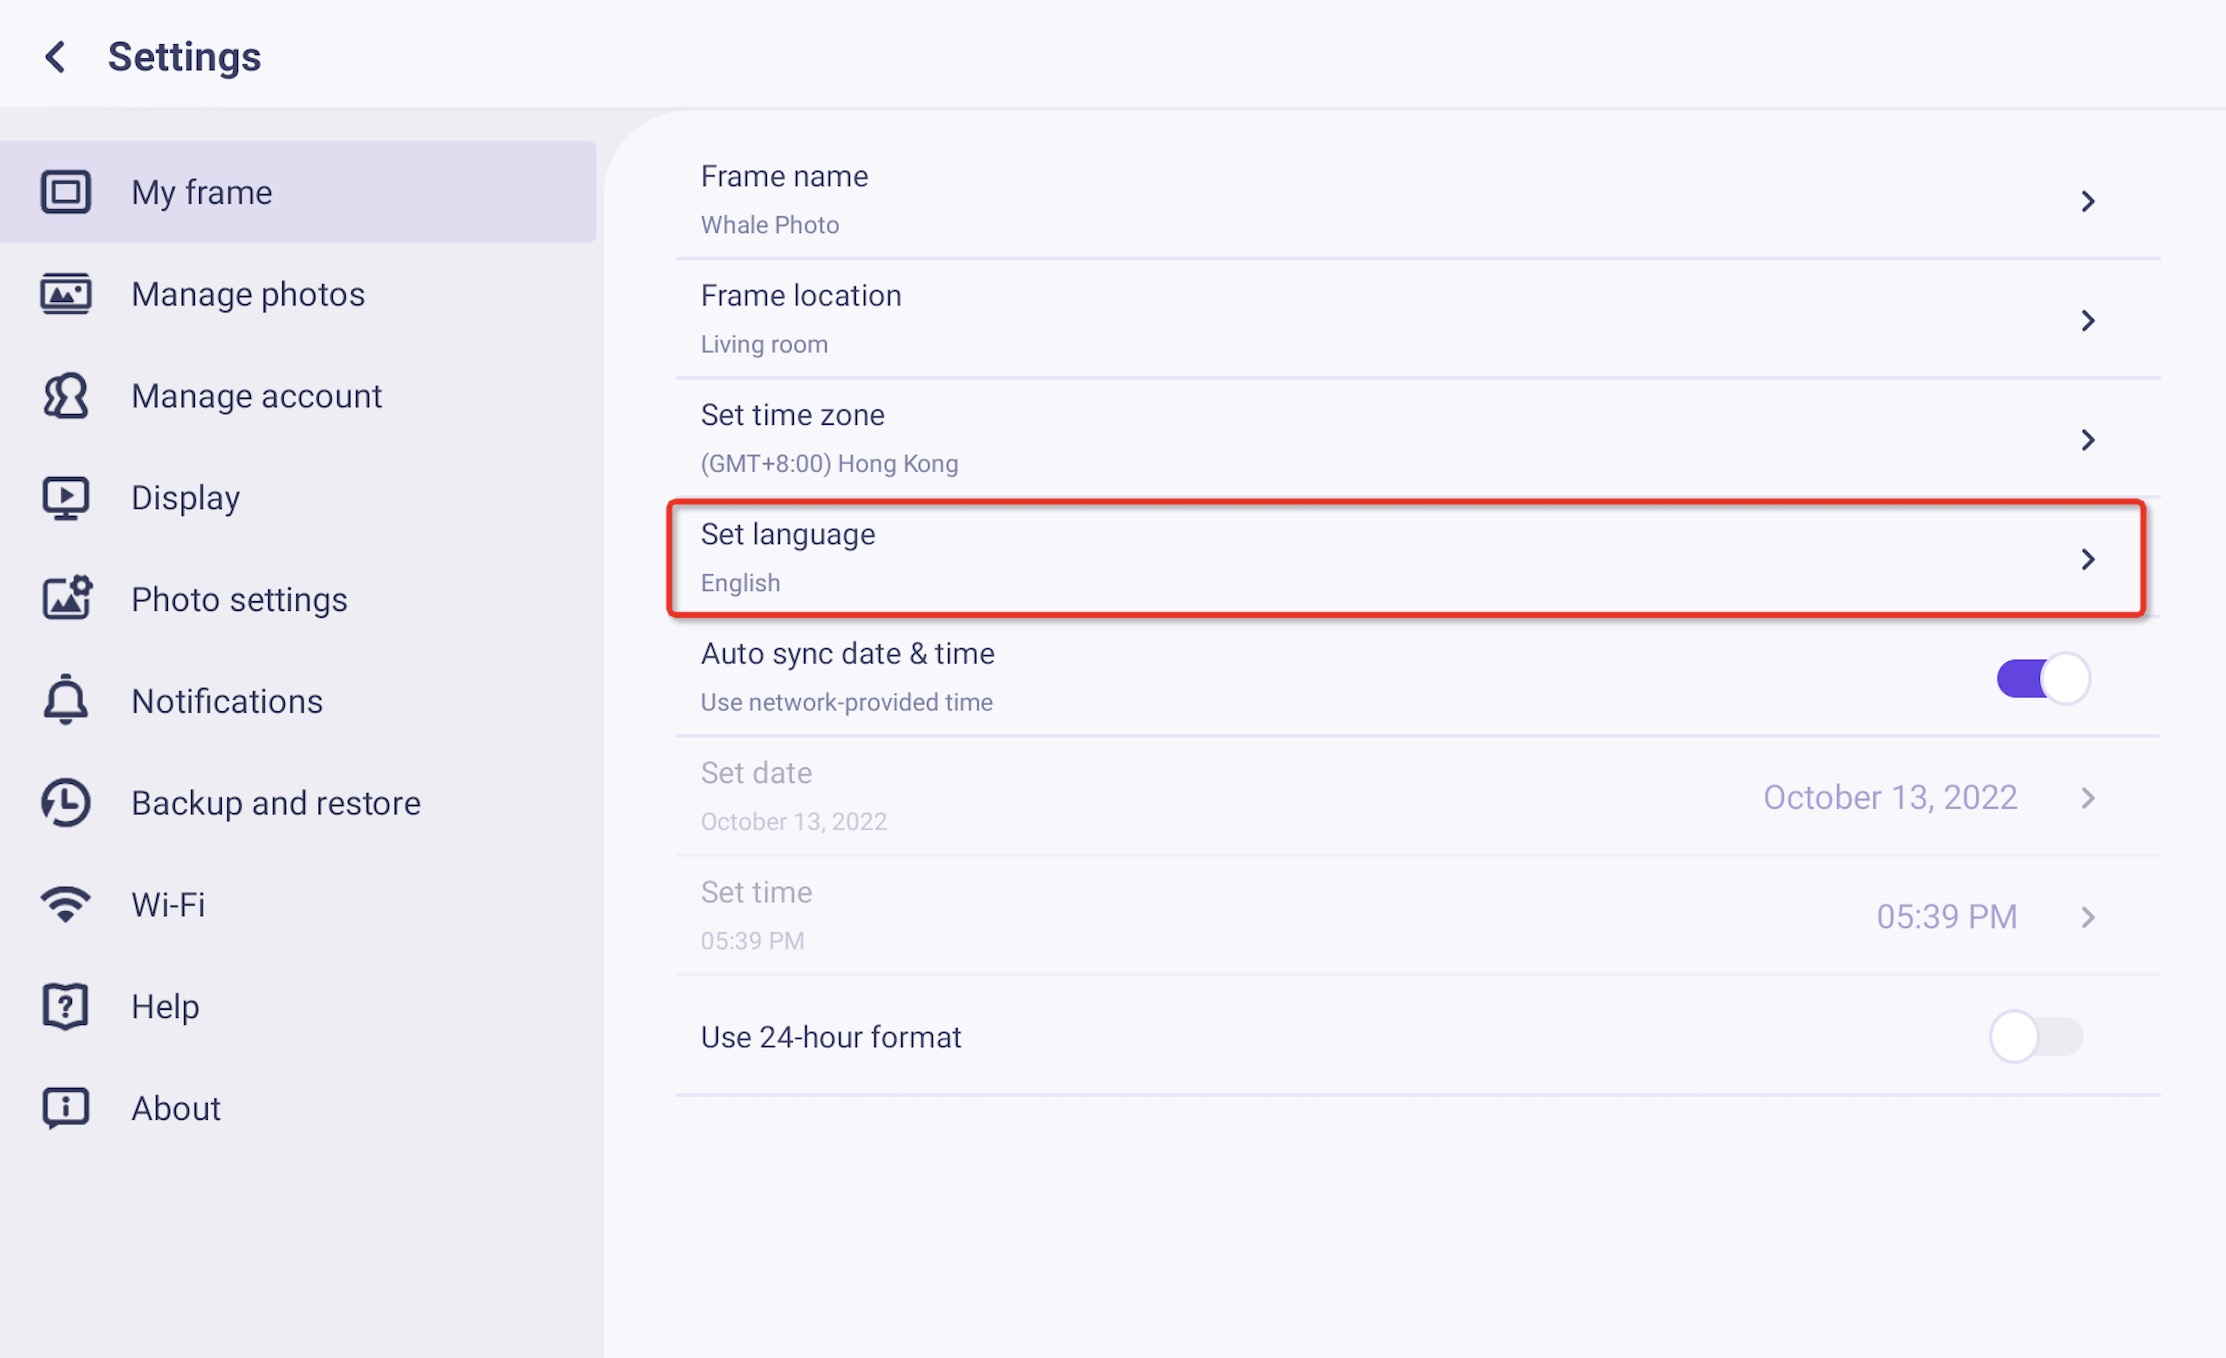
How to delete photos on your frame
Here’s a short guide explaining how to delete photos and videos from your frame.
1.Home
Press and hold the screen to delete the current photo or video.
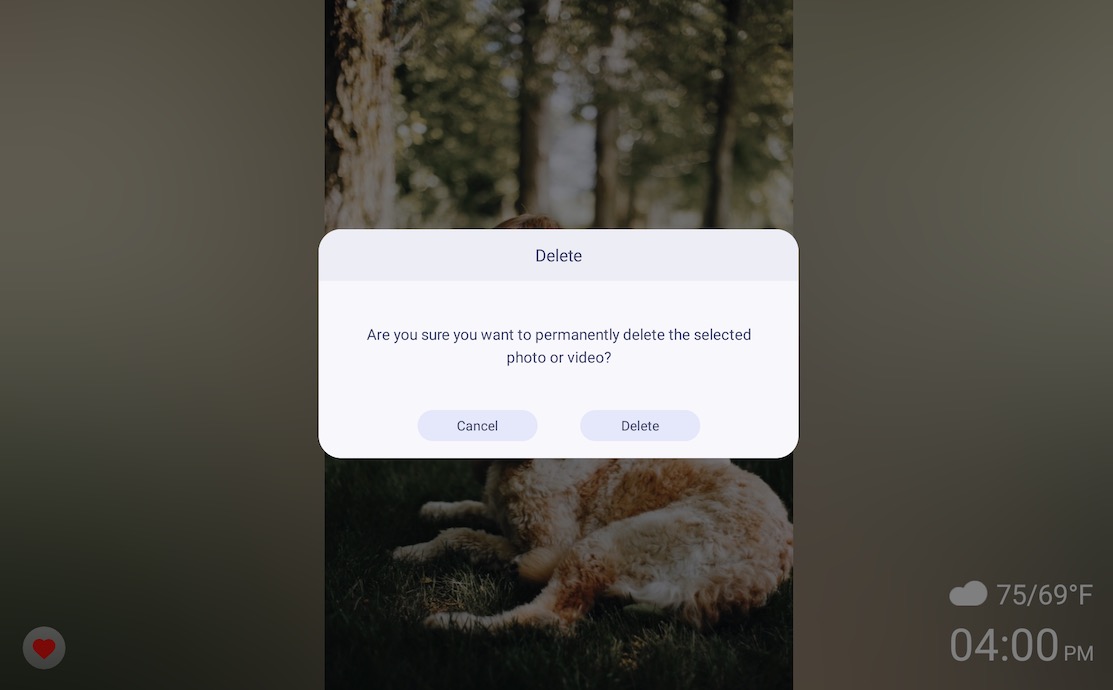
Delete via Quick Menu.
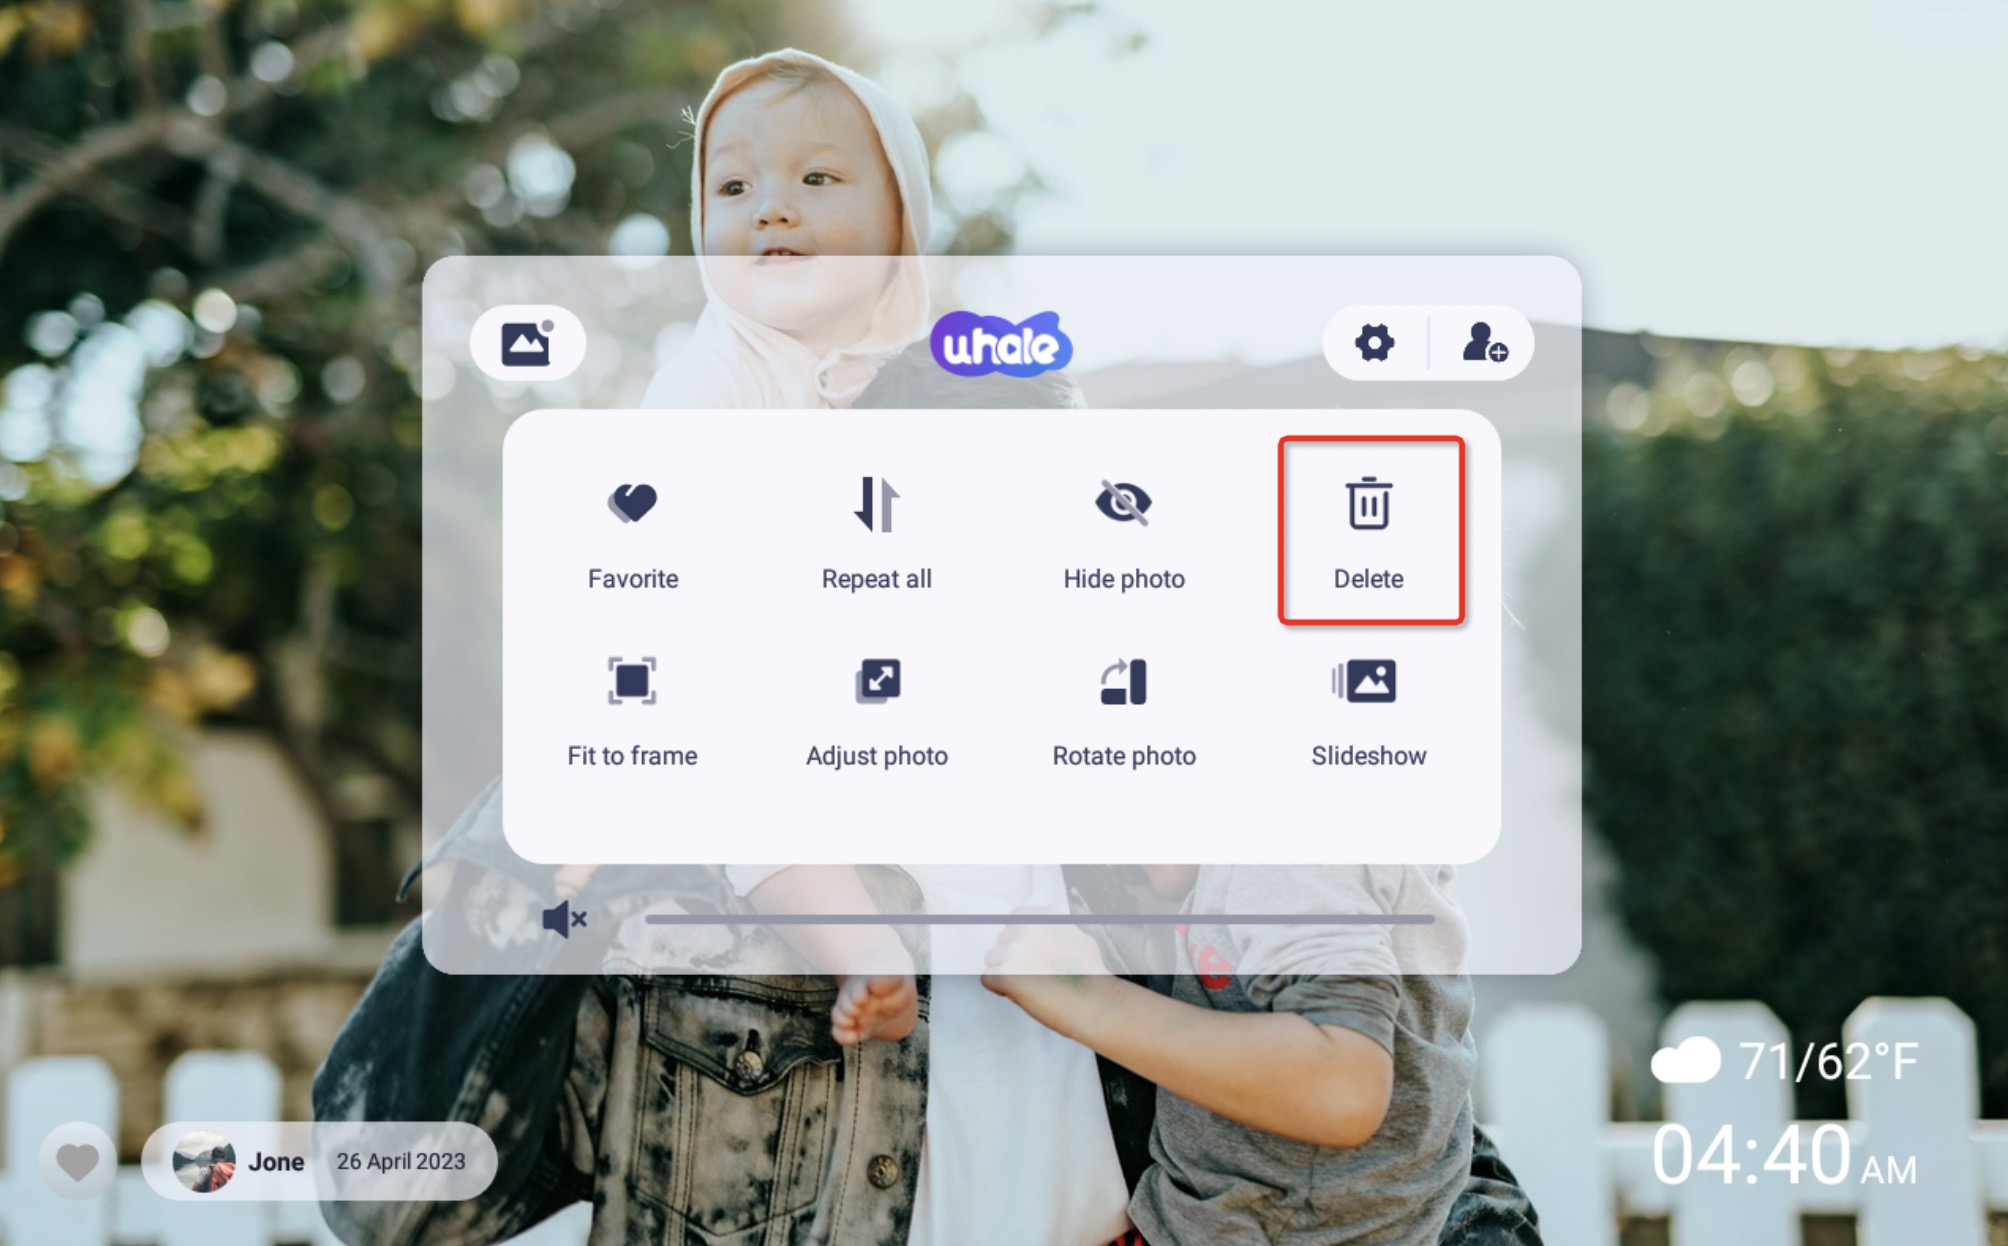
2.Settings
1)Open the Settings on your frame.
2)Press the “Manage photos” menu.
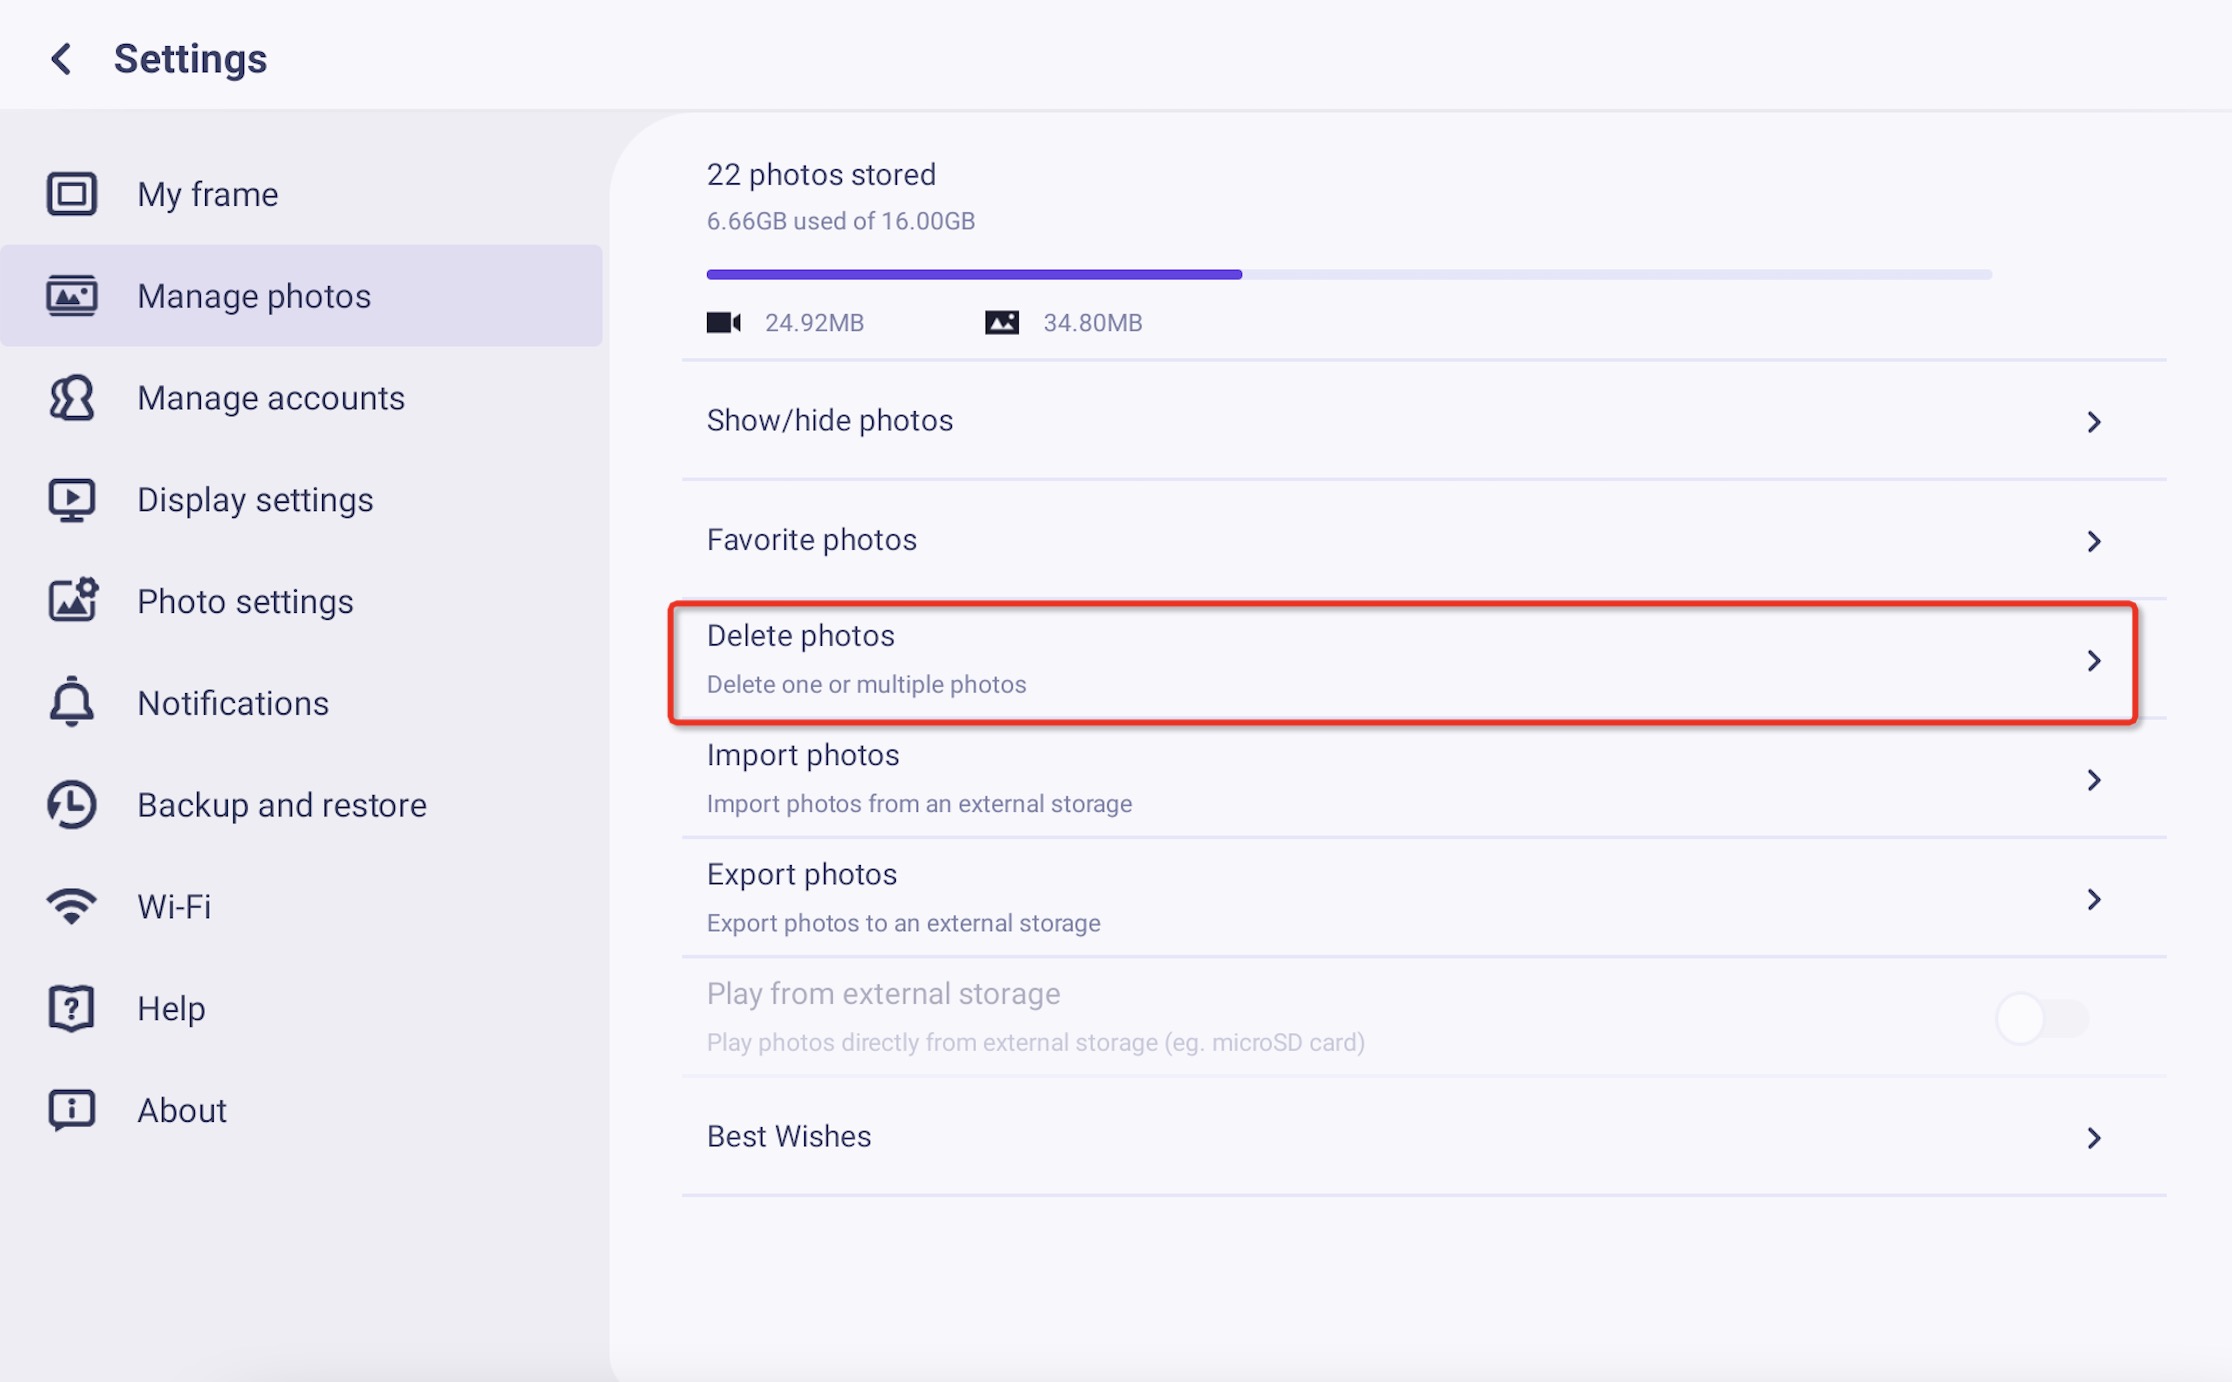
3)Press “Delete photos”.
4)Select the photo you want to permanently delete from the frame by tapping the photo.
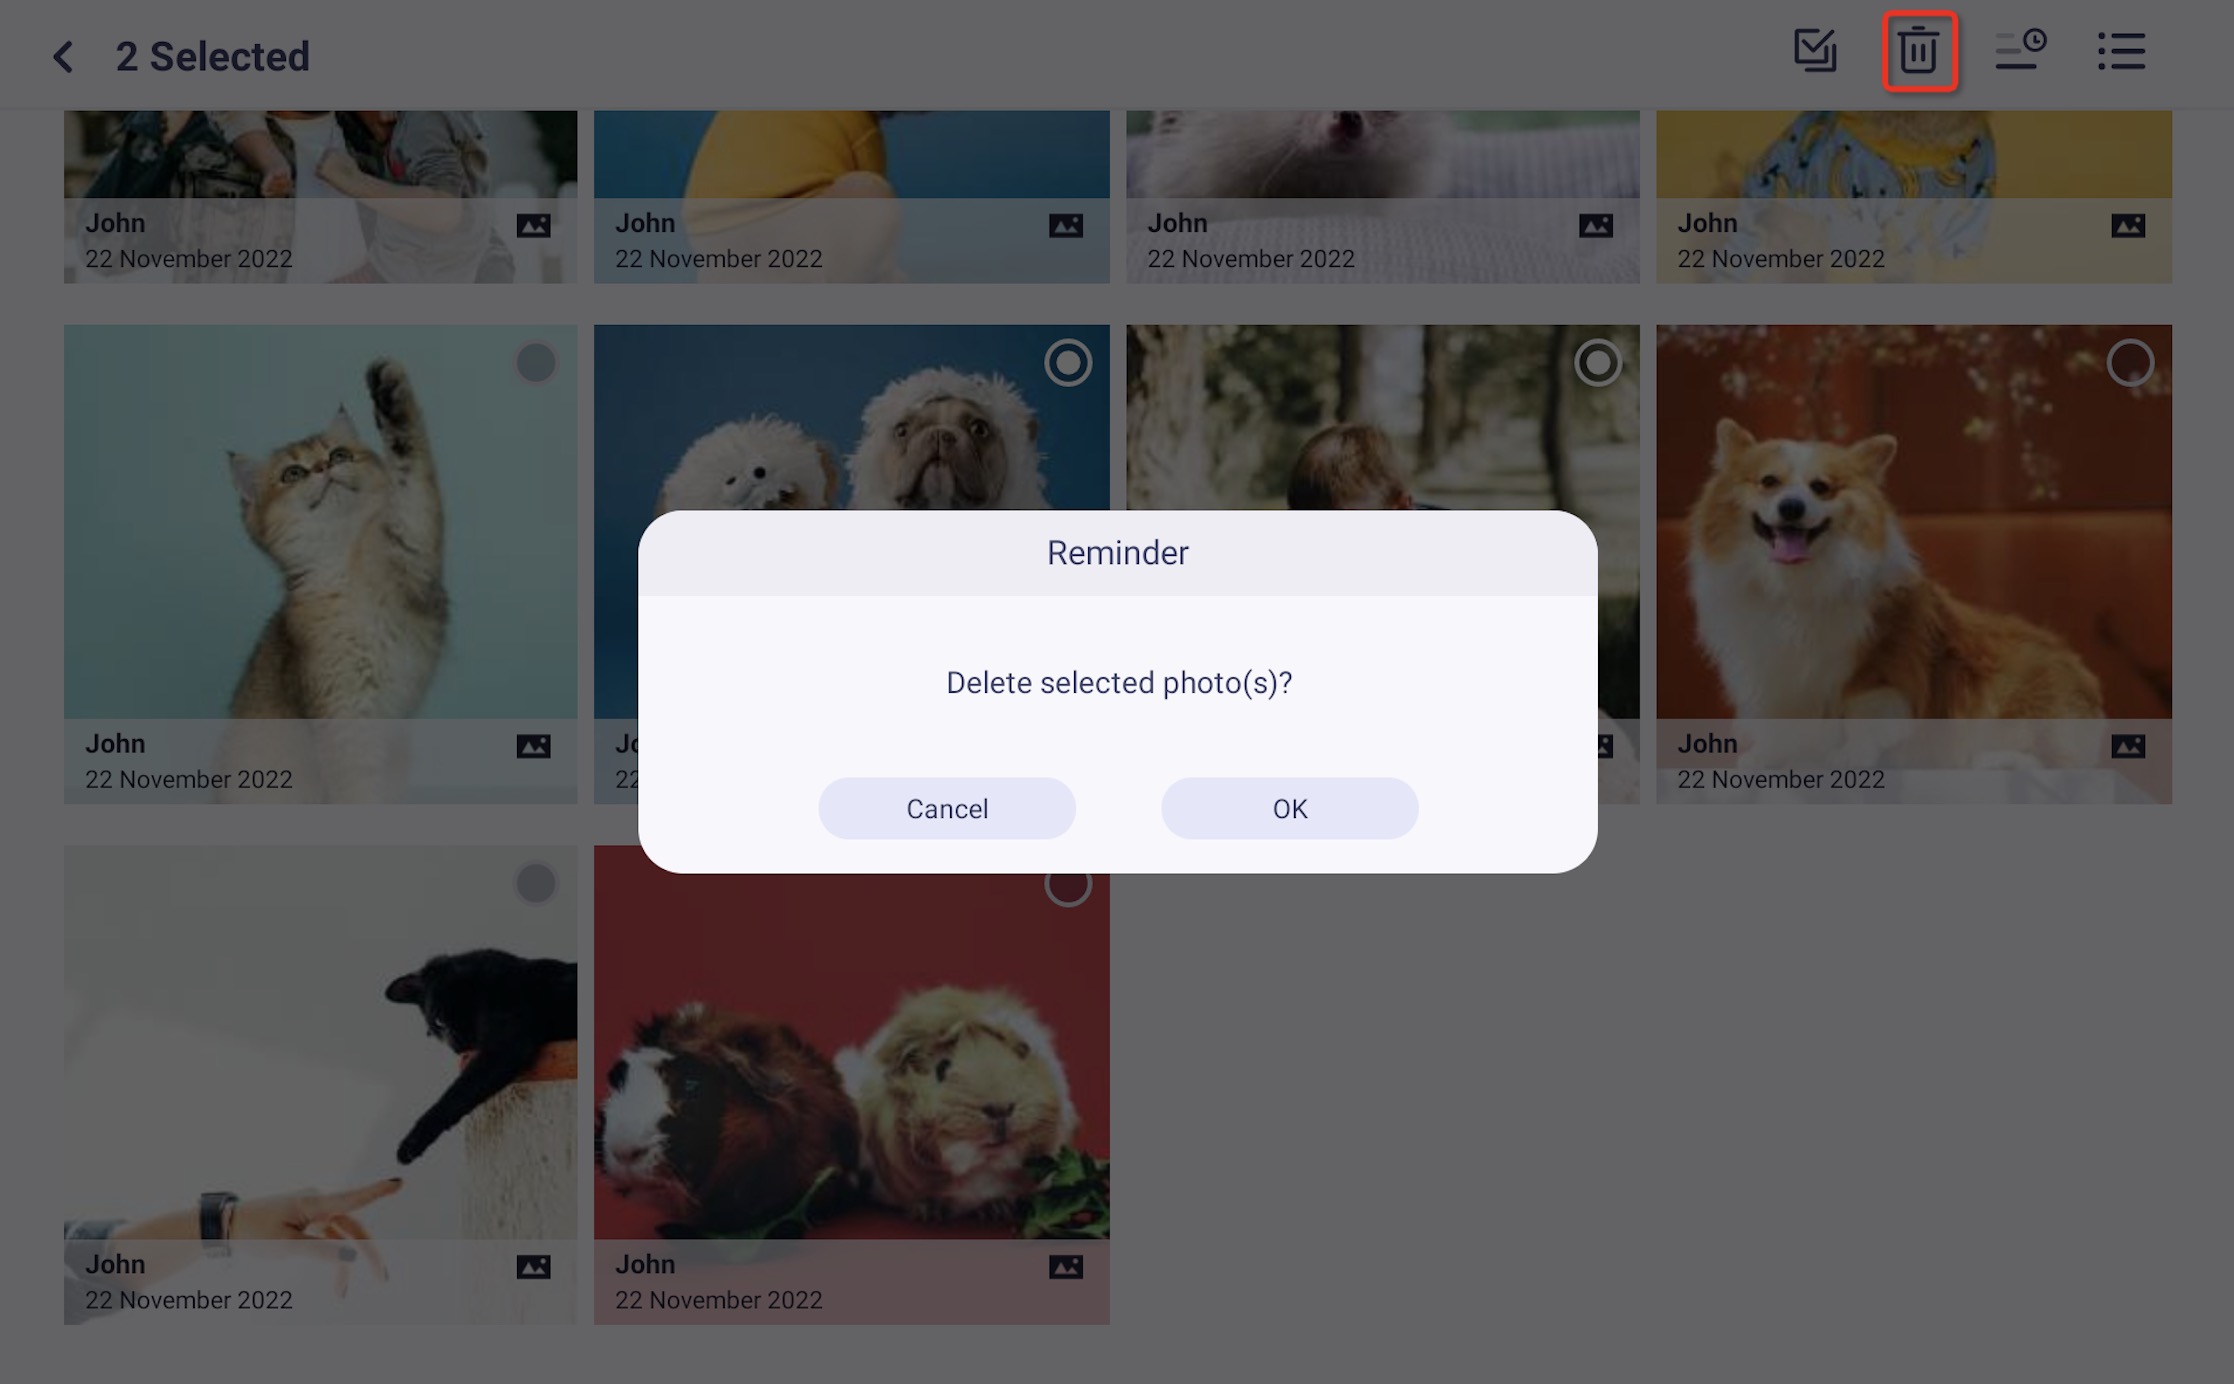
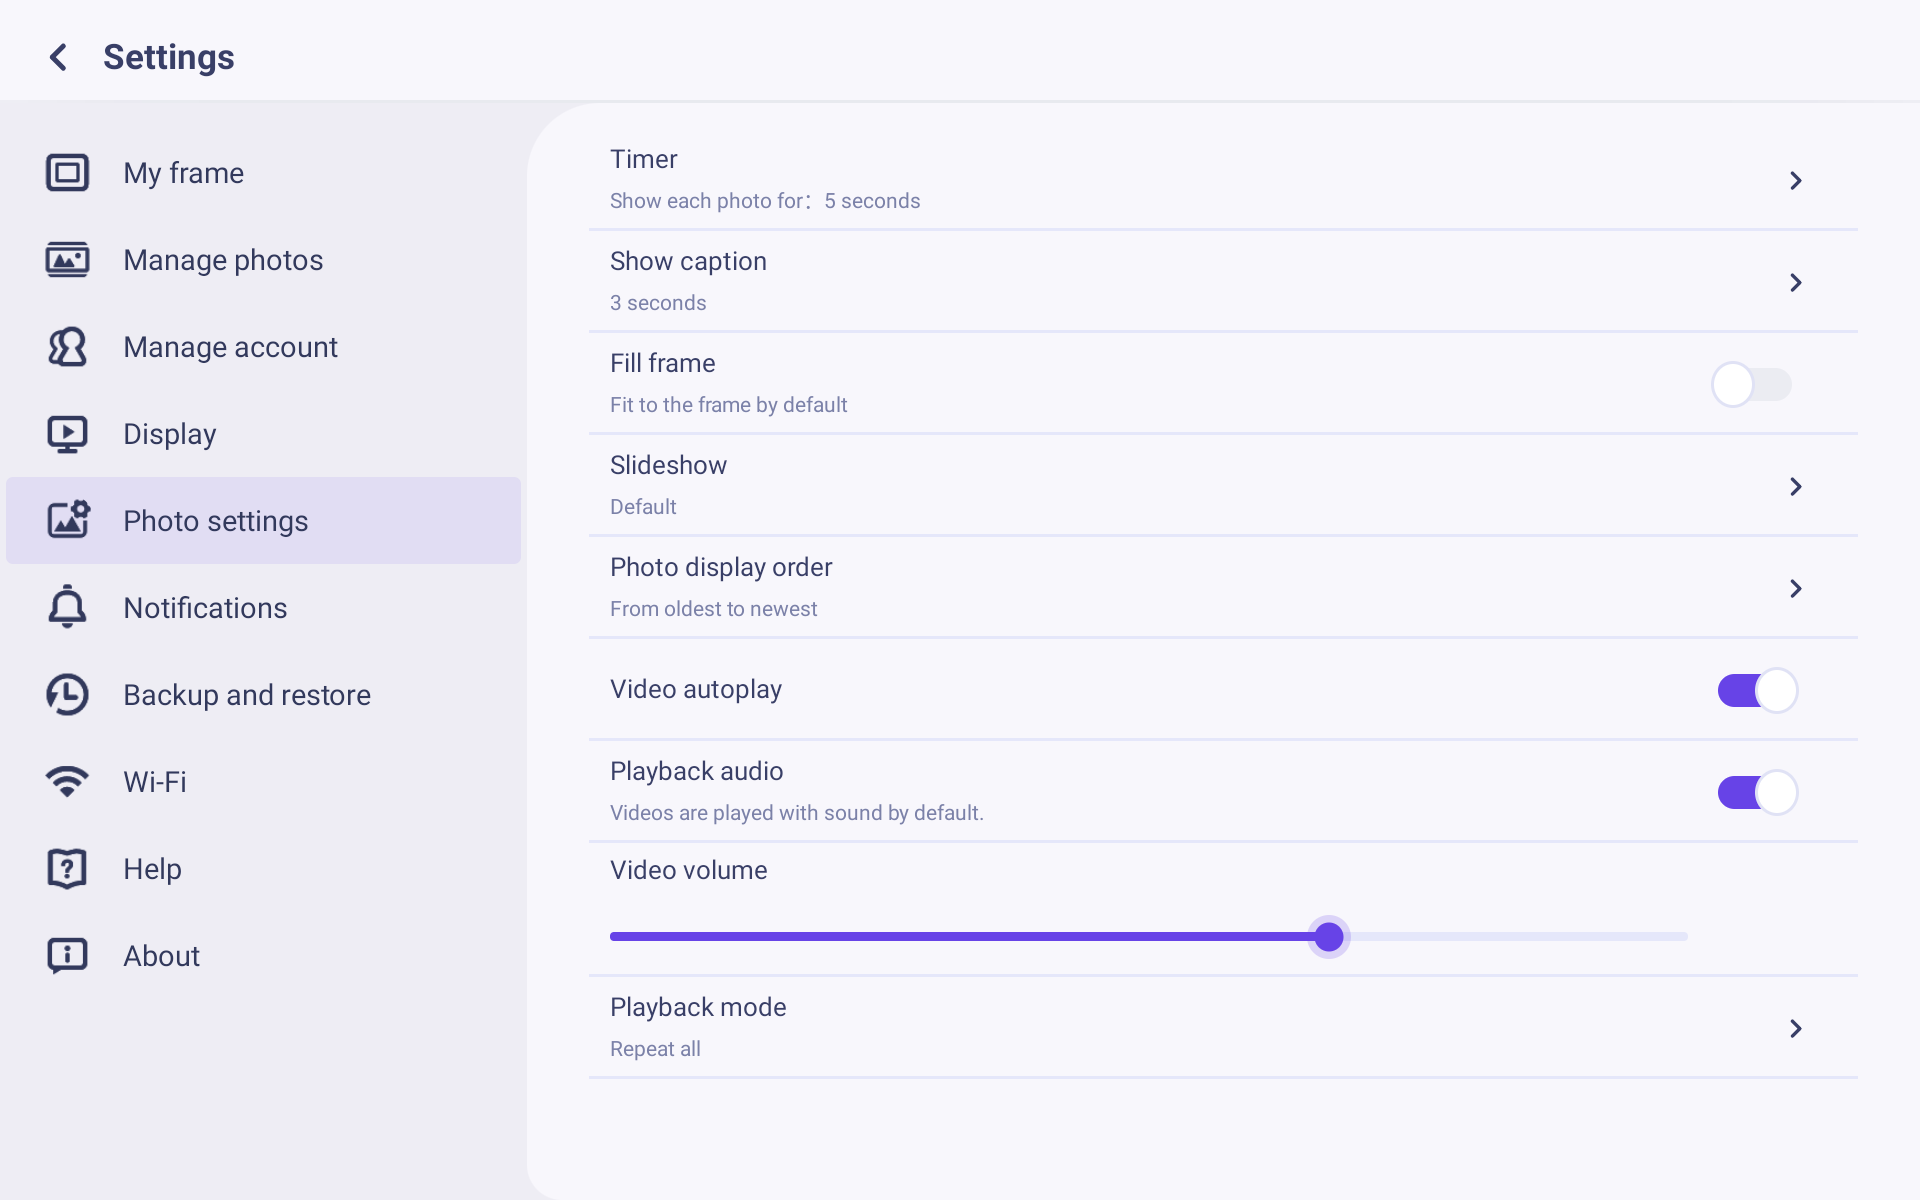
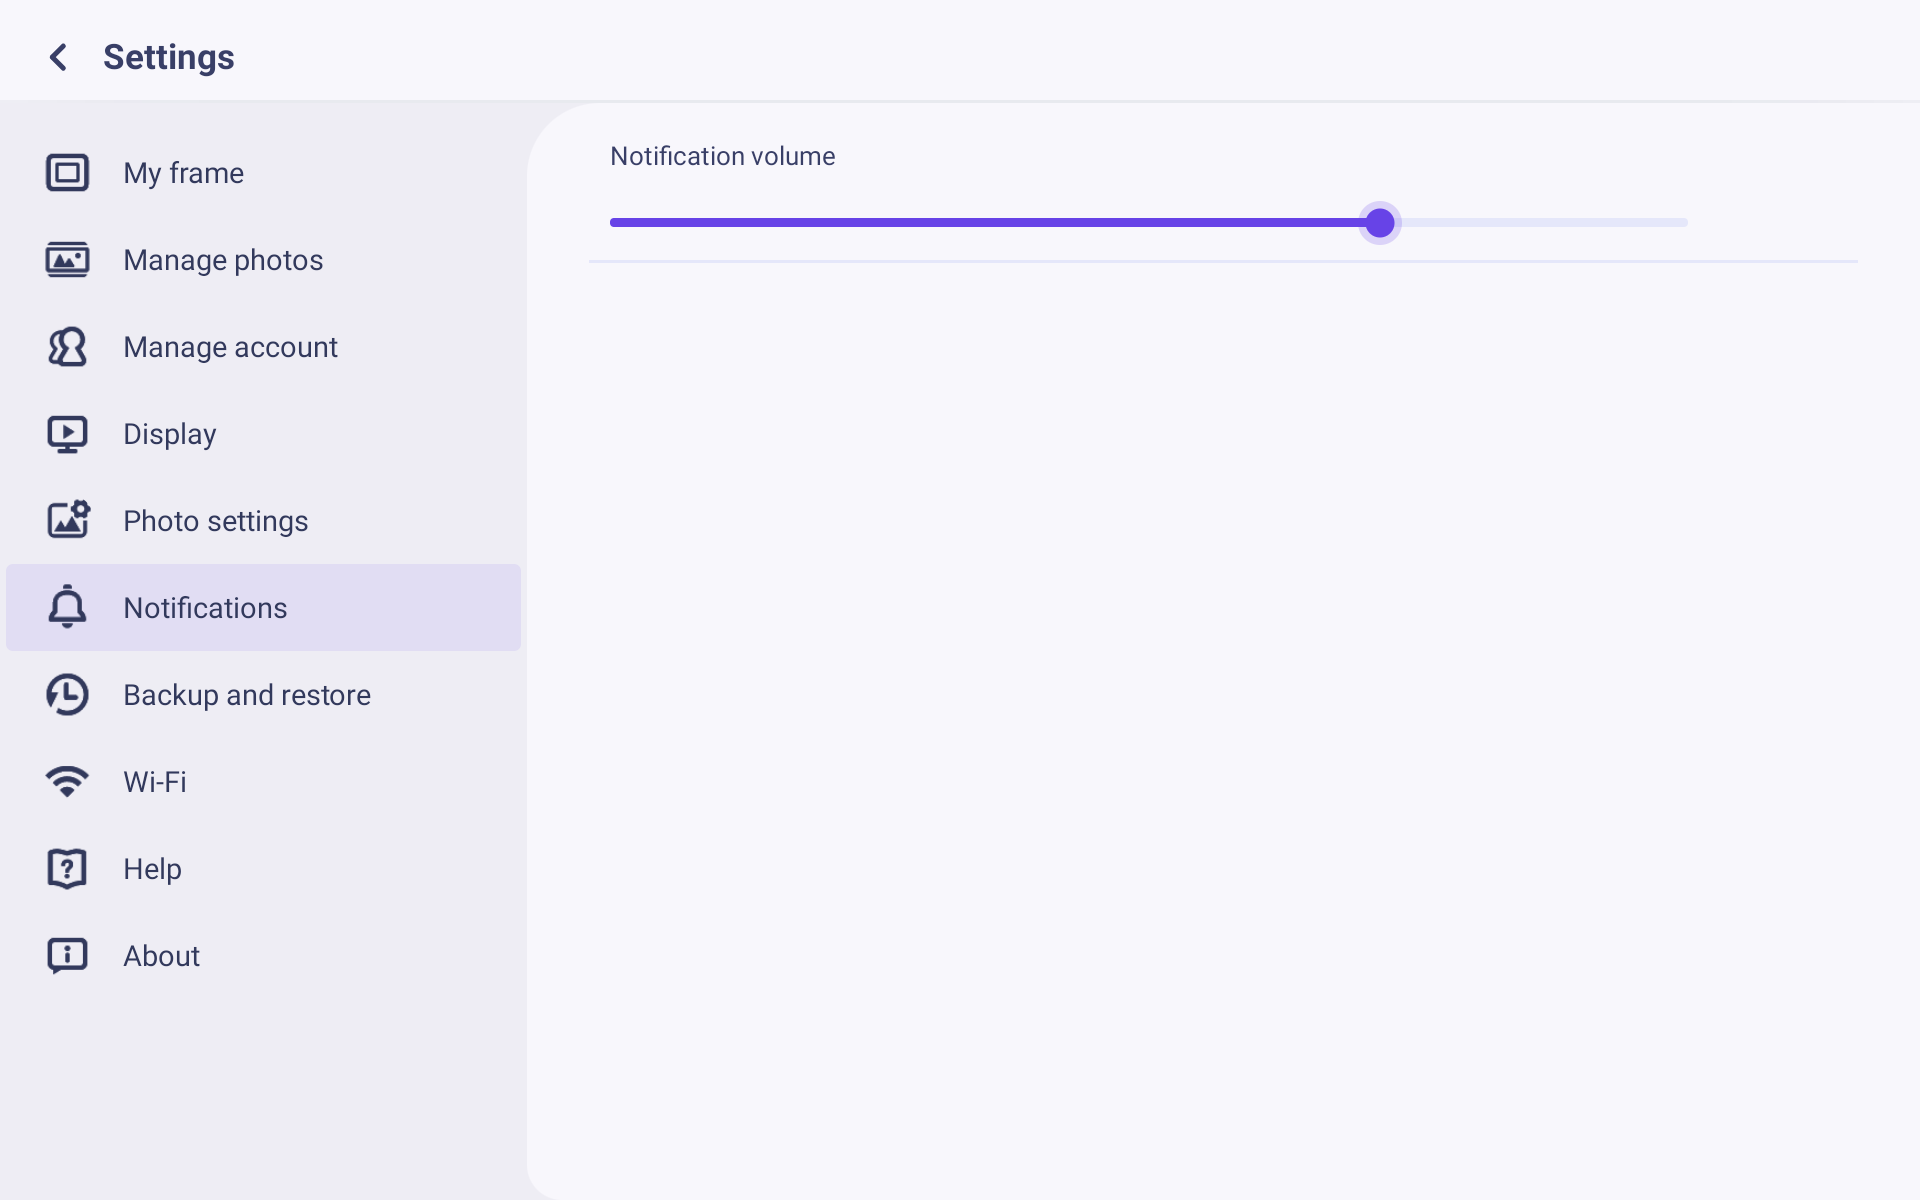
How to adjust video volume and notification volume
You can adjust the volume on your frame with a few simple steps.
1.Video volume
You can set the video volume in 3 ways.
1)Adjust the video volume slider in the quick menu.
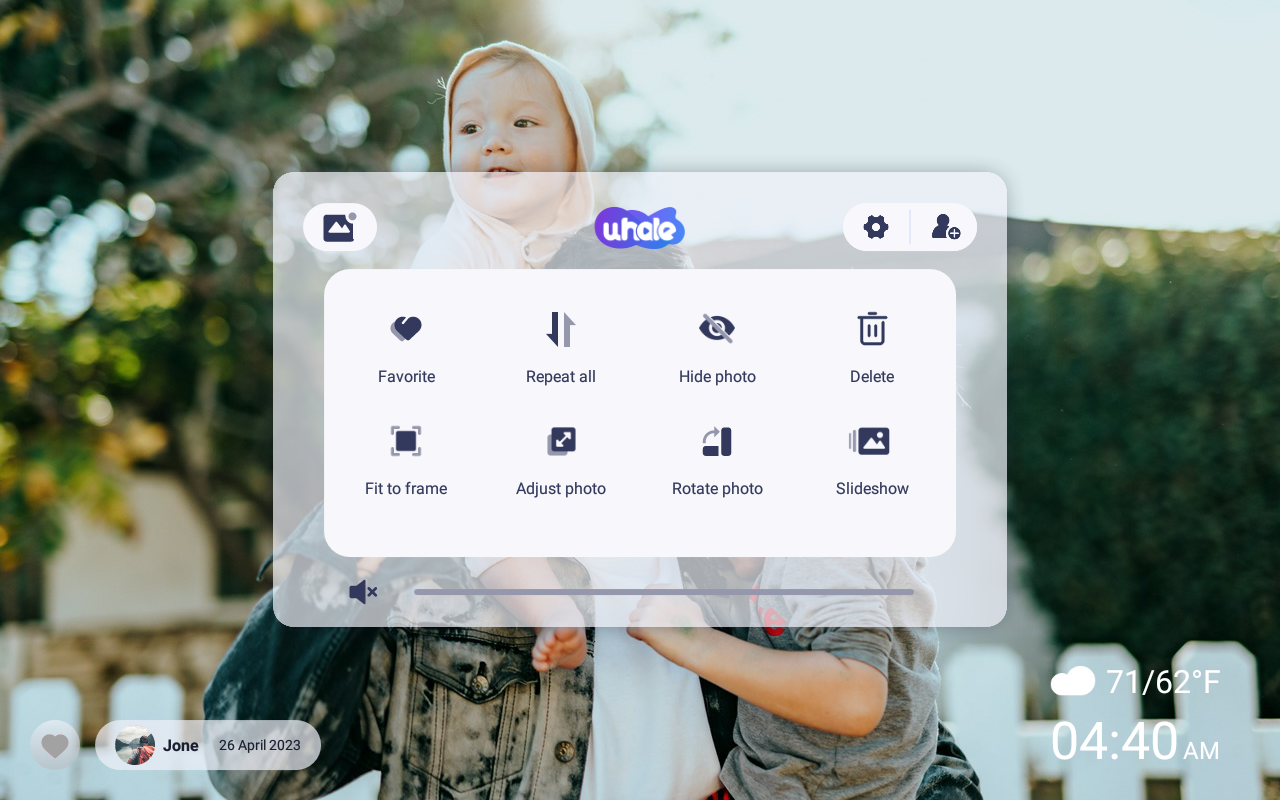
2)Home screen right swipe up and down to adjust the volume.
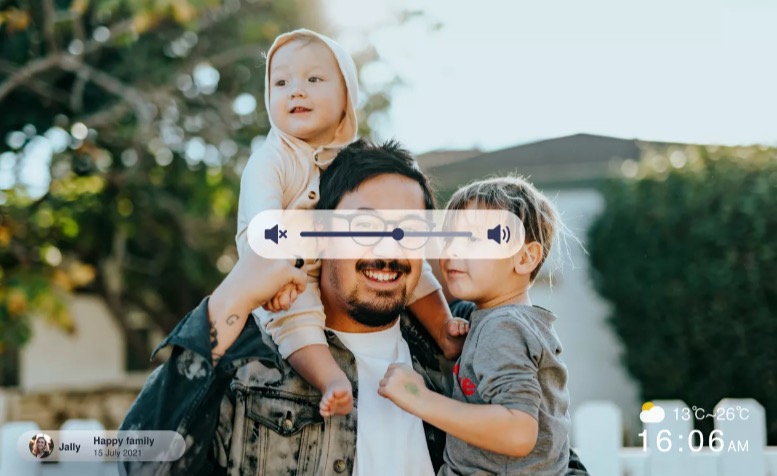
3)Settings
—Go to Settings
—Go to Display settings
—Adjust the Video volume slider
2.Notification volume
1)Go to Settings
2)Go to Notifications
3)Adjust the Notification volume slider
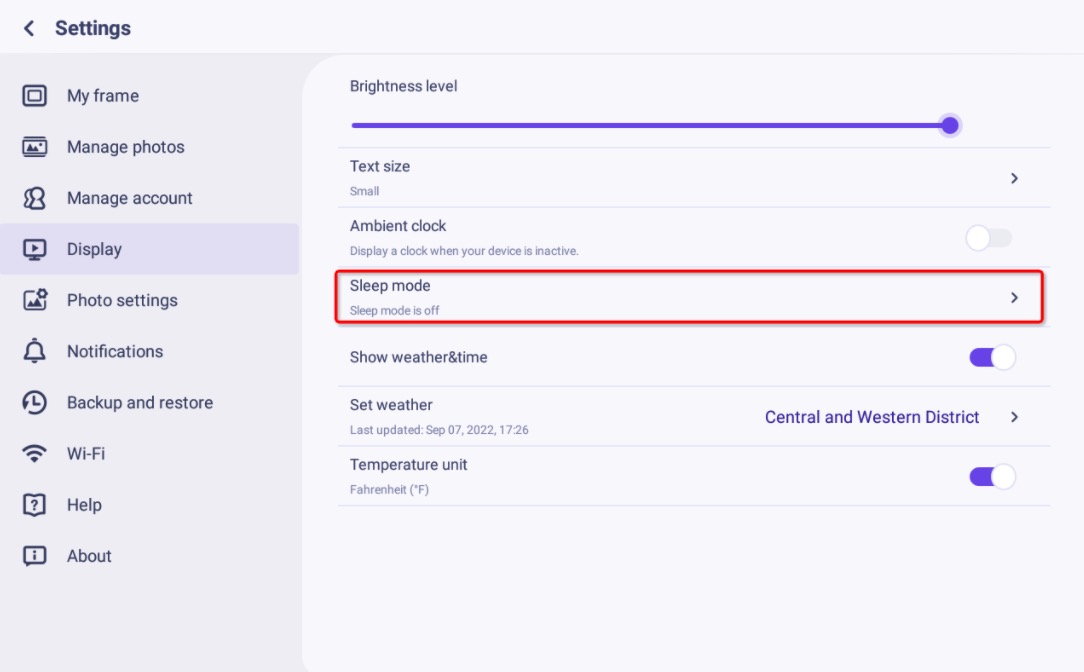
How to adjust sleep mode
When the sleep mode is on, the screen is turned off during a specific time to reduce energy consumption. The default setting is to turn off the screen at 20:00 and to turn it back on at 08:00. This can be changed by setting your preferred sleep mode start/end time.
Photos can still be received when the sleep mode is on.
Adjust Sleep Mode
1)Go to Settings
2)Press the Display settings submenu
3)Press “Sleep mode”
4)Set the sleep mode start time
5)Set the sleep mode end time
Tip: You can switch between A.M. and P.M. if necessary

Tip: The power button on the back/side of the frame can also be used to put the frame to sleep manually on most frames. Simply press it once!
How to import photos and videos
You can import photos to your frame from external devices using the import feature.
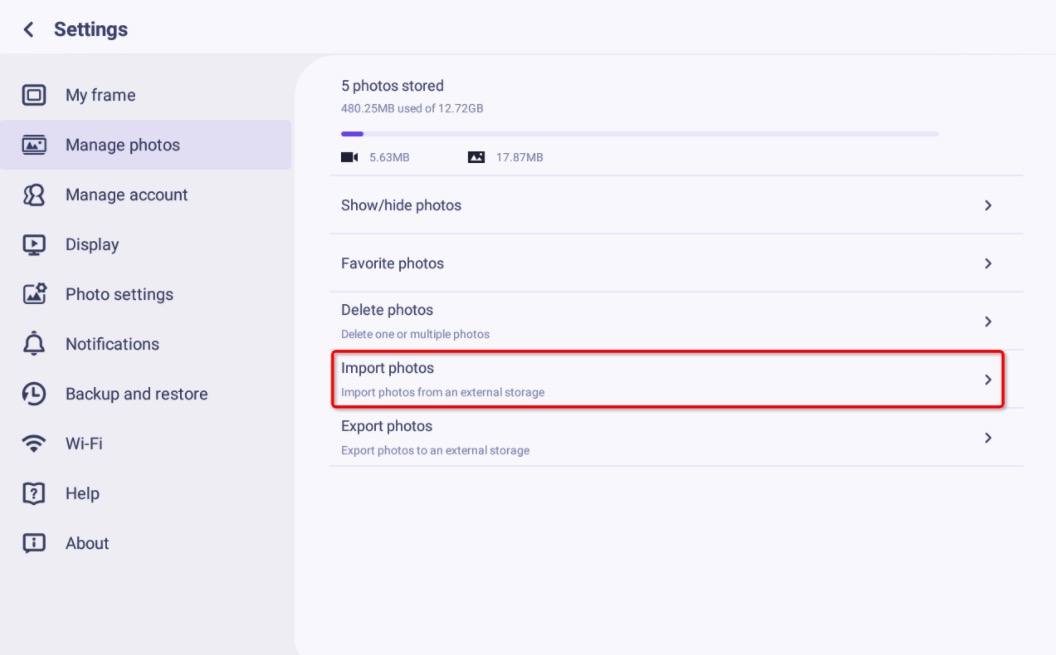
Import photos
1)Open the Settings on your frame.
2)Press the “Manage photos” menu.
3)Press “Import photos”.
4)Tap to select the photos you want to import.
Note: Use the square icon in the top right corner to select or de-select all photos at once.
The frame will now begin to import the photos to the frame’s storage (this may take a minute depending on the number of photos being imported).
| Photo requirements | Description |
| Photo format | .jpg .jpeg .png |
| Photo size | <=8MB |
Import videos
From Uhale version 3.2.0 you can import videos from external devices! It’s still an experimental feature, which means that bugs and problems can occur. Don’t hesitate to reach out to our support team in case you experience any problems.
Frames vary in their hardware specifications, which means that some frames will be better equipped to handle larger videos than others. You can check the requirements and recommendations for video files below.
Requirements for importing videos
| Video requirements | Description |
| Video format | MP4/M4V/FLV/MKV/3GP |
| Max resolution | 1080P |
Note: If the video does not meet these requirements, the frame will not be able to import the video.
Recommended limits for importing video
Your frame may show a warning in case the video file does not meet the recommended limits for video import. In many cases you will be able to import the video regardless of the warning. However, we strongly recommend following the recommended limits to ensure a smooth experience with your frame.
Here is a table with the recommended limits for a video:
| Video suggestions | Description |
| Video length | 1 sec—5 min |
| Video file size | 1MB -130MB |
| Max resolution | 1080P |
| Frame rate | 30 frames per second |
| Bitrate | 2-10Mbps |
Transcode video
If a video does not match the recommended limits, we suggest that you transcode the video to match the recommendations.
There are plenty of tools (e.g. video editing software, video converters, video transcoders etc.) that make it possible to convert and transcode videos to match these recommended limits.
Although we’re unable to provide support on how to use any specific tools, we enjoy using the free and Open Source video transcoder HandBrake, which is supported on Windows, Mac and Linux.
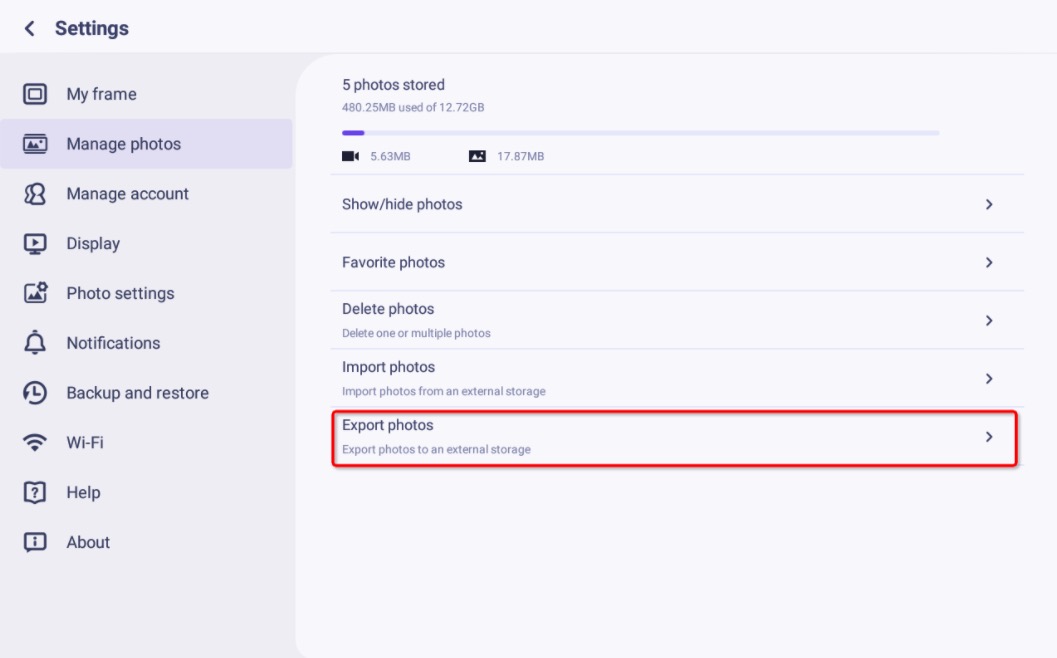
How to export photos and videos
You can export your photos out of your frame to external devices using the export feature. Here’s a guide!
Export Photos
1)Insert external devices into the frame
2)Open the Settings on your frame
3)Press the “Manage photos” menu
4)Press “Export photos”
The frame will start exporting all the photos and videos that you have on your frame – this may take a minute to finish.
The photos will be located on the external devices in a folder called “export”.
How to format an SD card
Your frame may have certain requirements with regards to the technical specifications of the SD card. Almost all frames have the following requirements:
1.The maximum storage of the SD card should be 32GB or less. (Some frames support higher capacity SD cards, such as 64GB or 128GB. Please refer to the product list or packaging for details.)
2.The format of the SD card should be FAT32 (most SD cards of this size are FAT32/ by default)
If you need to format the SD card to FAT32, here’s a quick guide to to do so depending on your computer’s operation system.
Warning:
If you format an SD card, all of the data stored on it will be deleted. Formatting SD cards is a normal thing to do and is usually required to make them compatible with the device that they will be used with. So please consider backing up the data on the SD card before formatting it if there is any.
Windows computers
1.Open the File Explorer (Where all your folders and files are found)
2.Locate This PC in the sidebar on the left and click it
3.Insert the SD card into your card reader
4.Right-click the SD card and select Format
5.Select the format FAT32 and a name and press Start
6.Wait for the formatting to finish before safely removing the card from the card reader
mac OS computers (Apple computers)
1.Insert the SD card into your card reader
2.Open the Disk Utility app
3.Select your SD card
4.Press “Erase”
5.Select the format FAT32 and a name and press Erase
6.Wait for the formatting to finish before safely removing the card from the card reader
How to make a backup of a frame/How to restore a frame from a backup
Uhale supports backing up photos to external device and also restoring data from the external device to the frame.
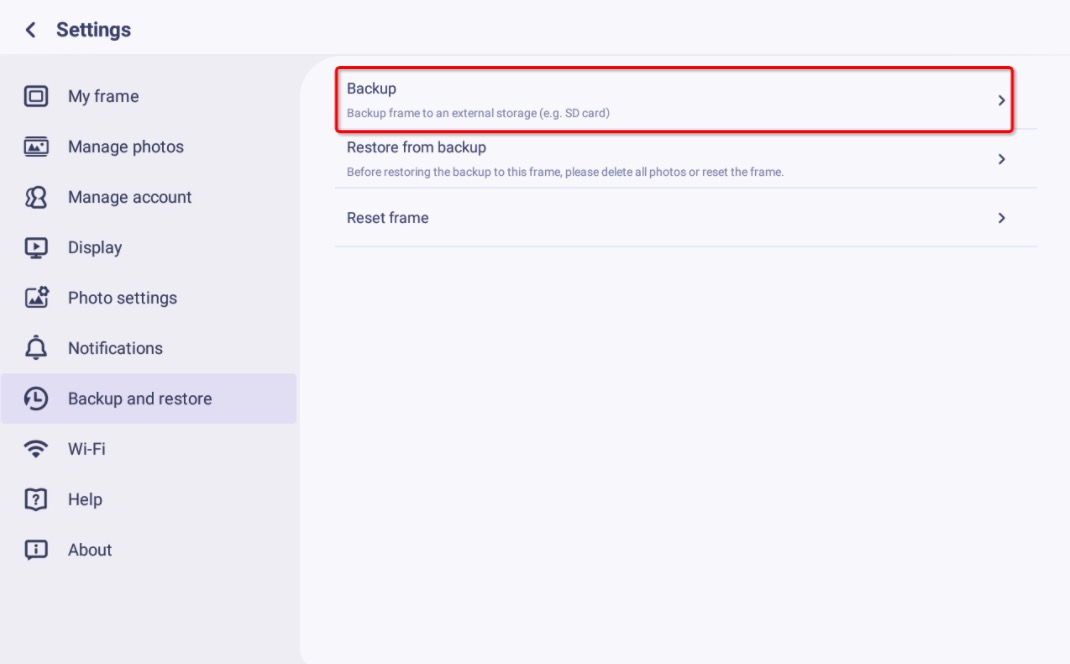
How to make a backup of a frame
1)Insert the external device (e.g. microSD card) into the frame
2)Go to Settings -> Backup and restore
3)Tap “Backup”
The frame should now begin the backup of your photos. (This may take a few minutes depending on the number and size of the photos and videos).
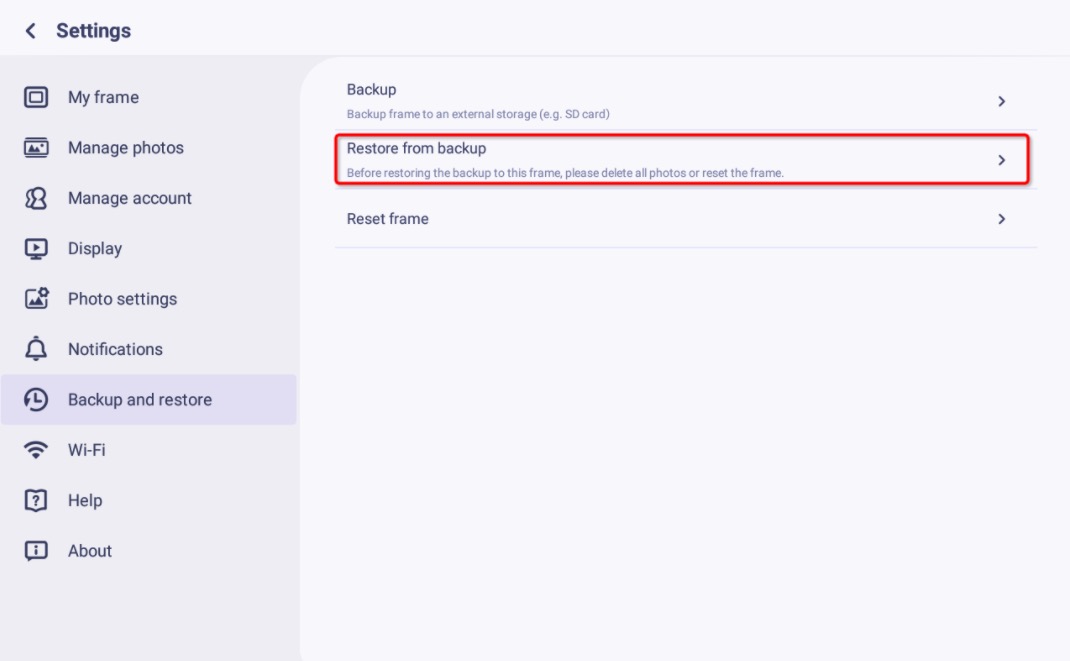
How to restore a frame from a backup
To restore a frame from a backup, you will first need to make a backup of your frame.
Afterwards, you can safely reset the frame and use the backup to restore the frame at a later point.
1)Delete all photos (Go to Settings -> Manage photos -> Delete photos)
2)Go to Settings -> Backup and restore -> Restore from backup
3)Wait for the frame to finish restoring the frame from the backup
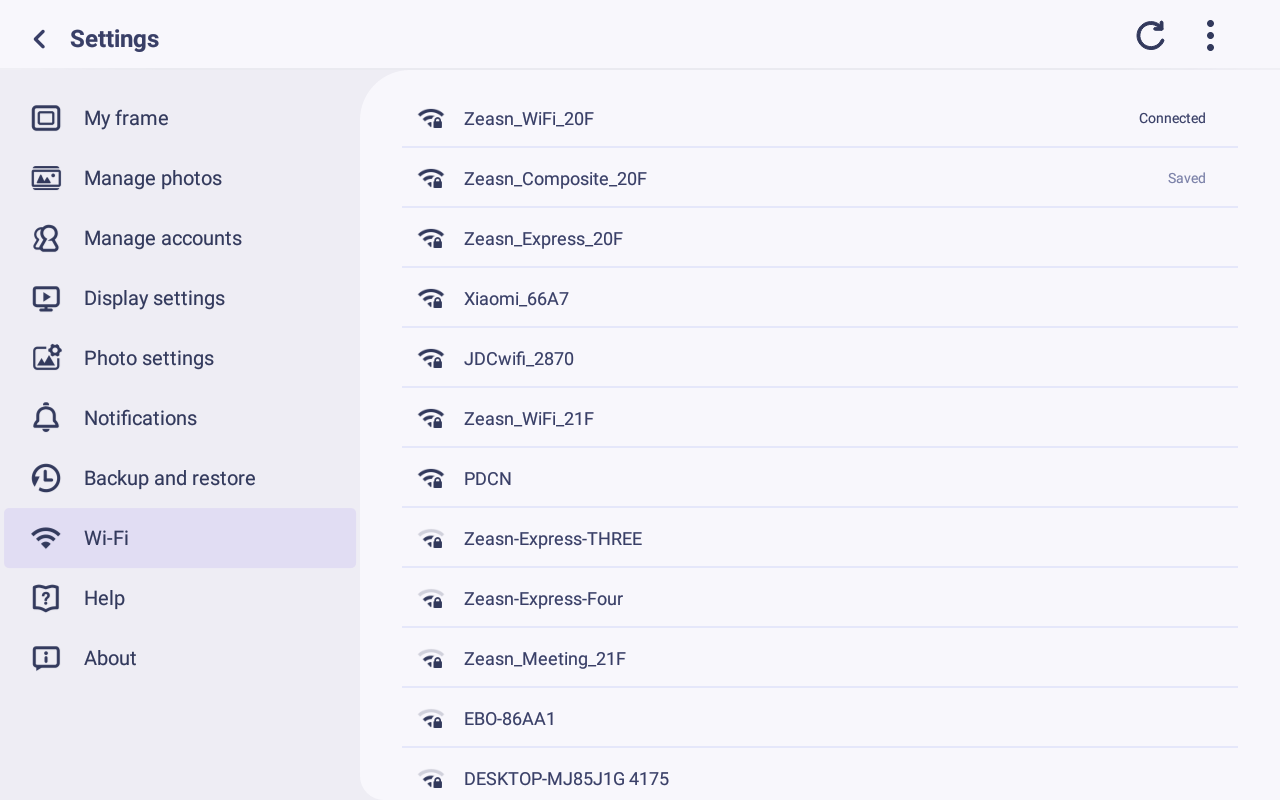
How to Connect to a Wi-Fi
Connecting your frame to your Wi-Fi is really easy!
Just follow these steps:
1. Open the Settings on your frame
2. Go to the Wi-Fi submenu
3. Find and press your Wi-Fi in the list of available networks
4. Enter the Wi-Fi password and press connect
5. Wait for the “connection status” to say connected
PC transfer via USB cable
From version 4.1.0 of the Uhale digital photo frame, you can now transfer photos and videos from your computer to the frame via a USB cable.
Here are the steps to do so:
1. Use a USB cable to connect the computer and the photo frame.
2. On the photo frame, go to Settings > Manage Photos, and find the option to transfer from the computer.
3. Open the computer transfer page, and the photo frame will automatically start connecting to the computer. Once the connection is successful, it will display a connected status. With the frame connected, you can now copy photos and videos from your computer to the photo frame.
4. Open your computer, and you should be able to find the photo frame’s folder named “DCIM” in the File Explorer.
5. Copy the photos and videos you want to transfer into the “DCIM” folder.
6. Wait for the data transfer to complete. After the transfer is finished, you can view and play the copied photos and videos in the photo frame’s gallery. The copying speed will depend on the number and size of your photos and videos.
Note:
1. Do not disconnect the USB cable during the copying process.
2. Currently, only Windows and Linux systems are supported; the Mac system is not supported.
Unsupported Files
Your photo frame does not support all file formats, which means some files may not display when transferred. To identify any unsupported files that have been transferred, follow these steps:
1. Go to Settings > Manage Photos.
2. Find the computer transfer option, and locate the unsupported files.
3. Click Manage, and you will be able to see the unsupported photos and videos.
4. You can choose to delete all unsupported photos and videos at once to free up storage space.
If a photo or video is not displayed in the slideshow, it may be because the file format is not supported by your frame. See below for more information on supported photo and video formats.
Supported Photo Formats
| Photo | Description |
| Photo formats | JPEG/JPG/PNG |
| Photos size | <=4MB |
Supported Video Formats
| Video | Description |
| Video formats | MP4/M4V/MOV/FLV/MKV/M2TS/3GP |
| Video size | Unrestricted |
| Video length | Unrestricted |
| Video resolution | <=1080P |
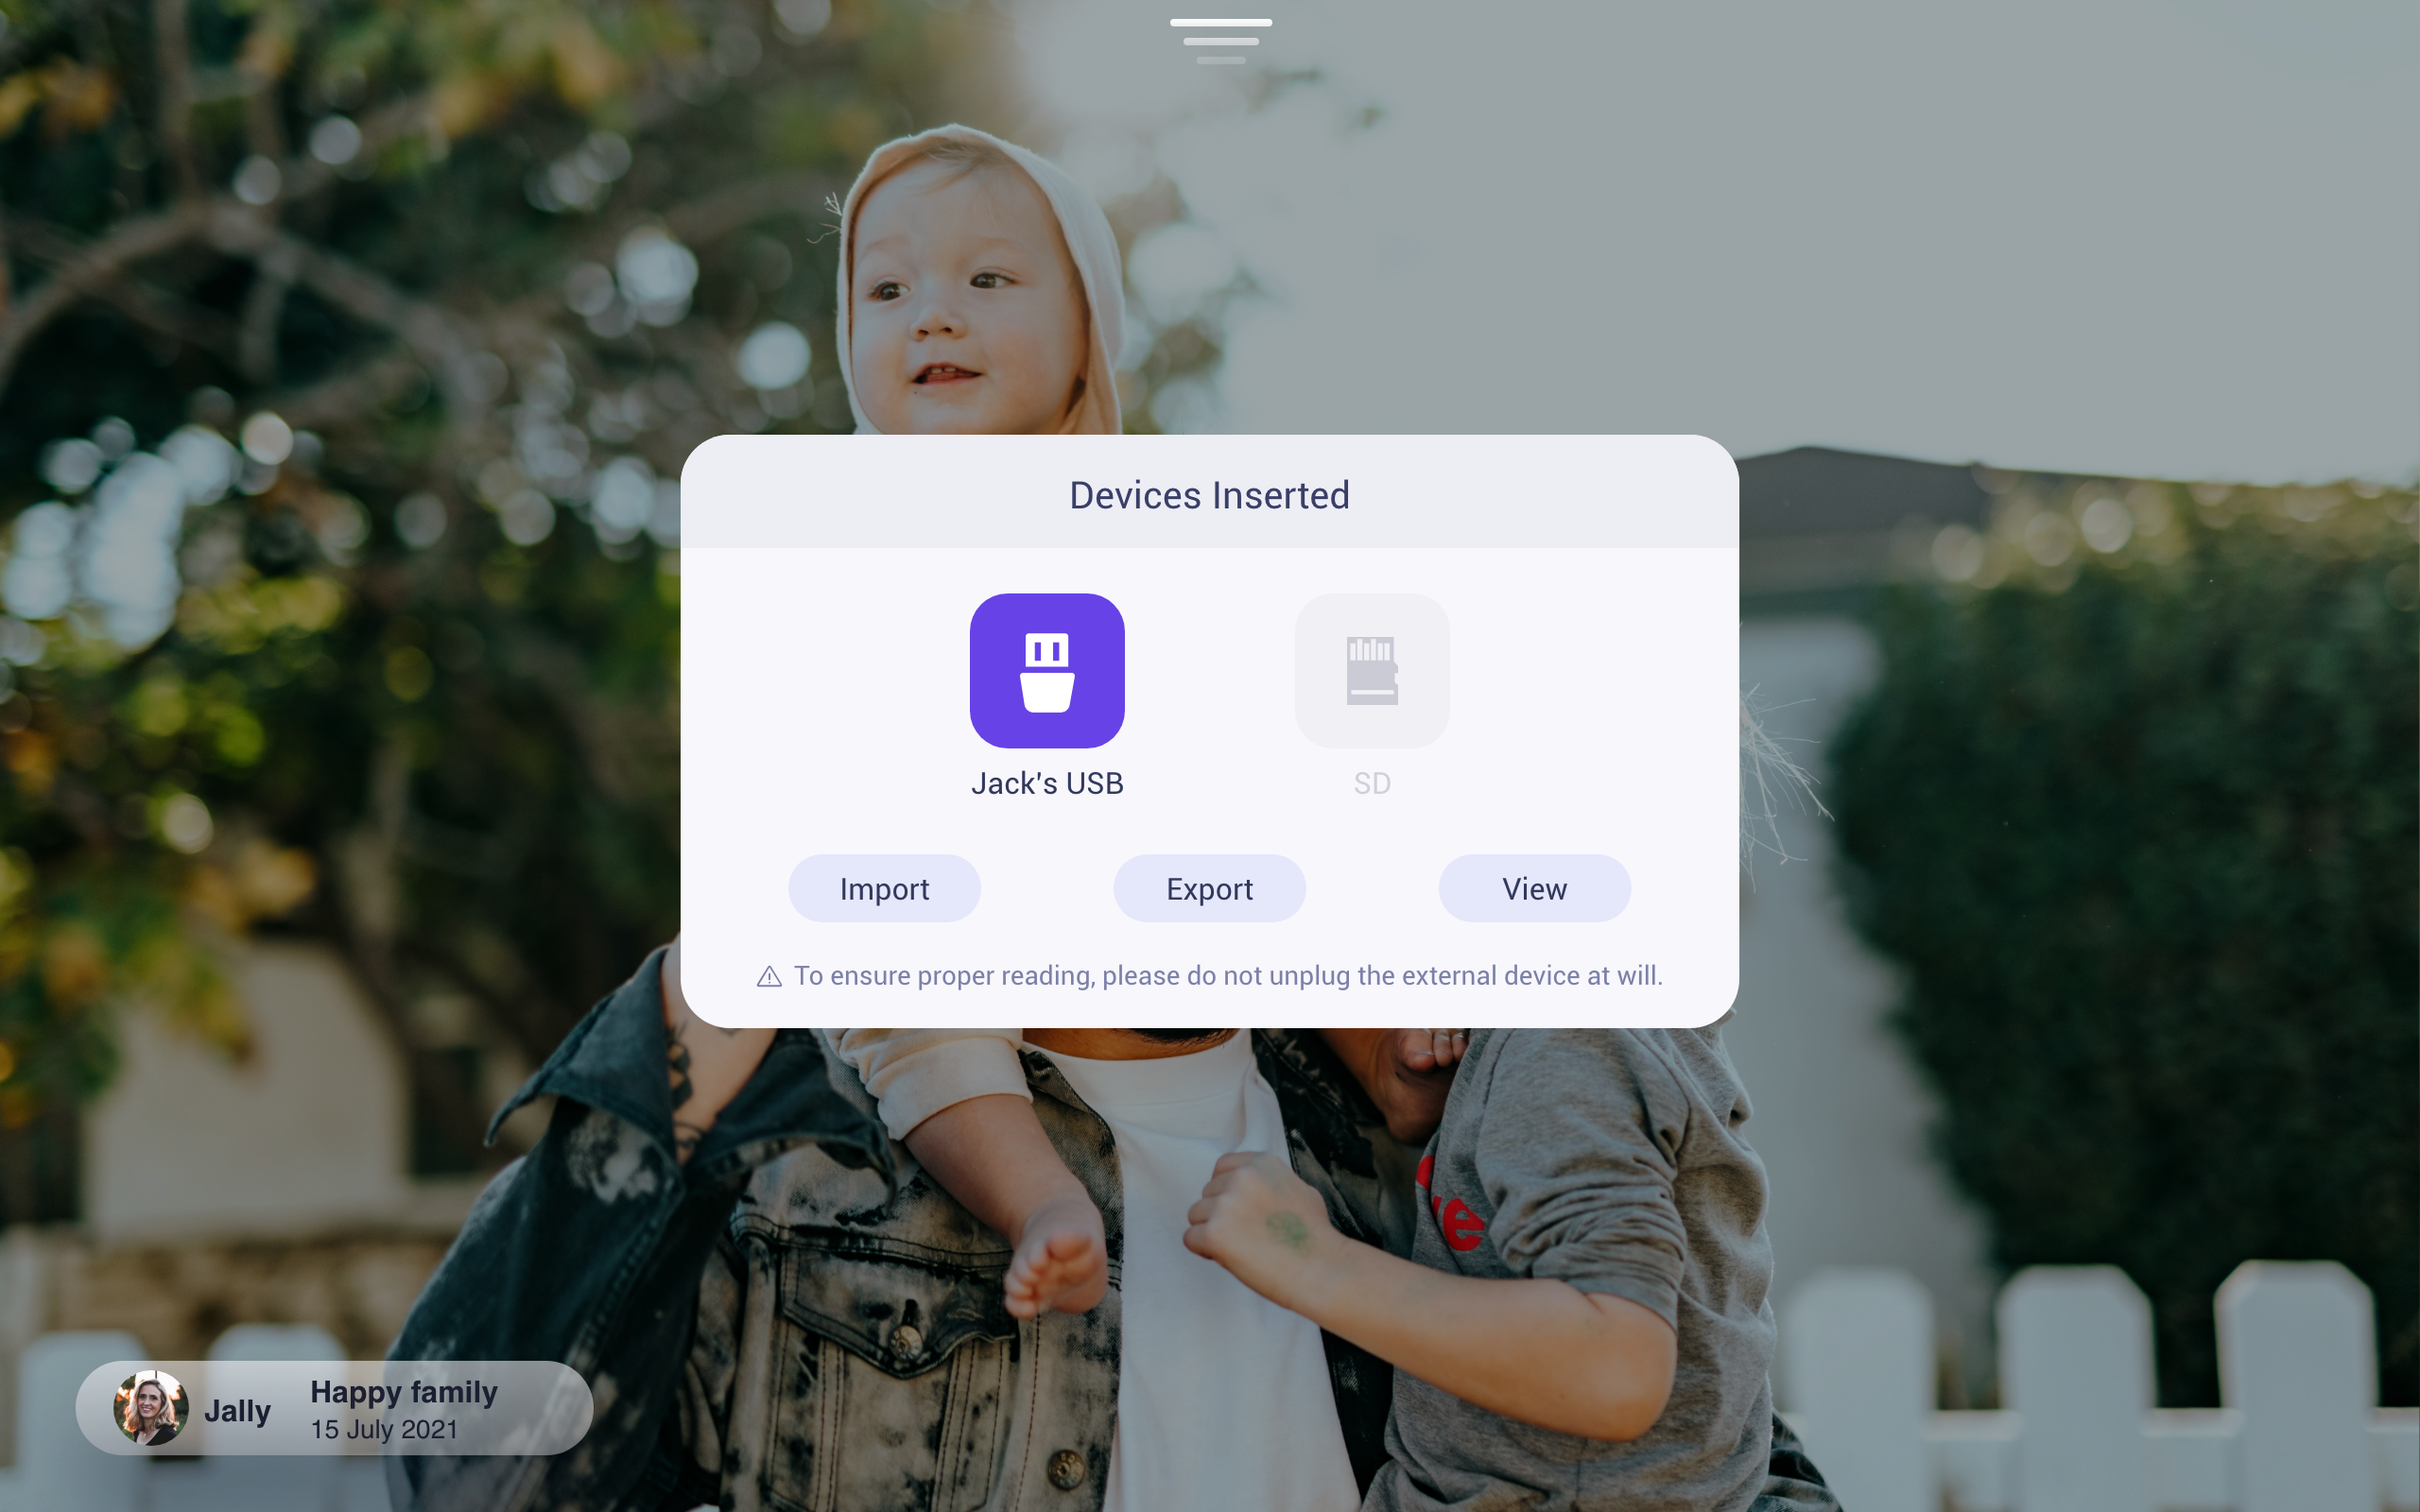
Play photos/videos from external storage
From Uhale version 3.2.0 you can play photos and videos directly from an external storage (e.g. a micro SD card) without the need to take up space on the frame’s internal storage.
Step:
1)Plug in the external storage
2)Select “View” in the menu that appears
You can view the rules in the gallery.
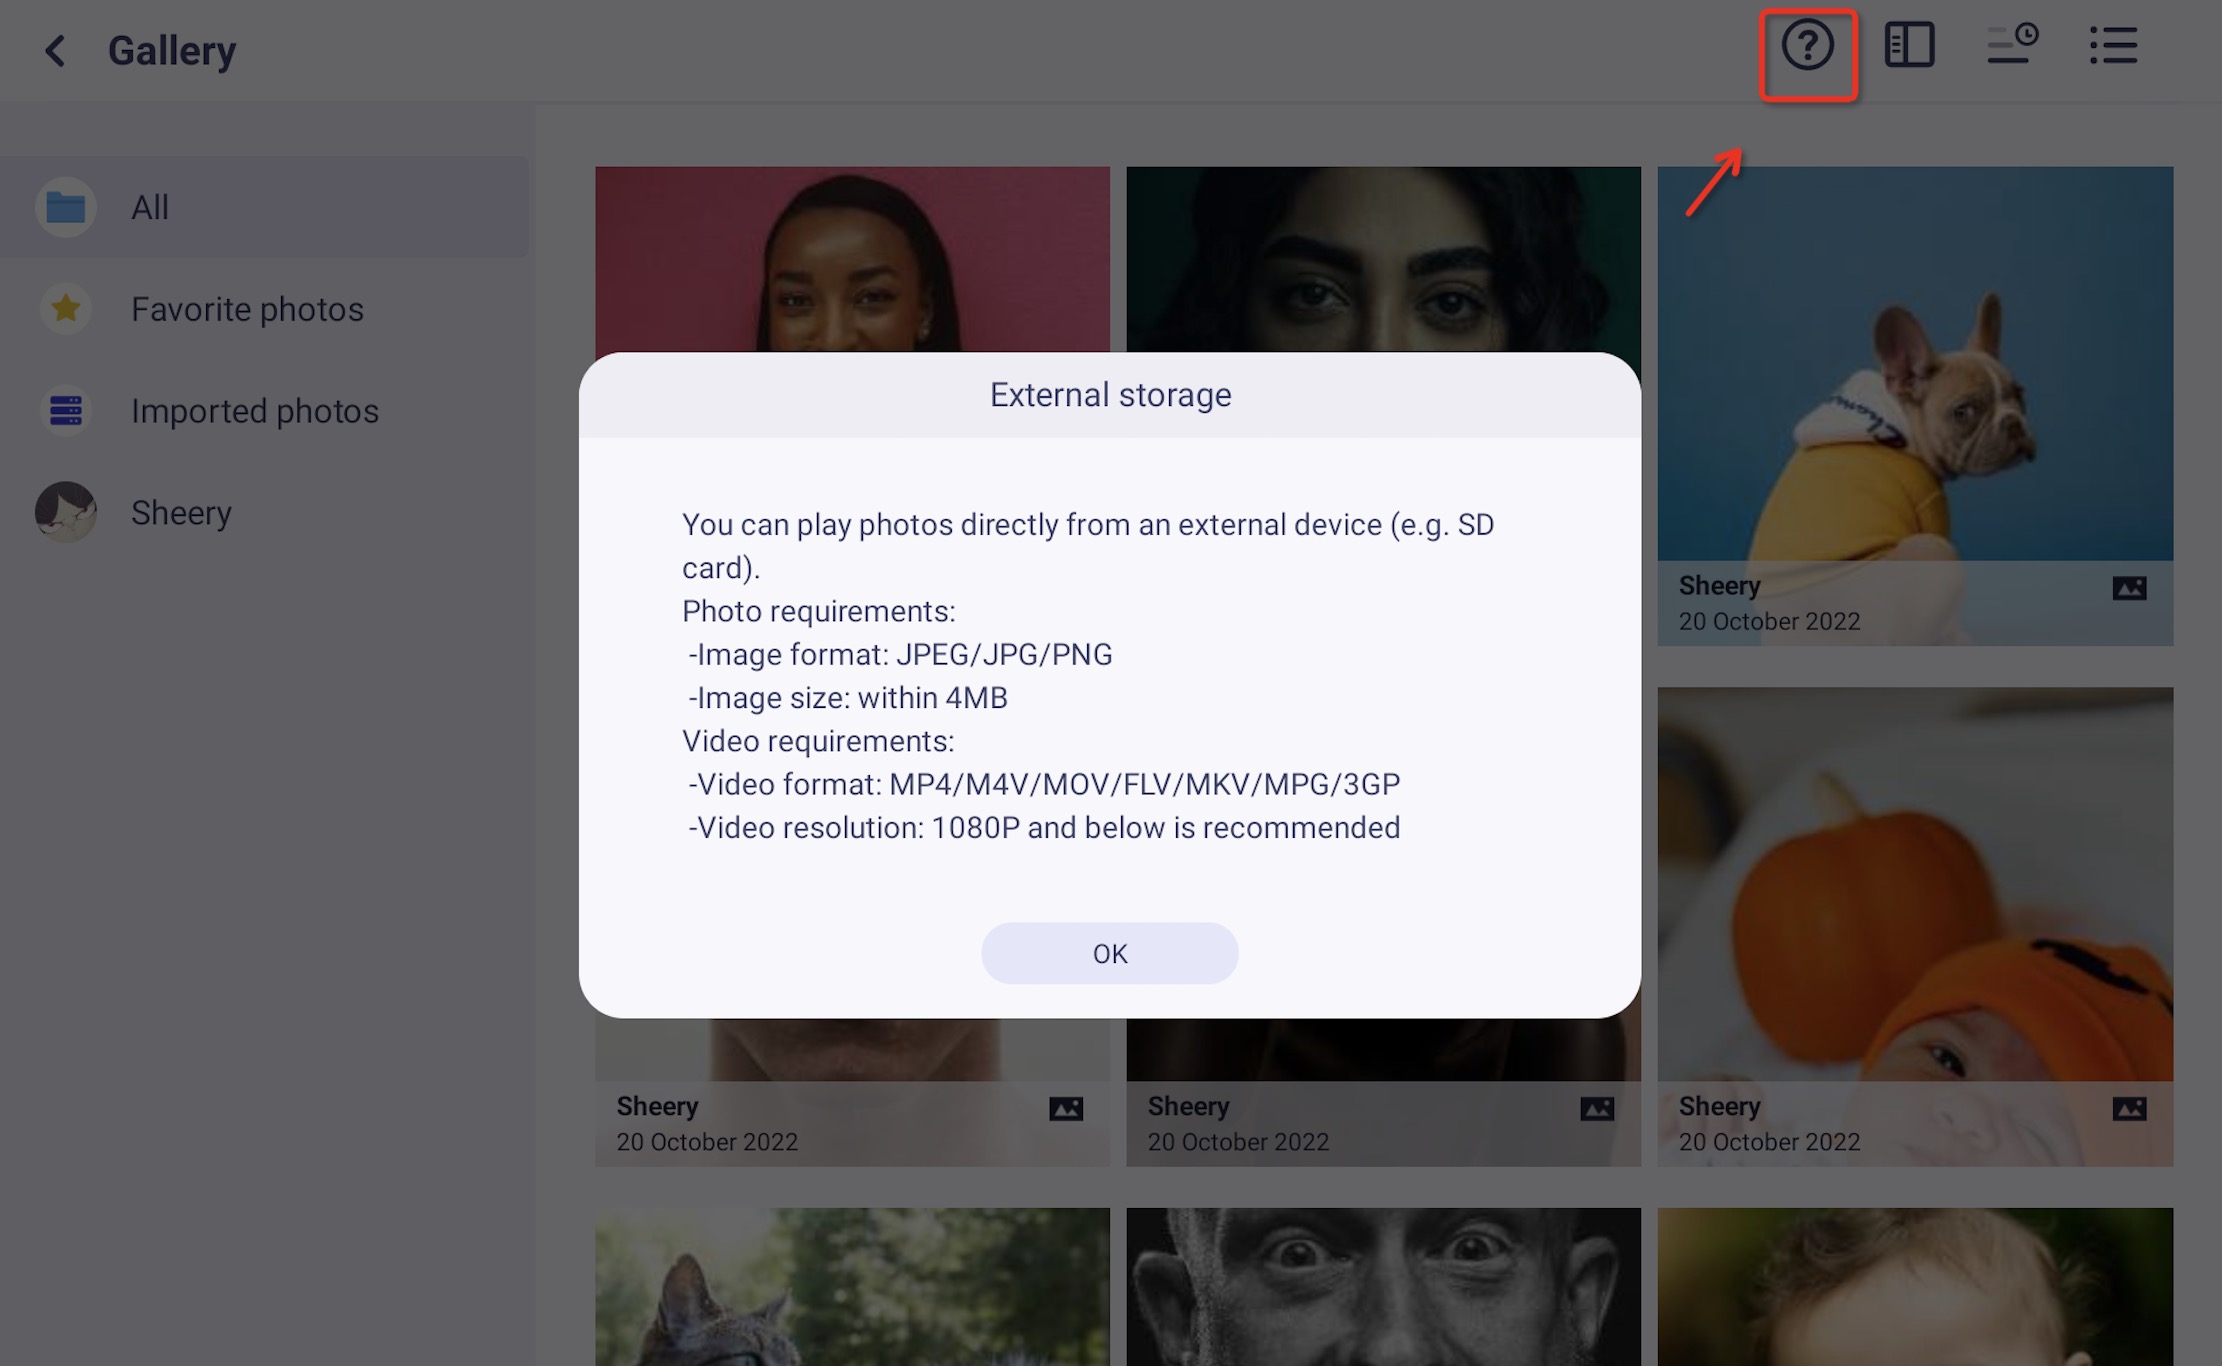
If a photo or video is not displayed in the slideshow, it may be because the file format is not supported by your frame. See below for more information on supported photo and video formats.
Supported Photo Formats
| Photo | Description |
| Photo formats | JPEG/JPG/PNG |
| Photos size | <=4MB |
Supported Video Formats
| Video | Description |
| Video formats | MP4/M4V/MOV/FLV/MKV/M2TS/3GP |
| Video size | Unrestricted |
| Video length | Unrestricted |
| Video resolution | <=1080P |
Frames vary in their hardware specifications, which means that some frames will be better equipped to handle larger videos than others.
How to connect the frame to a smartphone hotspot
Being able to connect your frame to a smartphone hotspot can come in handy in cases where a Wi-Fi is not available or for troubleshooting your frame’s Wi-Fi connection.
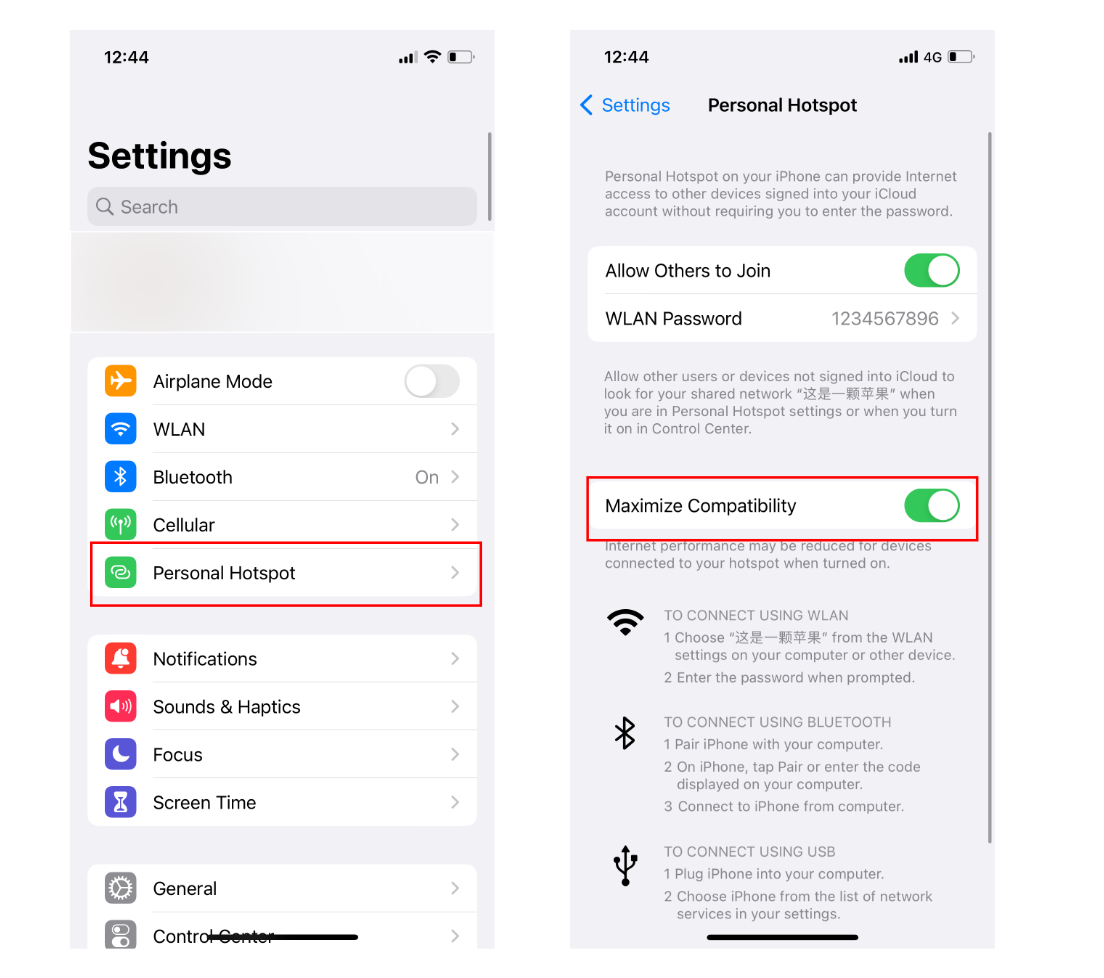
1.Hotspot on an iPhone
1)Go to Settings
2)Go to “Personal Hotspot”
3)Enable “Allow Others to Join” and set a Wi-Fi password
Note: If you have an iPhone 12 or later, make sure to enable the setting “Maximize Compatibility”
2.Hotspot on an Android
Steps may vary slightly between different Android phones
1)Go to Settings
2)Go to “Network & internet”
3)Go to “Hotspot & tethering”
4)Set up a hotspot with a name and a password and turn it on
Note: If you see a “Band” or “Advanced” setting, make sure to set the band to “2.4 GHz”
Once enabled, the name of the hotspot should appear in the Wi-Fi settings on the frame, where you can tap it and connect to it with the password you set.
Download the Uhale App
Uhale Frame displays wonderful moments shared by mobile devices. Touch-screen operation is easy to use, making sharing photos and videos smoother and more convenient.
Download the App by scanning the QR code.

Find the Uhale App on:
1)Android: Search for “Uhale” on Google Play
2)IOS: Search for “Uhale” on the App Store
How to send photos/videos from smartphone to frame
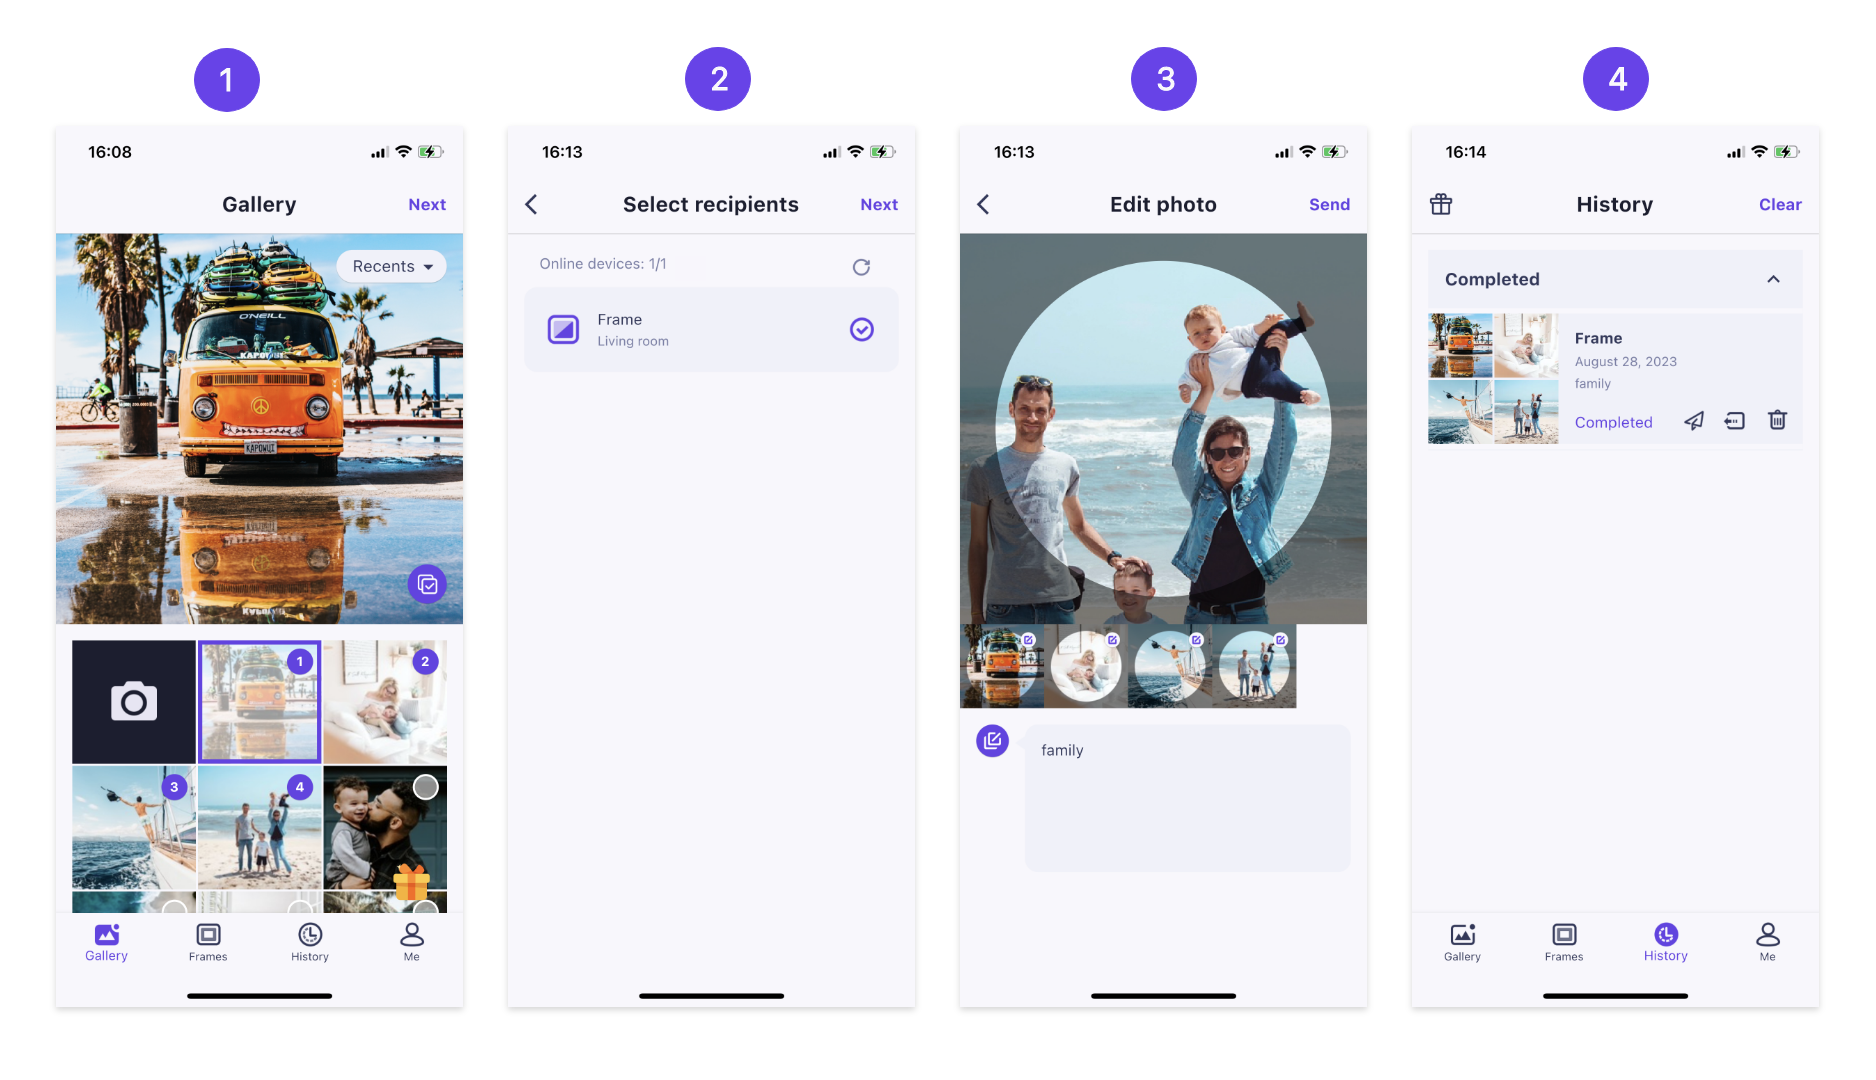
You can share photos/videos to frames via Uhale App.
1.Photo Share
Sharing photos is divided into picture share and video share.
Photo share: select pictures (up to 50 pictures) – select photo frames – edit pictures (adjust focus areas and name photos) – send.
Photo requirements
Android Photo format:.jpg .jpeg .png
iOS Photo format:.jpg .jpeg .png .heic .heif
2.Video Share
Video share: select video (only one video can be selected, 30 seconds length video) – select photo frame – edit video (video length and video naming) – send.
Video requirements
Android Video format: .mp4 .m4a
iOS Video format: .mp4 .m4a .mov
How to switch between albums in the App
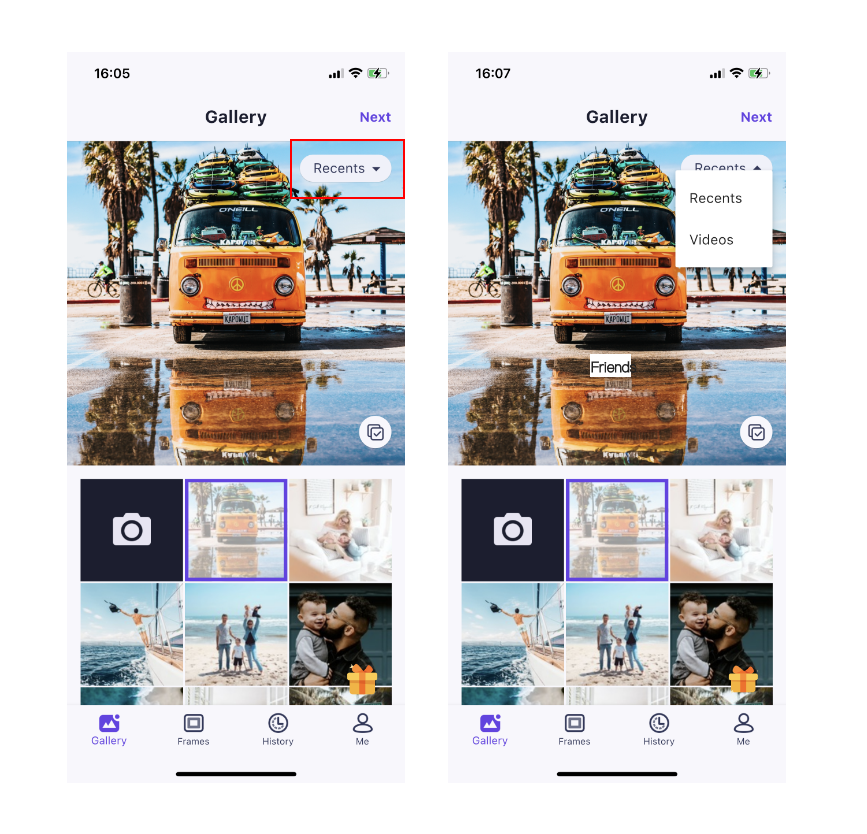
In the Uhale App you can easily switch between the different photo albums on your phone and thus make it easier to select specific photos!
Step:
1)Click on the Album button in the top left corner of the photo (The one highlighted in red on the photo below).
2)Select any photo album from your phone.
How to Allow Access to Photos in the Uhale App
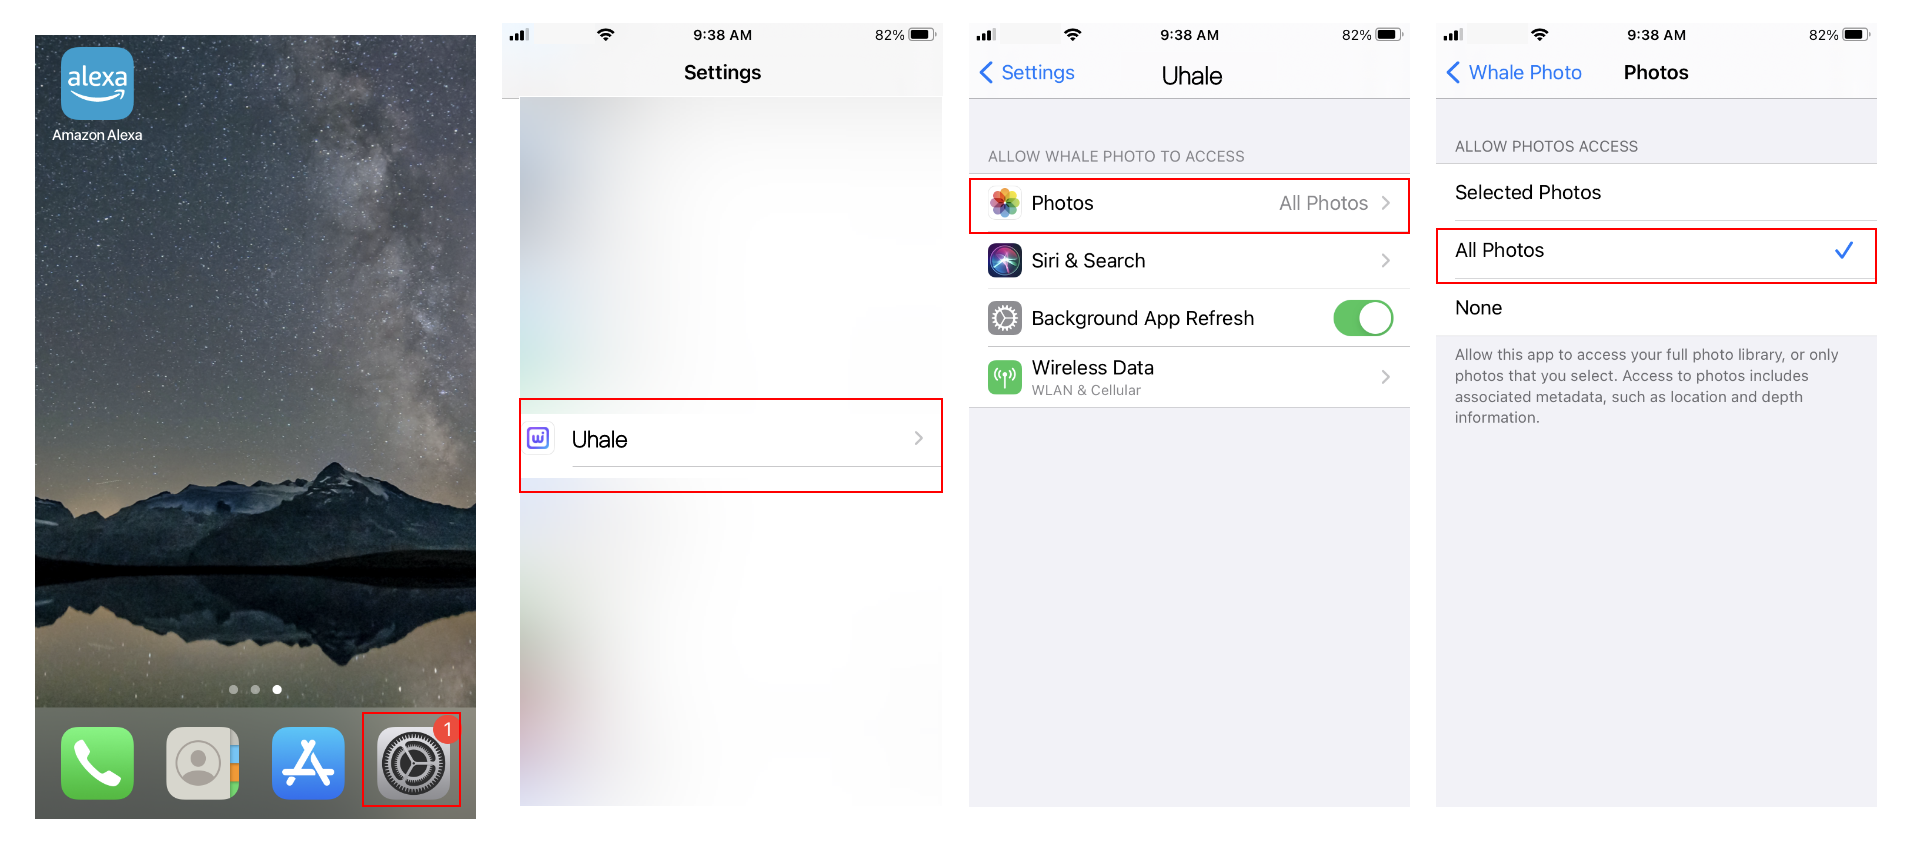
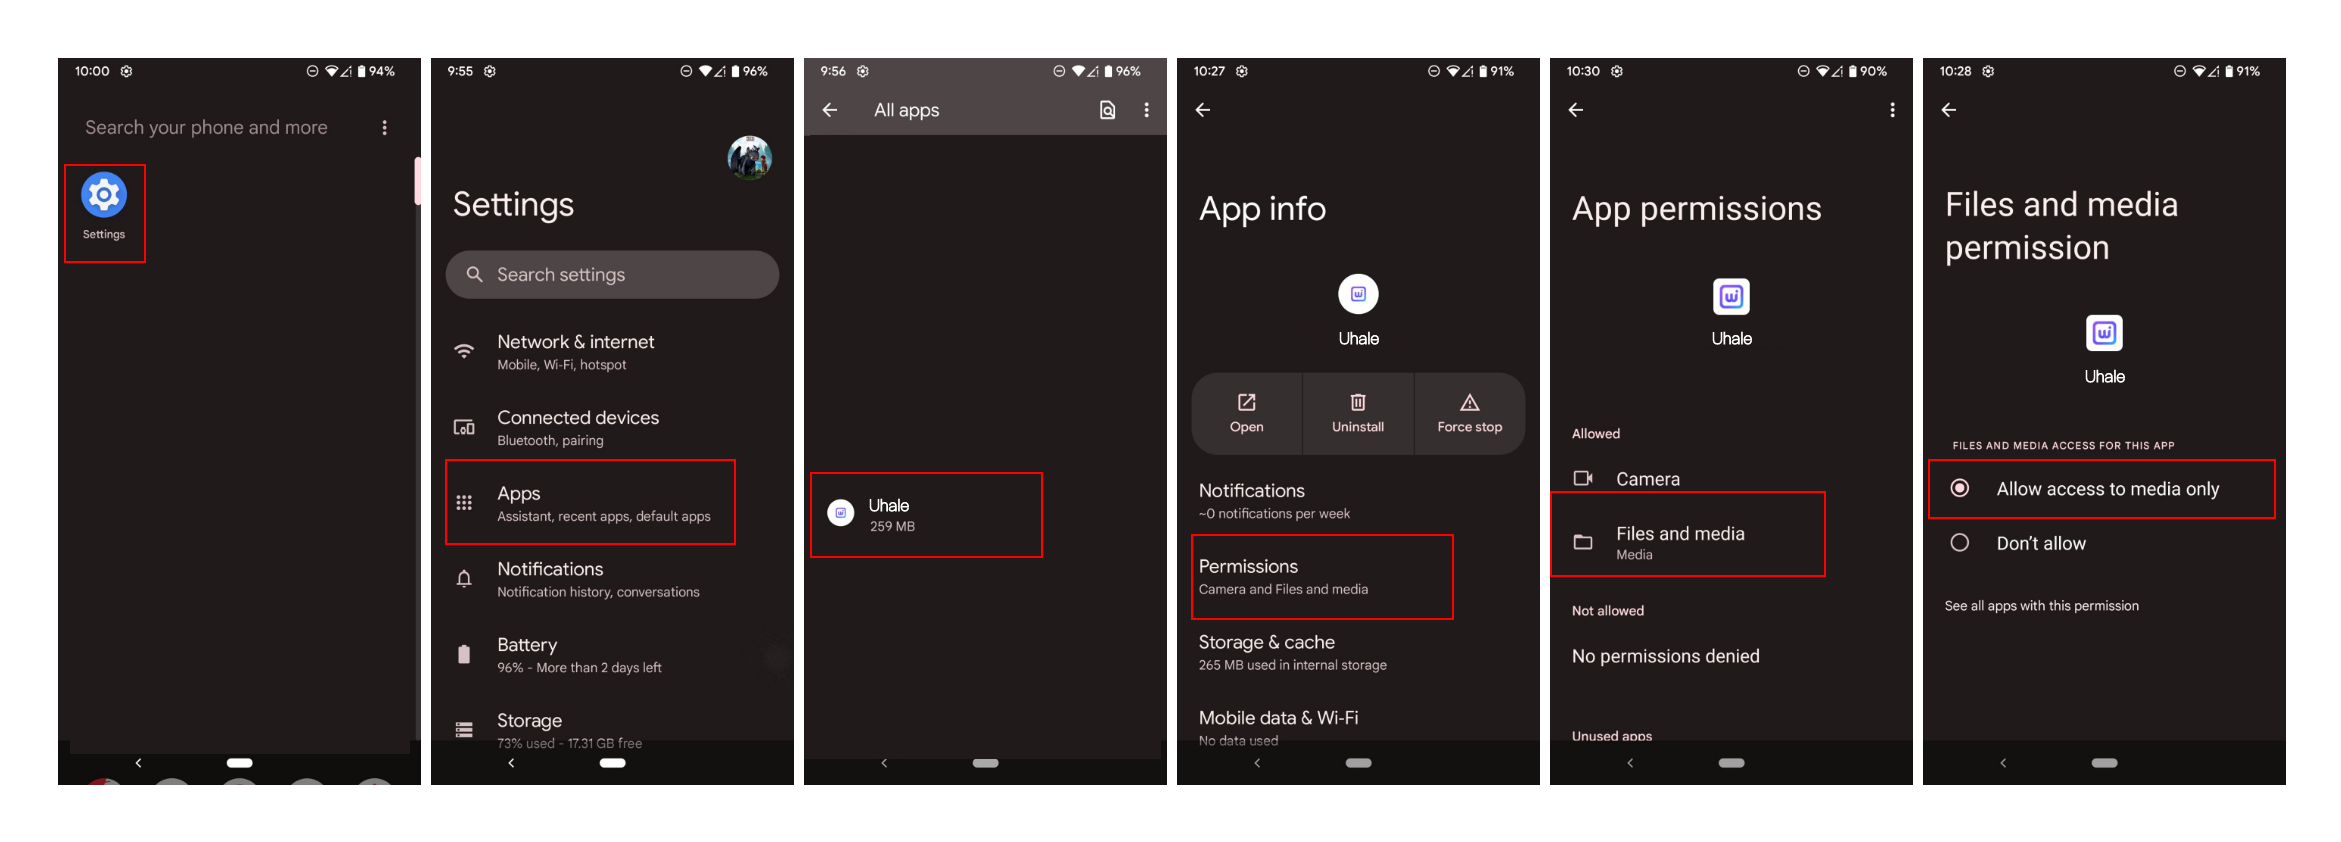
If you don’t see your photos in the Uhale Photo app, it might be due to the app lacking permission to see your photos.
How to Allow Access With an iPhone:
Please find Uhale Photo App in Settings-Photos-Select all photos.
How to withdraw photos/videos
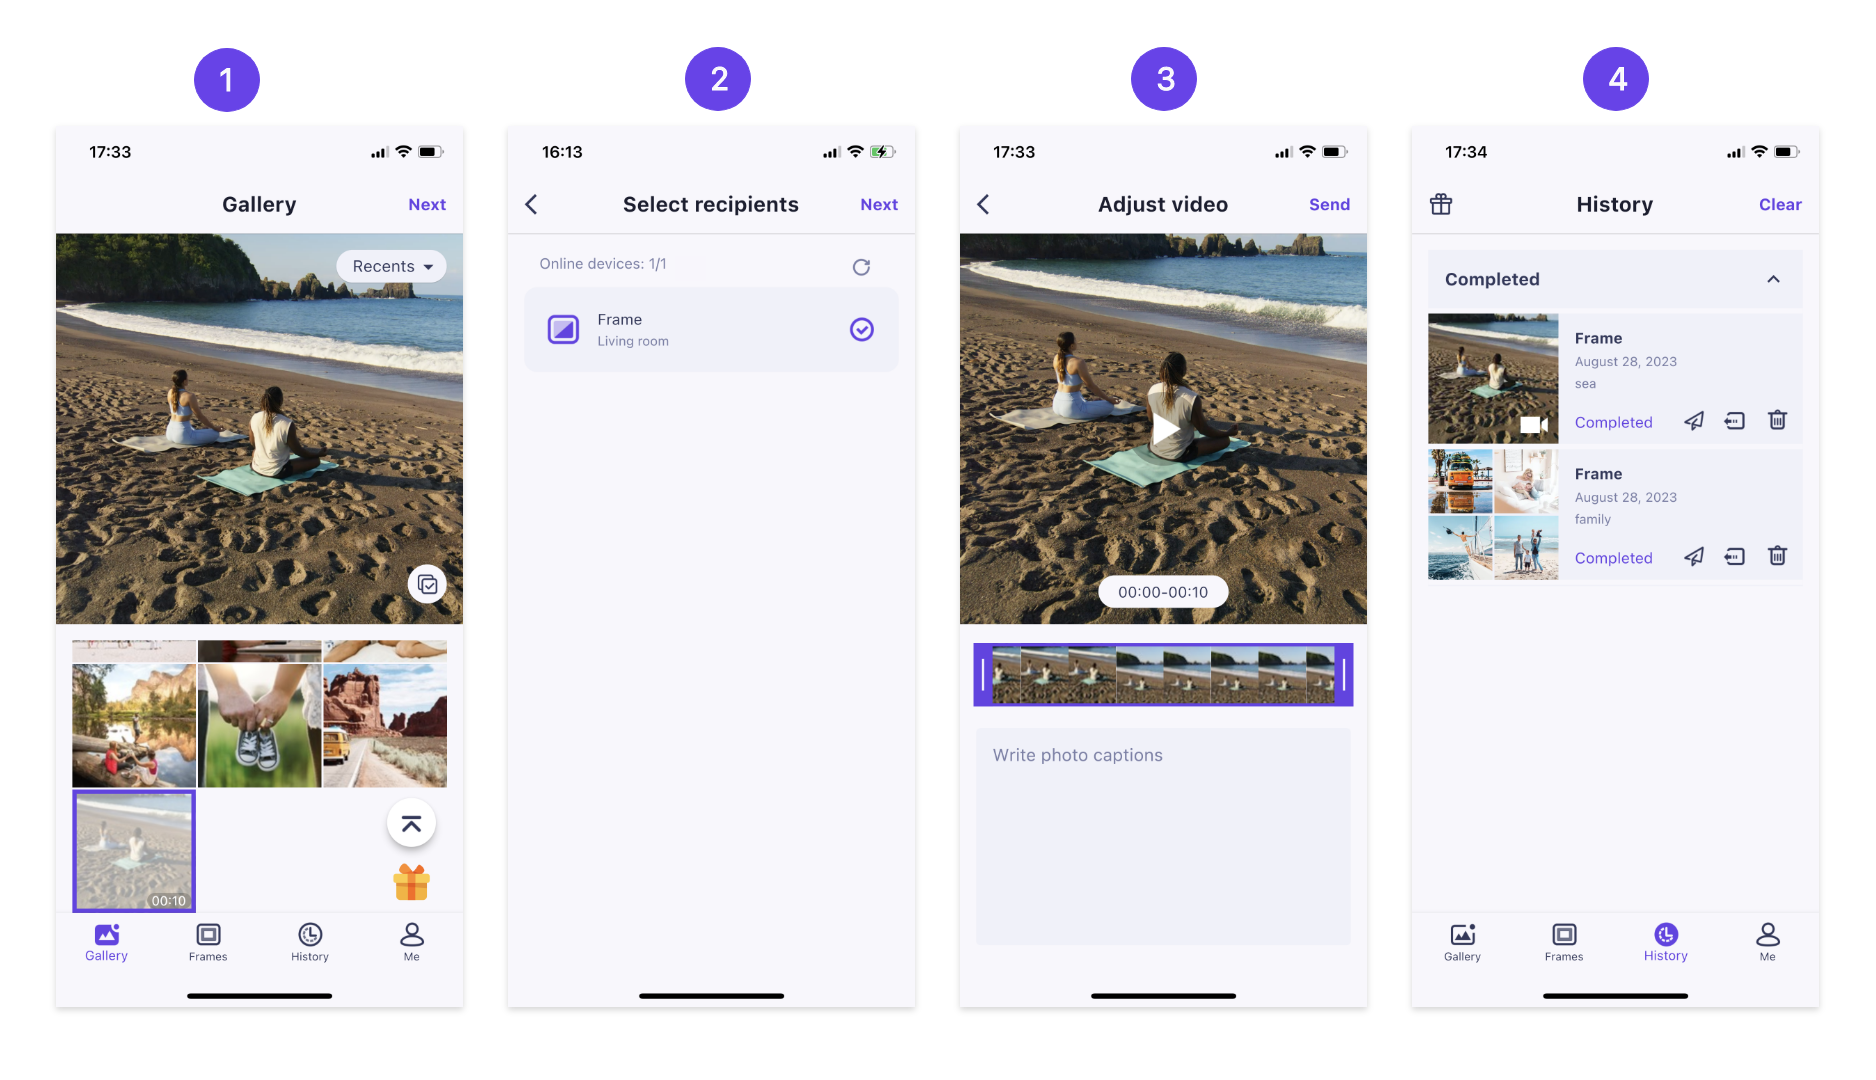
You can withdraw photos/videos which are already sent to frame from Uhale mobile app
note: withdraw only works when history is retained and frame stays online.
To withdraw: In Uhale “history” – select the icon of the ones you would like to withdraw.
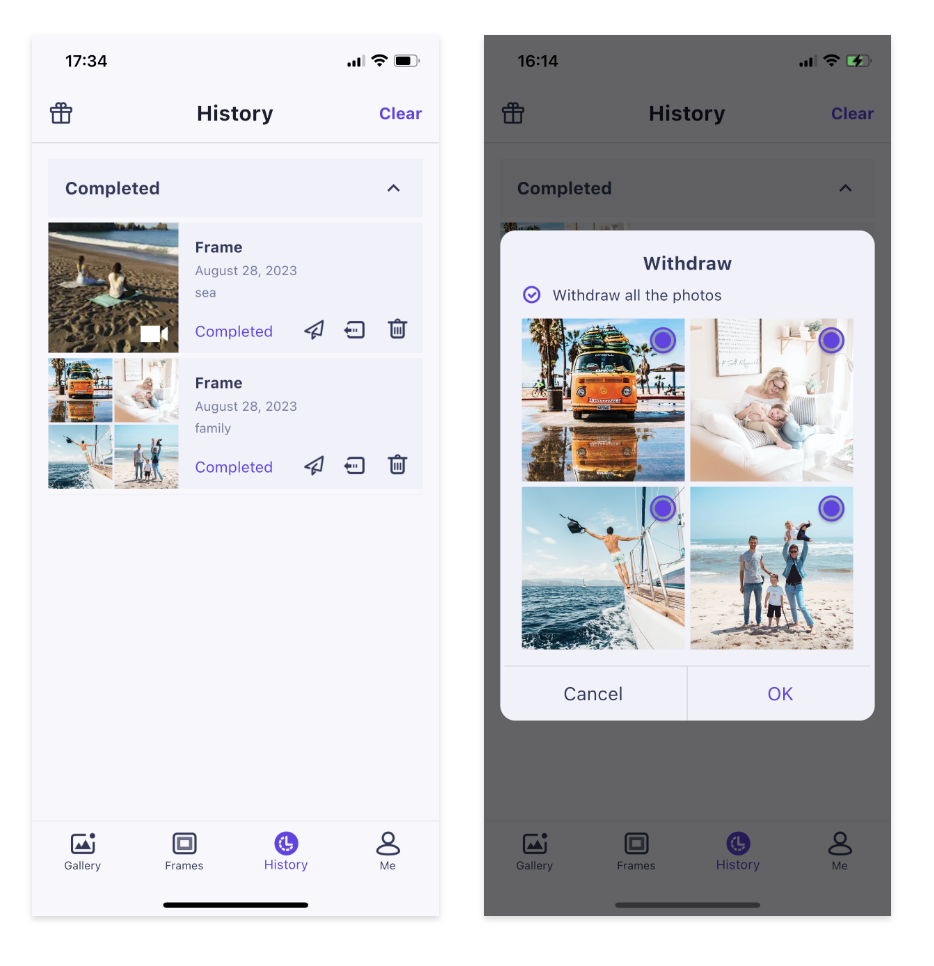
You can check the status of photo sending tasks and perform some quick actions on the sending history side.
1)Delete: Deletes local history data (does not delete frame photos).
2)Clear: clears the history data (does not delete the task in the sent state).
3)Resend: you can resend this photo to other frames.
4)Withdraw: Deletes local history data and frame photos, as long as the history record on the app exists and the frame is online, you can withdraw the photos.
How to send out wishes?
From Uhale frame version 3.3.0, you can send out wishes.
Step:
1.Open the Uhale APP on your phone.Tap the【Gift】icon.
Note: Please upgrade the APP to version 3.11 or above.
2.Write down your wishes in text;
3.Select a style;
– Send a greeting card
– Send Pop-ups
4.Instant “Wish”;
Set up an instant “Wish” and surprise your loved ones
5.Timed “Wish”;
Create a timed “Wish” to make sure not to miss out any important moment
6.Choose a frame(s) you would like to send wishes to;
7.You can check the wishes record in APP-History-“best wishes” icon.
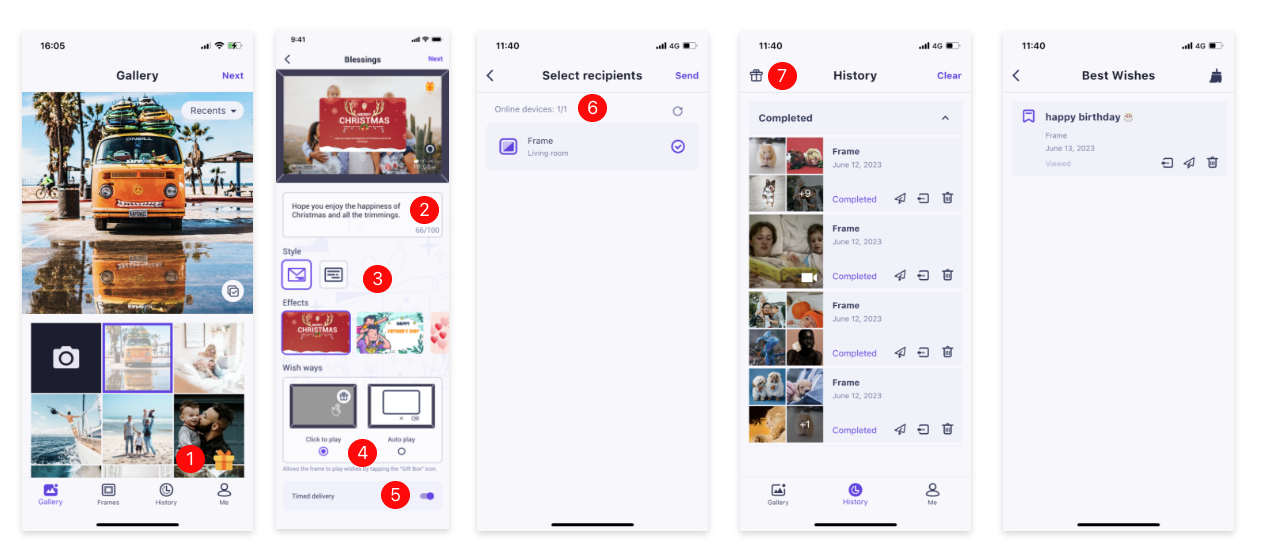
8.View the best wishes in the frame.
1)Pop-ups

2)Greeting card

How to log in/out of Webside
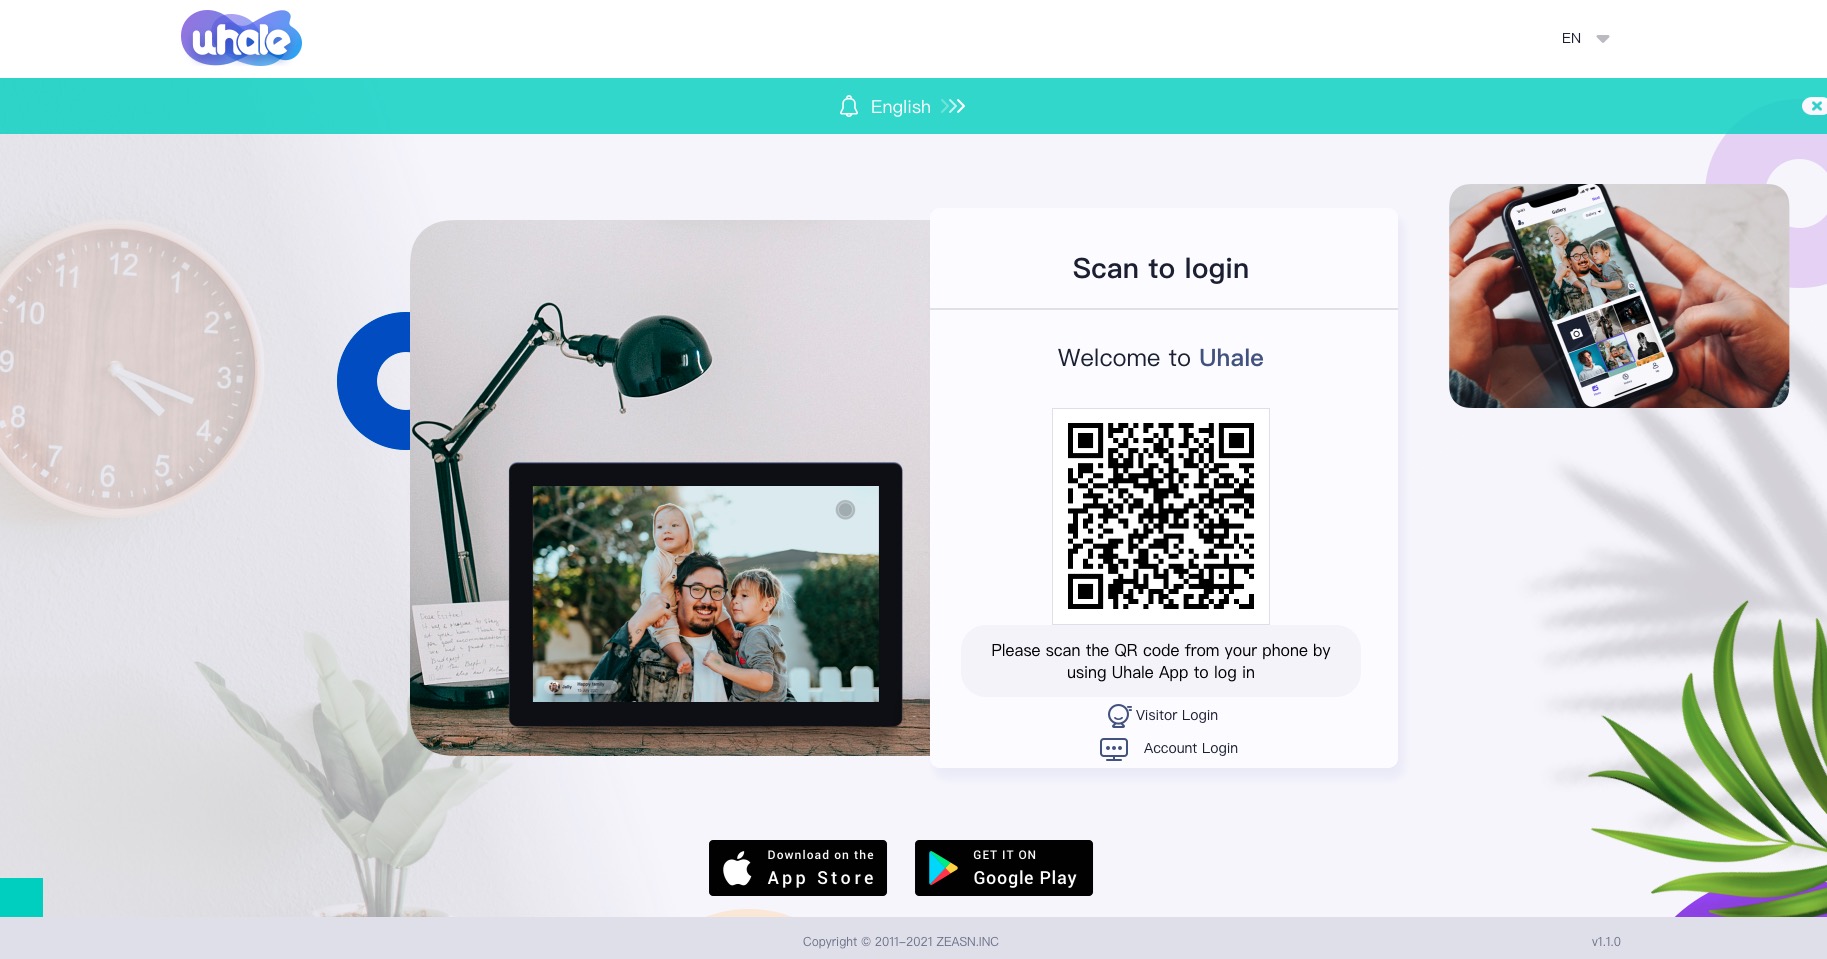
Visit the website to get access to Uhale Web: https://uhale.zeasn.tv
Log in
1.Scan code login
Download, install and open the “Uhale” APP on your mobile devices, and find the QR code under [Scan] to log in.
2.Account Login
Support login to the web terminal by account password.
3.Visitor Login
No need for an account, fast transfer. Sharing made easier.
Log out
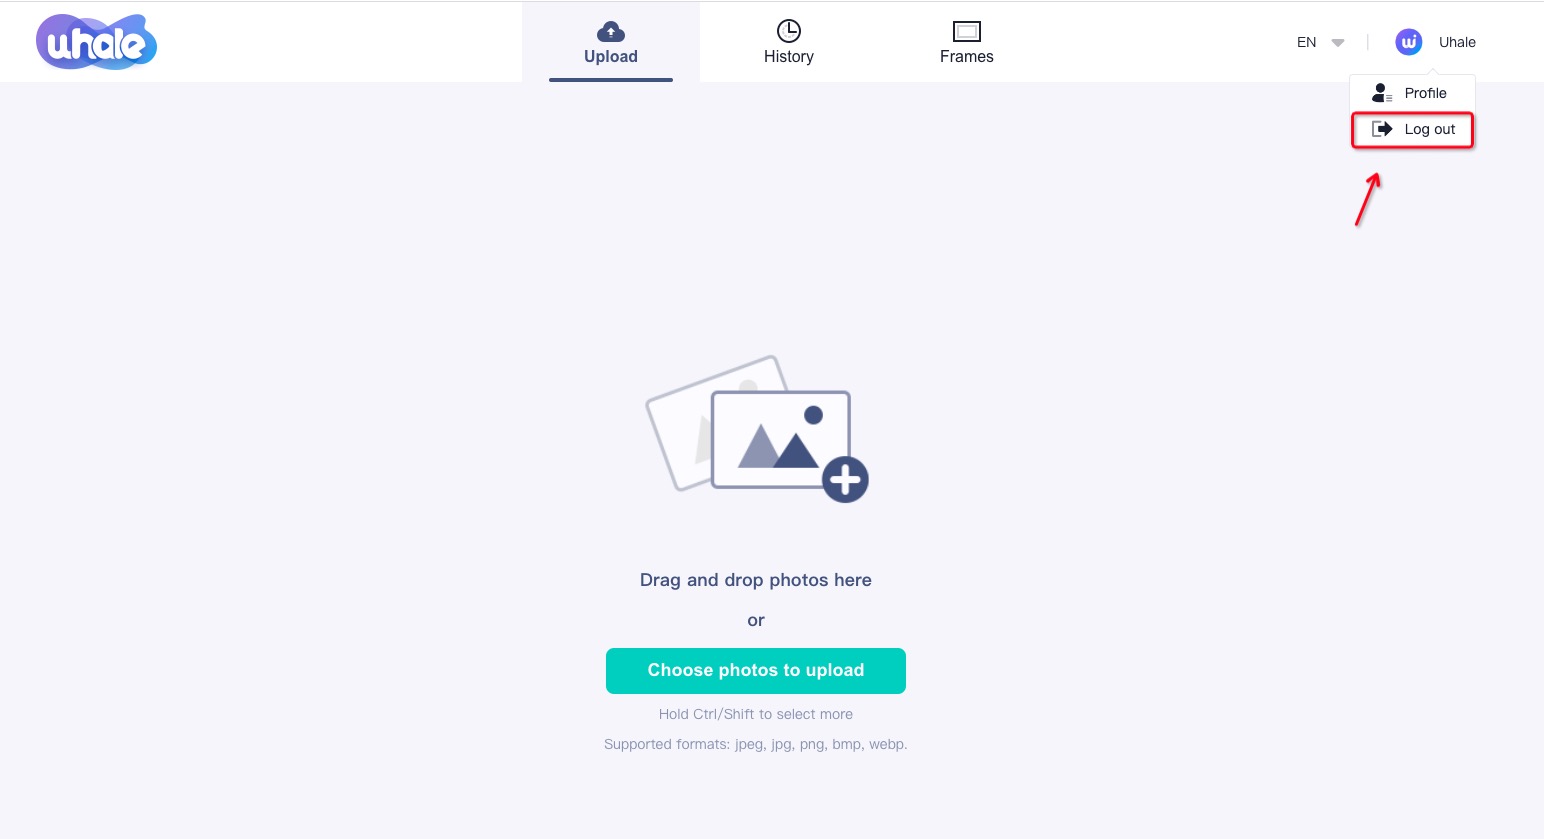
If you want to switch to another account for sharing, you can log out of your current account by clicking Logout in the upper right corner and log in again.
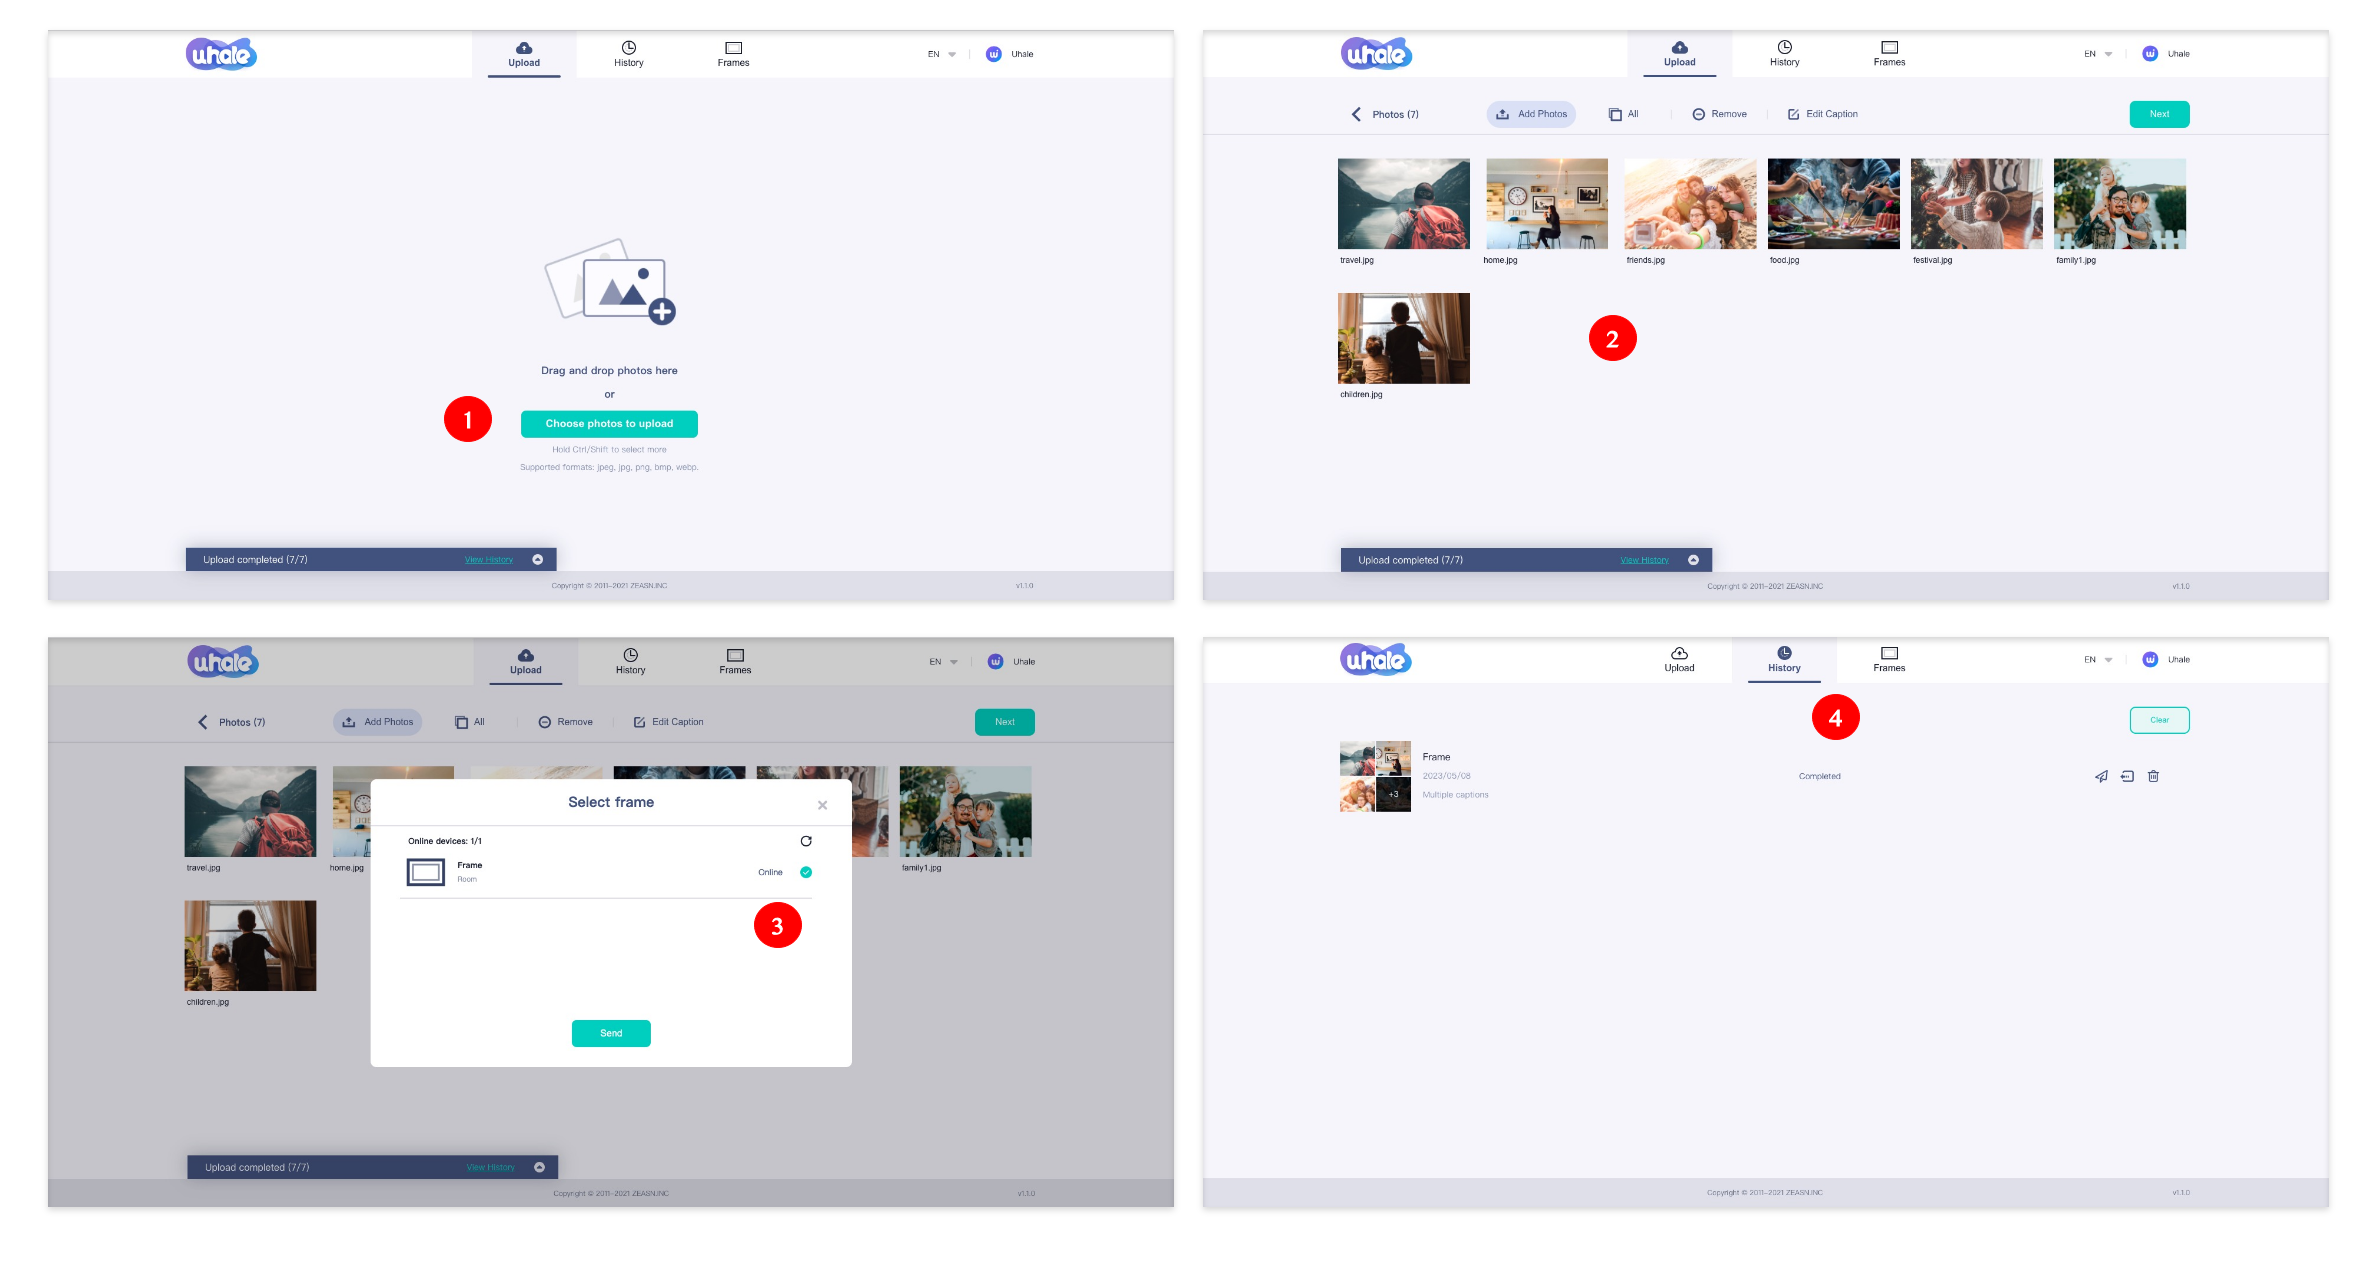
How to send photos from Webside
For alarge number of photos to be uploaded at one time, we recommend uploading from the Uhale website.
Address: https://uhale.zeasn.tv
Photo Share
1.Select photos (up to 500 images, supported formats: jpeg/jpg/png/bmp)
2.Photo editing
1)Adding more photos onto the existing list.
2)Select All: Click [Select All] to select all photos, and the number of selected photos will be displayed in the upper left corner. Click [Select All] again to undo.
3)Remove: Selected photo(s)can be removed from the current transfer list by clicking [Remove].
4)Renaming multiple photos: Selected photo(s) can be renamed in batch on the page.
NOTE:Exit the editing mode, select a photo frame to complete photo sharing. Photo(s) cannot be shared under editing mode.
3.Select the photo frame (support sending 1 or more photo frames).
4.After clicking send, you can check the sending status in the taskbar or history.
Extra Features
Only some picture frames support additional features, please refer to the product list or packaging.
1. How to connect your frame with Alexa?
2. How to Zoom In on Photos in your frame?
How to connect your frame with Alexa?
If Your frame is “Work with Alexa” certified or “Compatible with Alexa”(Please refer to the product listing or packing), then you will be able to connect the frame with Alexa built-in device(Eg Echo Show, Echo dot, etc.) and control the frame by voice.
Before set up connection between Alexa and your frame, please download “Amazon Alexa” app to your mobile phone from Google Play or App Store first.
Step 1: Download the “Uhale” App
If you have already downloaded the “Uhale” APP, skip this step.
If you haven’t, download from the store.Only email accounts can use the Alexa voice assistant, and visitor accounts do not support the voice assistant.
Android: Search for “Uhale” via Google play.
iOS:Search for “Uhale” via App Store.
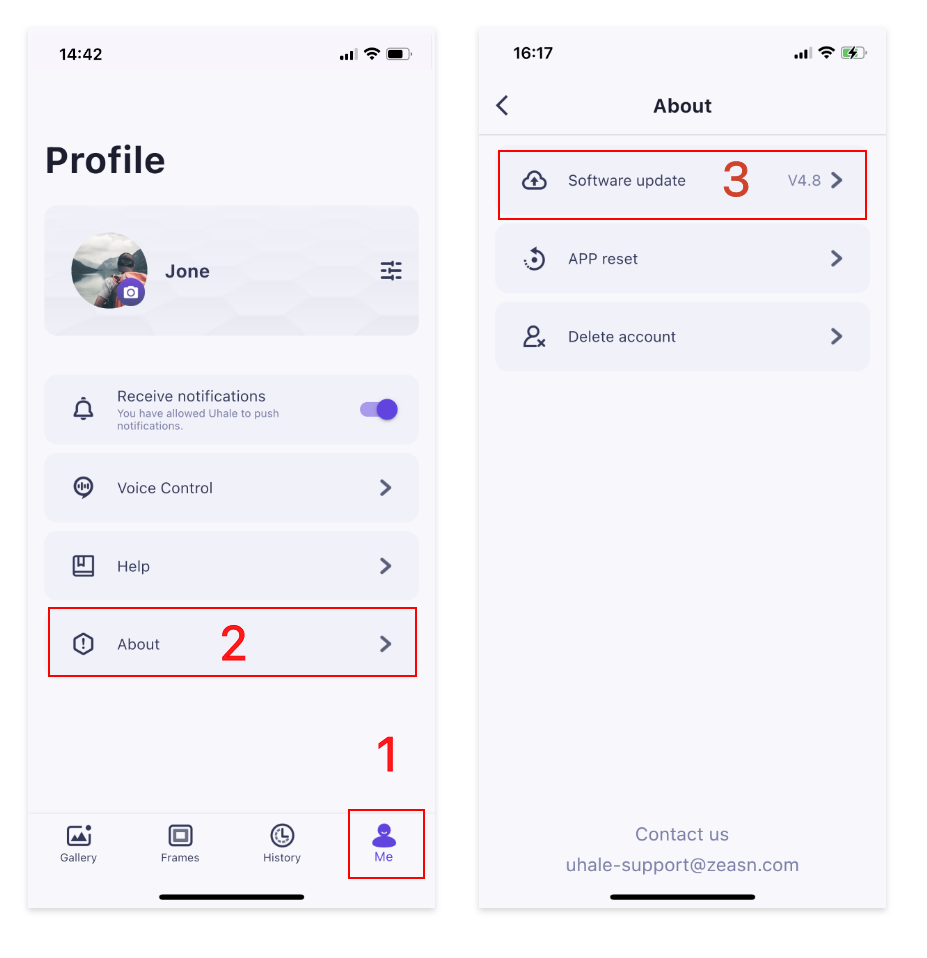
Note: Please make sure that the version of Uhale on your phone is 3.6 or above.
View steps:
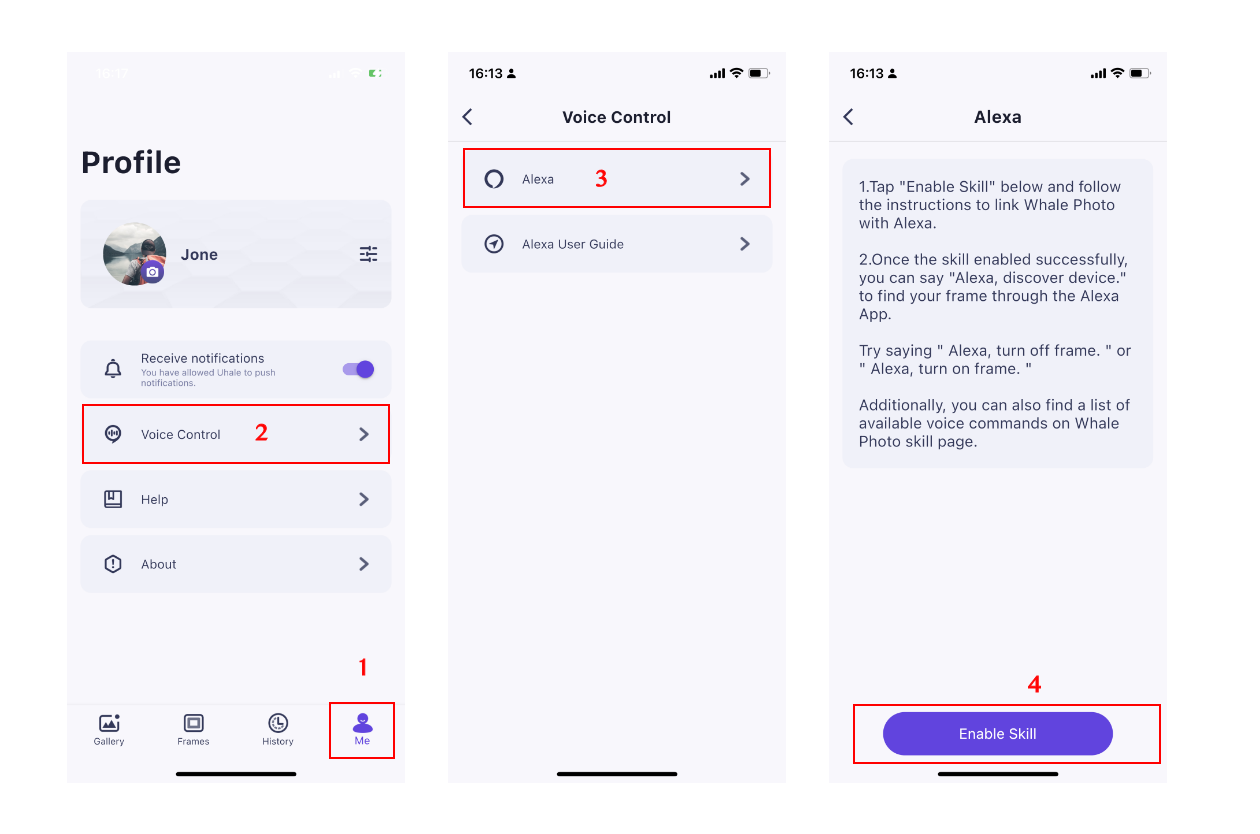
Step 2: Connect your frame with Alexa via Uhale App
1.Go through “Personal Center”-“Voice Control”- “Alexa”, then tap “Enable Skill”.
2.Tap “LINK”and give it a moment to proceed.
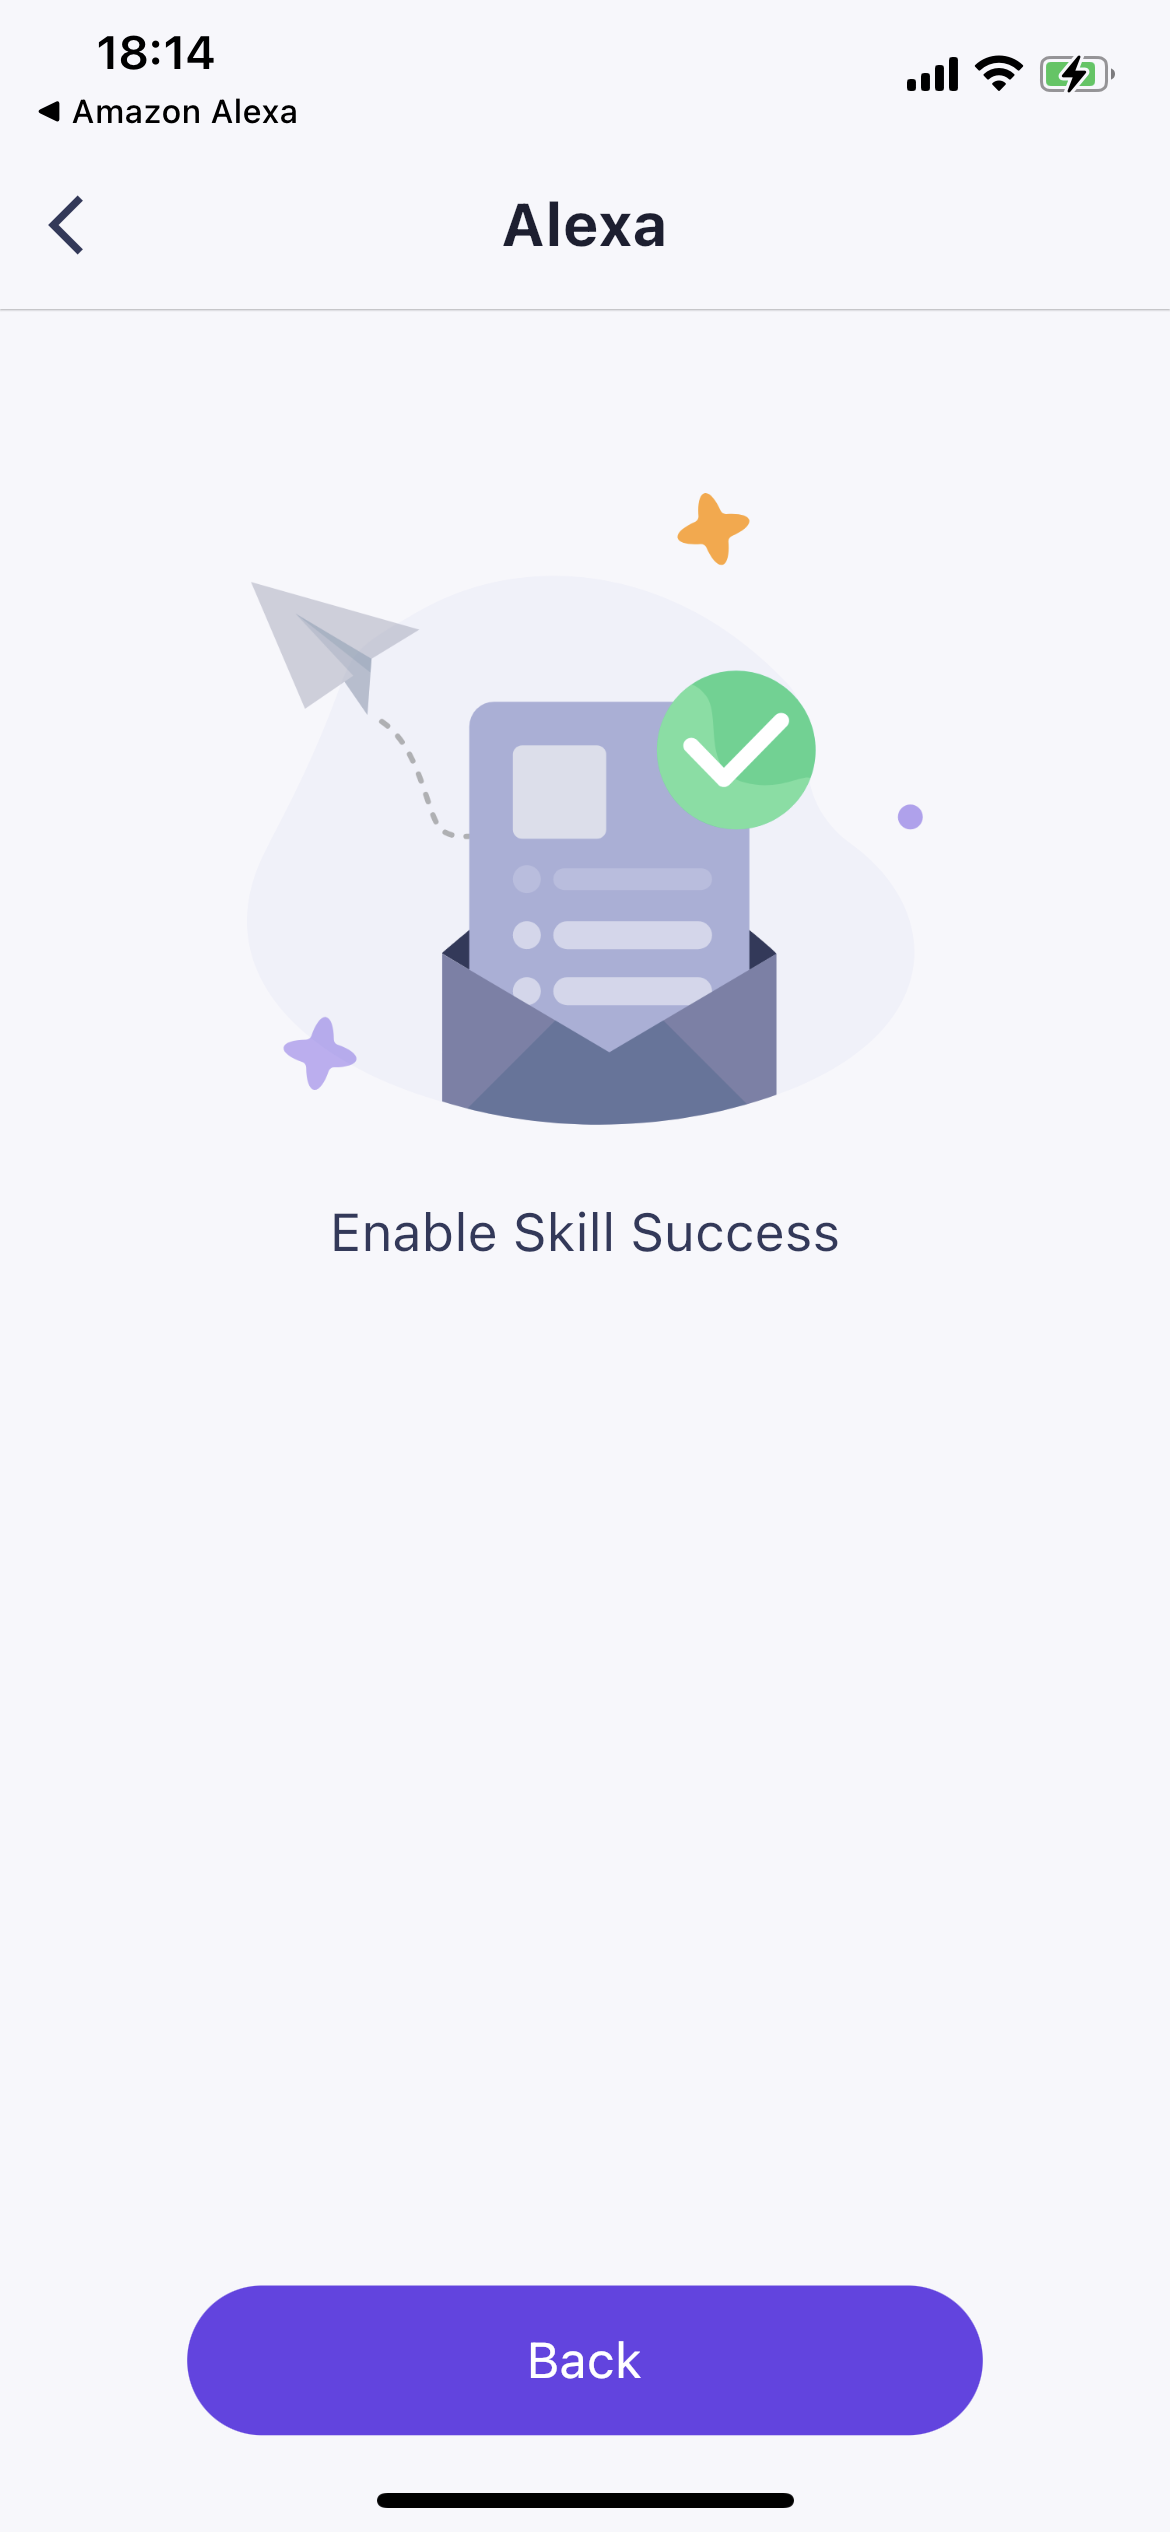
3.Once linking is done, you will receive a notification from Alexa app, saying the frame is connected with Alexa.
Step 3: Photo frame control
Try to control your frame by saying:
| No | Skill | Remark |
| 1 | Alexa, turn off“Frame” | Turn on sleep mode |
| 2 | Alexa, turn on“Frame” | Turn off sleep mode |
| 3 | Alexa, volume up on“Frame” | Volume up |
| 4 | Alexa, volume down on“Frame” | Volume down |
| 5 | Alexa, mute on“Frame” | Mute |
| 6 | Alexa, unmute on“Frame” | Unmute |
| 7 | Alexa, go home on“Frame” | Go to the Home Page |
| 8 | Alexa, go settings on“Frame” | Go to Settings |
| 9 | Alexa, play on“Frame” | Video playback |
| 10 | Alexa, pause on“Frame” | Video pause |
| 11 | Alexa, previous on“Frame” | Previous |
| 12 | Alexa, next on“Frame” | Next |
How to Zoom In on Photos in your frame?
First, make sure the frame you are using supports the photo zoom feature, with a version of v3.7.2 or higher.
If the feature is still unavailable, your device may not support it.
Operation steps:
1. Free Zoom: Use two fingers to pinch in and out for zooming in and out, supporting a maximum 3x magnification.
Note: Place two fingers on the photo and slowly spread them apart to magnify the photo. You can also place two fingers on the magnified photo and slowly pinch them together to minimize the photo.
2. Once your fingers leave the screen, the currently selected area will be displayed.

Precautions:
1. The frame only works on photos and cannot zoom video.
2. Ensure your fingers are dry and clean for the best experience.
3. Do not use any external tools to zoom in and out to avoid damaging the frame.
Official Privacy Information
For current information about Uhale’s privacy practices, data processing, account requests, and applicable user rights, review the official Uhale Privacy Policy. Privacy terms may vary by product version, service, and region.